LinkedIn has several uses for businesses, including options for advertising, hiring quality talent, and sharing relevant industry articles. But did you know that you can also create LinkedIn Product Pages that feature the items and services you’re trying to sell?
It’s a newer, lesser-known feature on LinkedIn, but a tool that’s helpful in bringing more awareness to your products and services.
In this article, we’ll talk about the features in LinkedIn Product Pages, what you can add to each page, and how to implement these wonderful pages on your current LinkedIn Business Page.
 Table of contents:
- What are LinkedIn Product Pages?
- How to make LinkedIn Product Pages
- How to add a LinkedIn Services Page
What are LinkedIn Product Pages?
A LinkedIn Product Page serves as somewhat of an online store, but without payment processing on LinkedIn. This way, you’re able to showcase products on LinkedIn and link to actual sales pages on your website.
Not only that, but LinkedIn Product Pages work well for services.
Therefore, you can develop a product page for a suite of digital software (and other industries in the future) or for services like web design or email marketing.

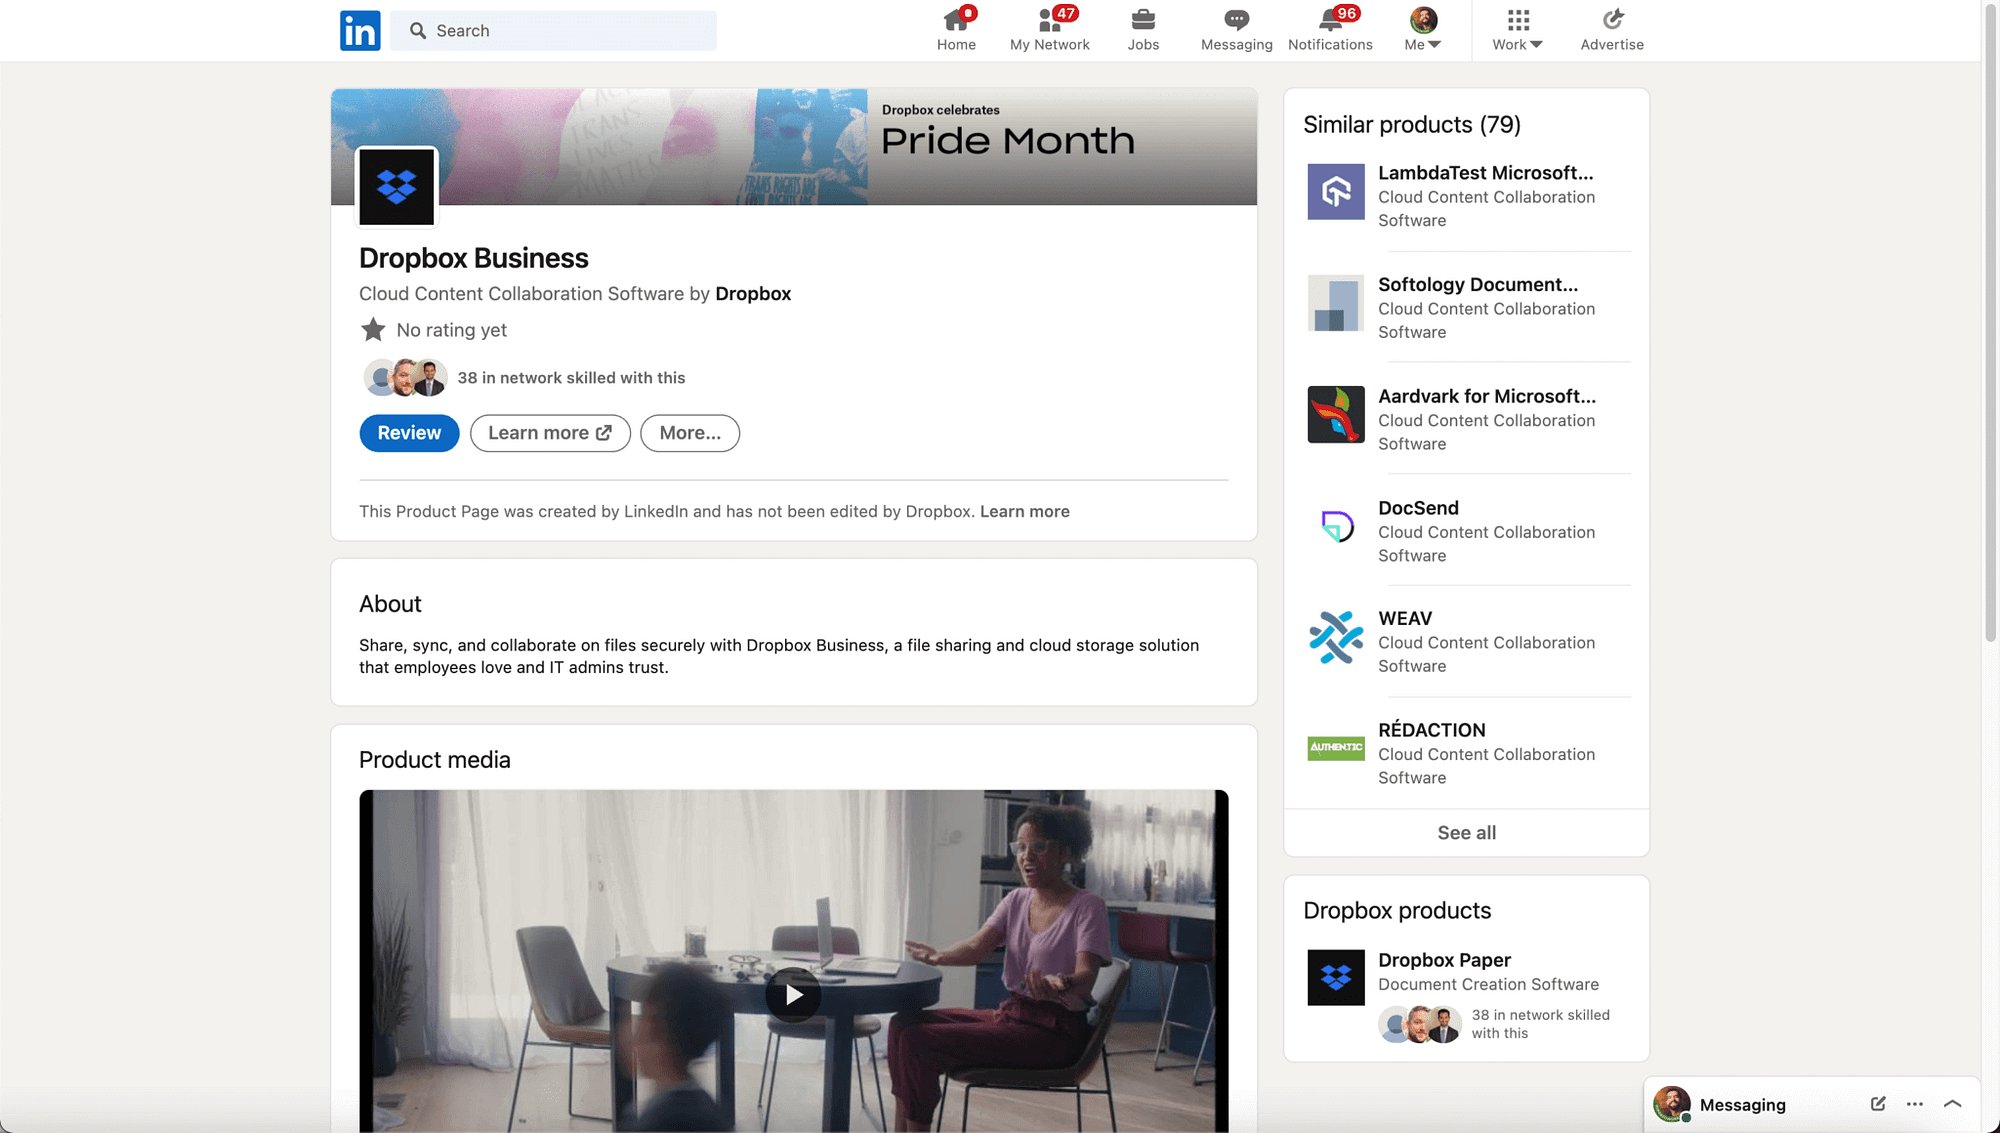
The product pages get connected to your LinkedIn Business Page and shown as a tab for interested customers to click on and view information about all your products.

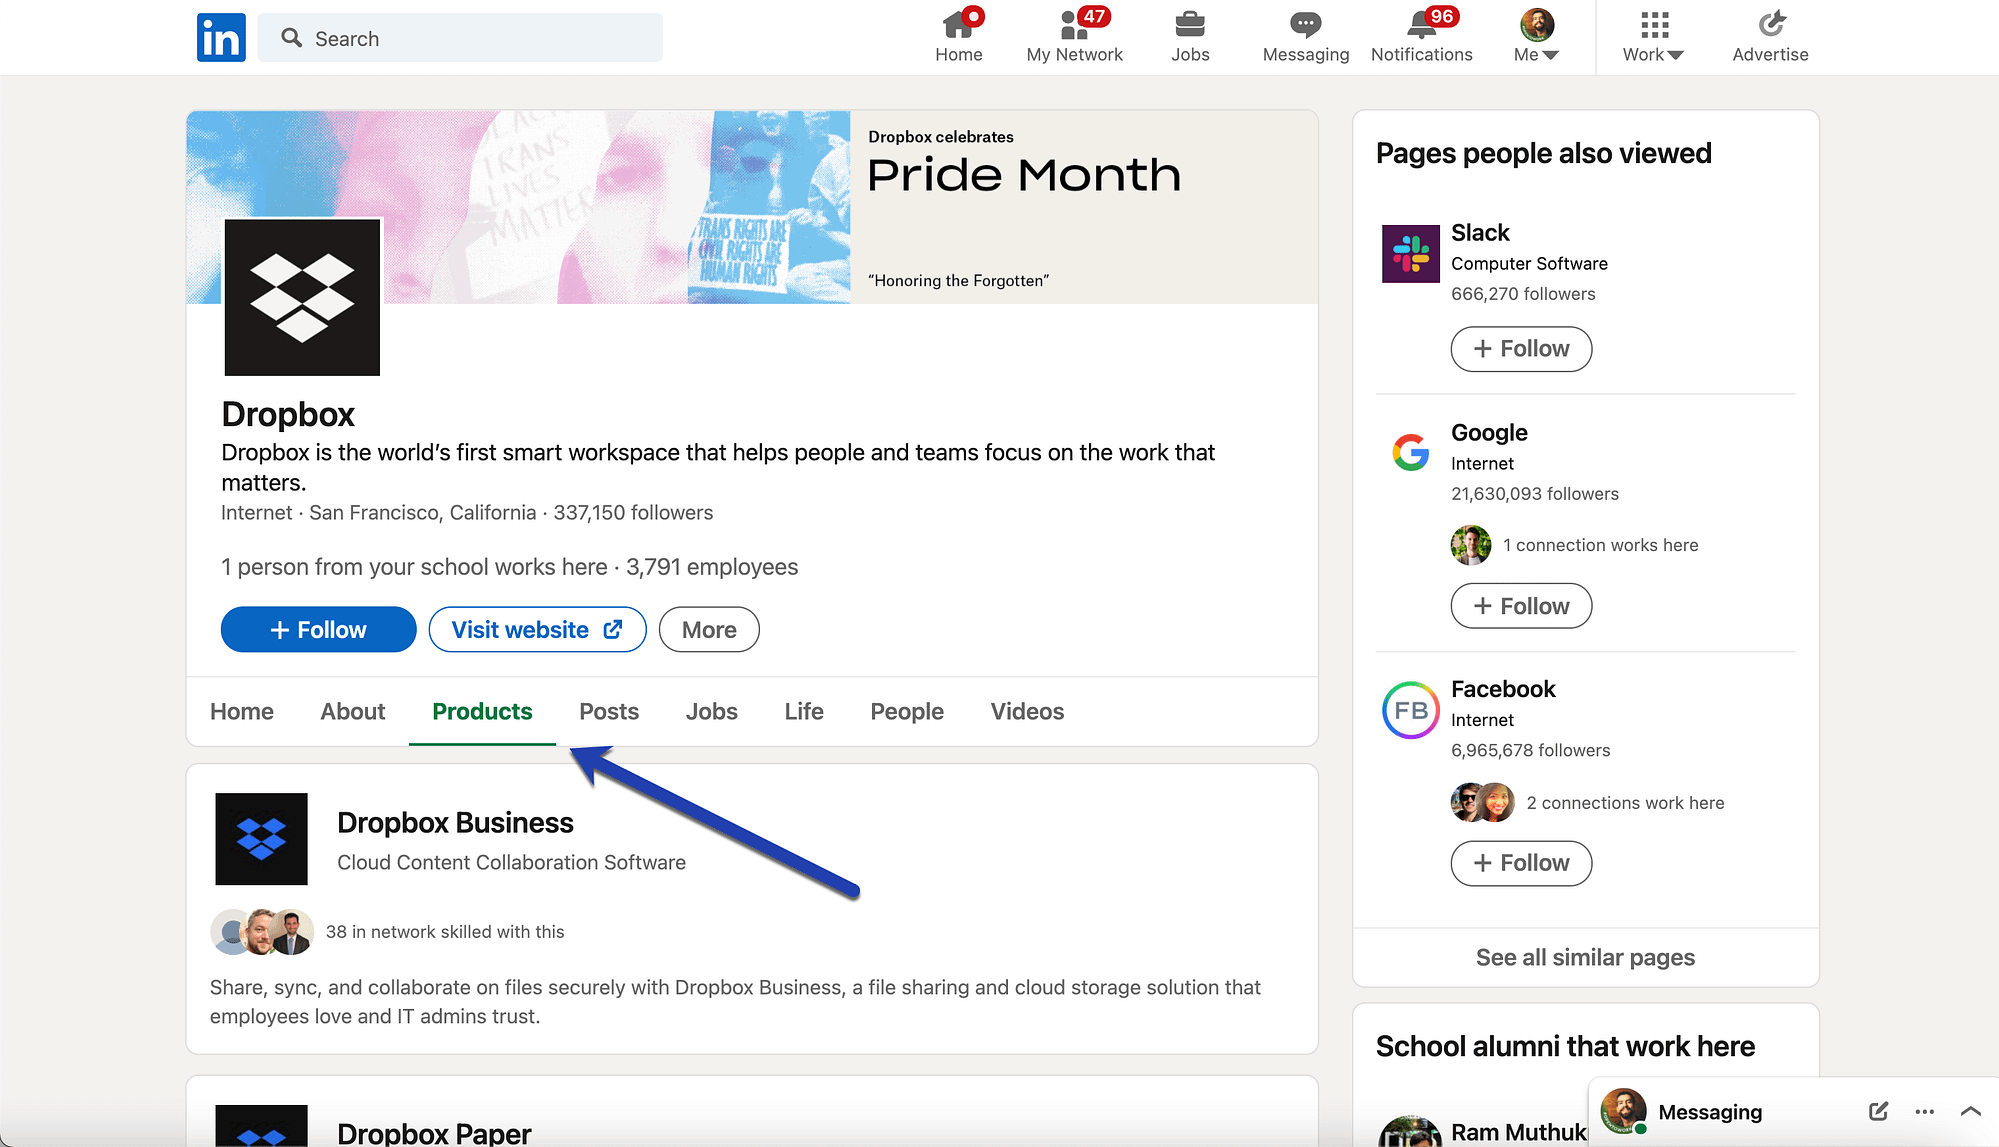
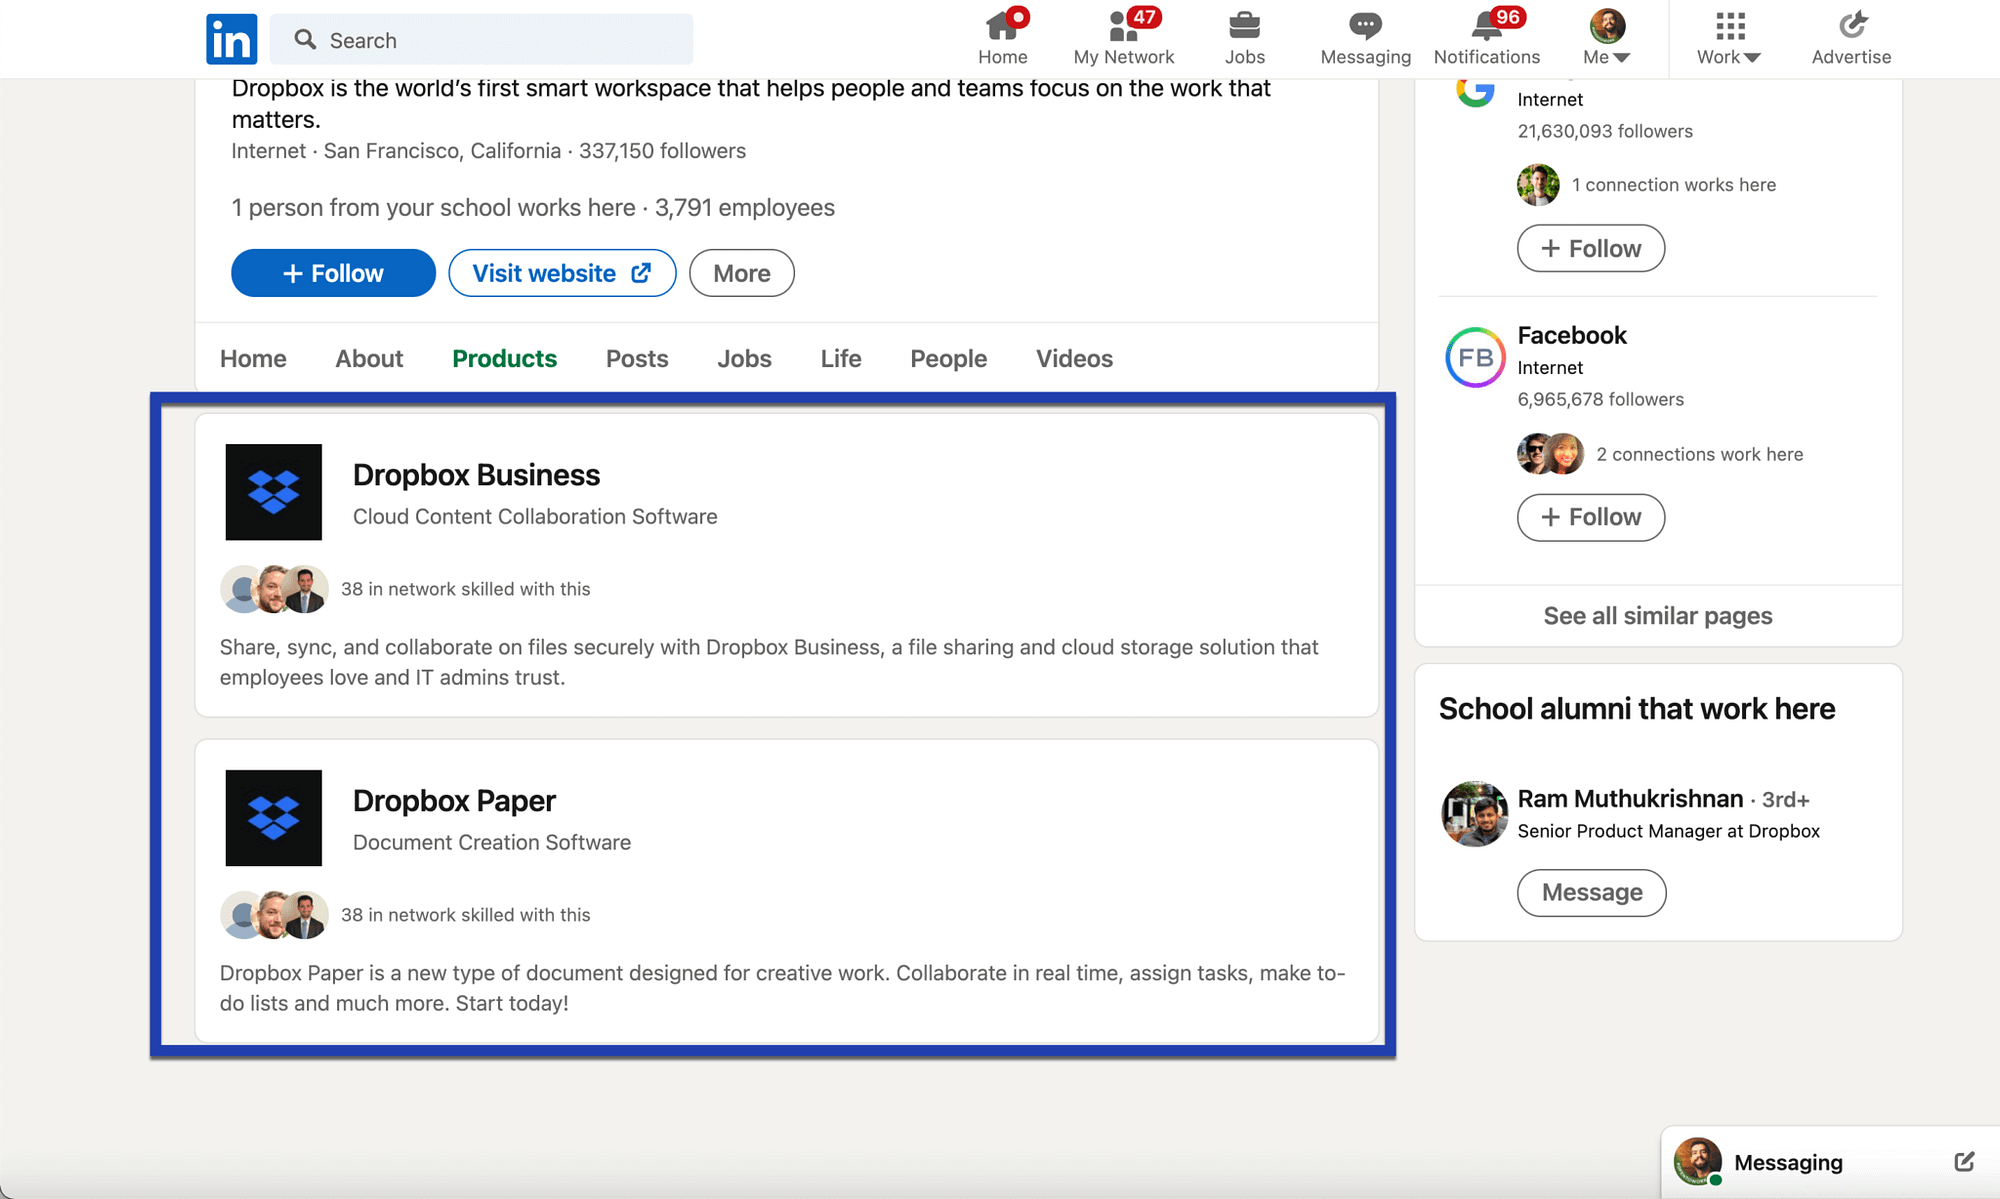
And a list of products is shown under that tab.

Overall, the LinkedIn Product Pages provide an extra method of explaining what it is your company provides while keeping your Business Page clutter-free.
What can you show on LinkedIn Product Pages?

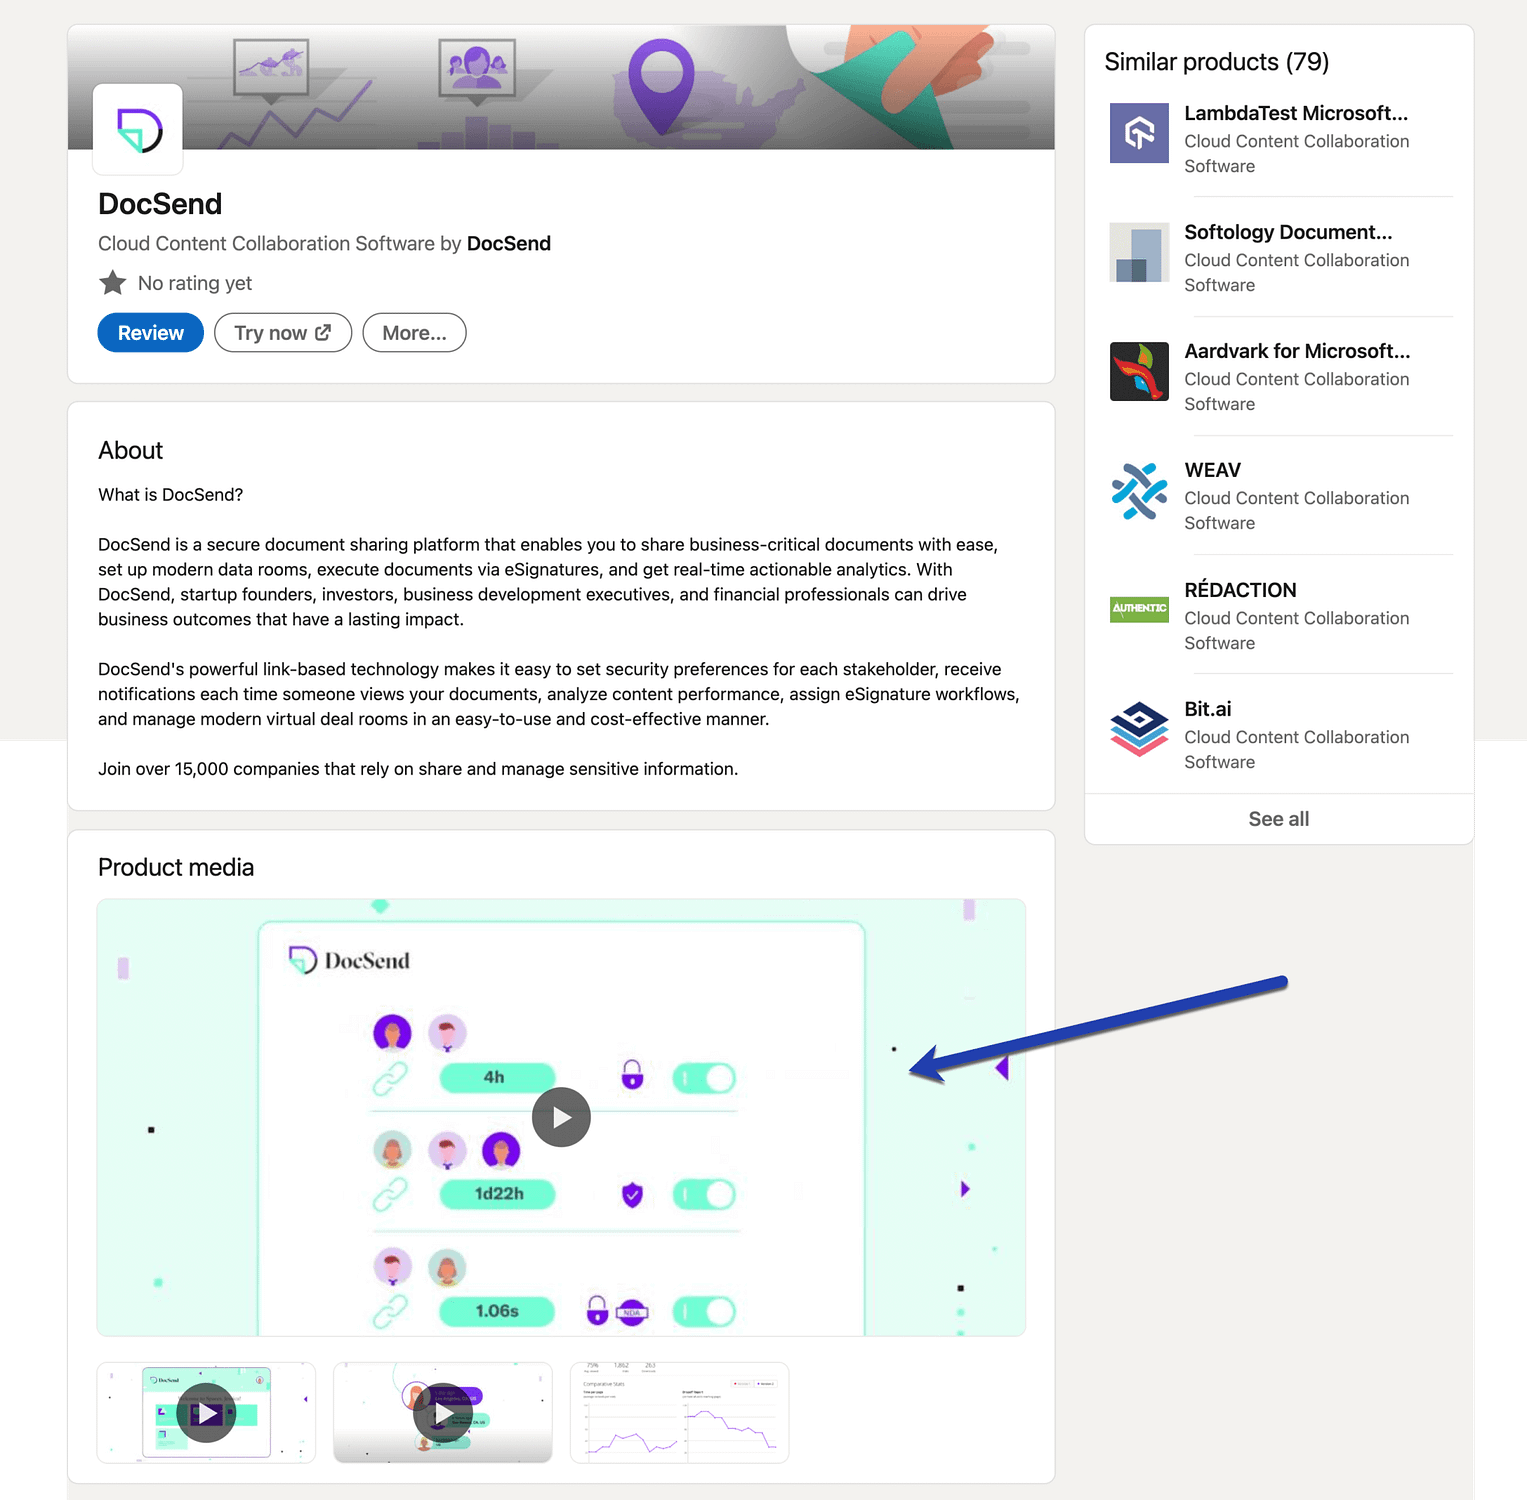
Besides a title and description of your product, you can add several other elements to each product page:
- Media objects like videos and images to bring your products to life
- An area to accept customer reviews for that particular product
- A list of high-profile or VIP customers or clients, or simply companies that use the product
- Buttons to the actual product or landing pages (with a checkout module and payment processing) on your website
- Areas to add product logos, custom calls to action, and product categories

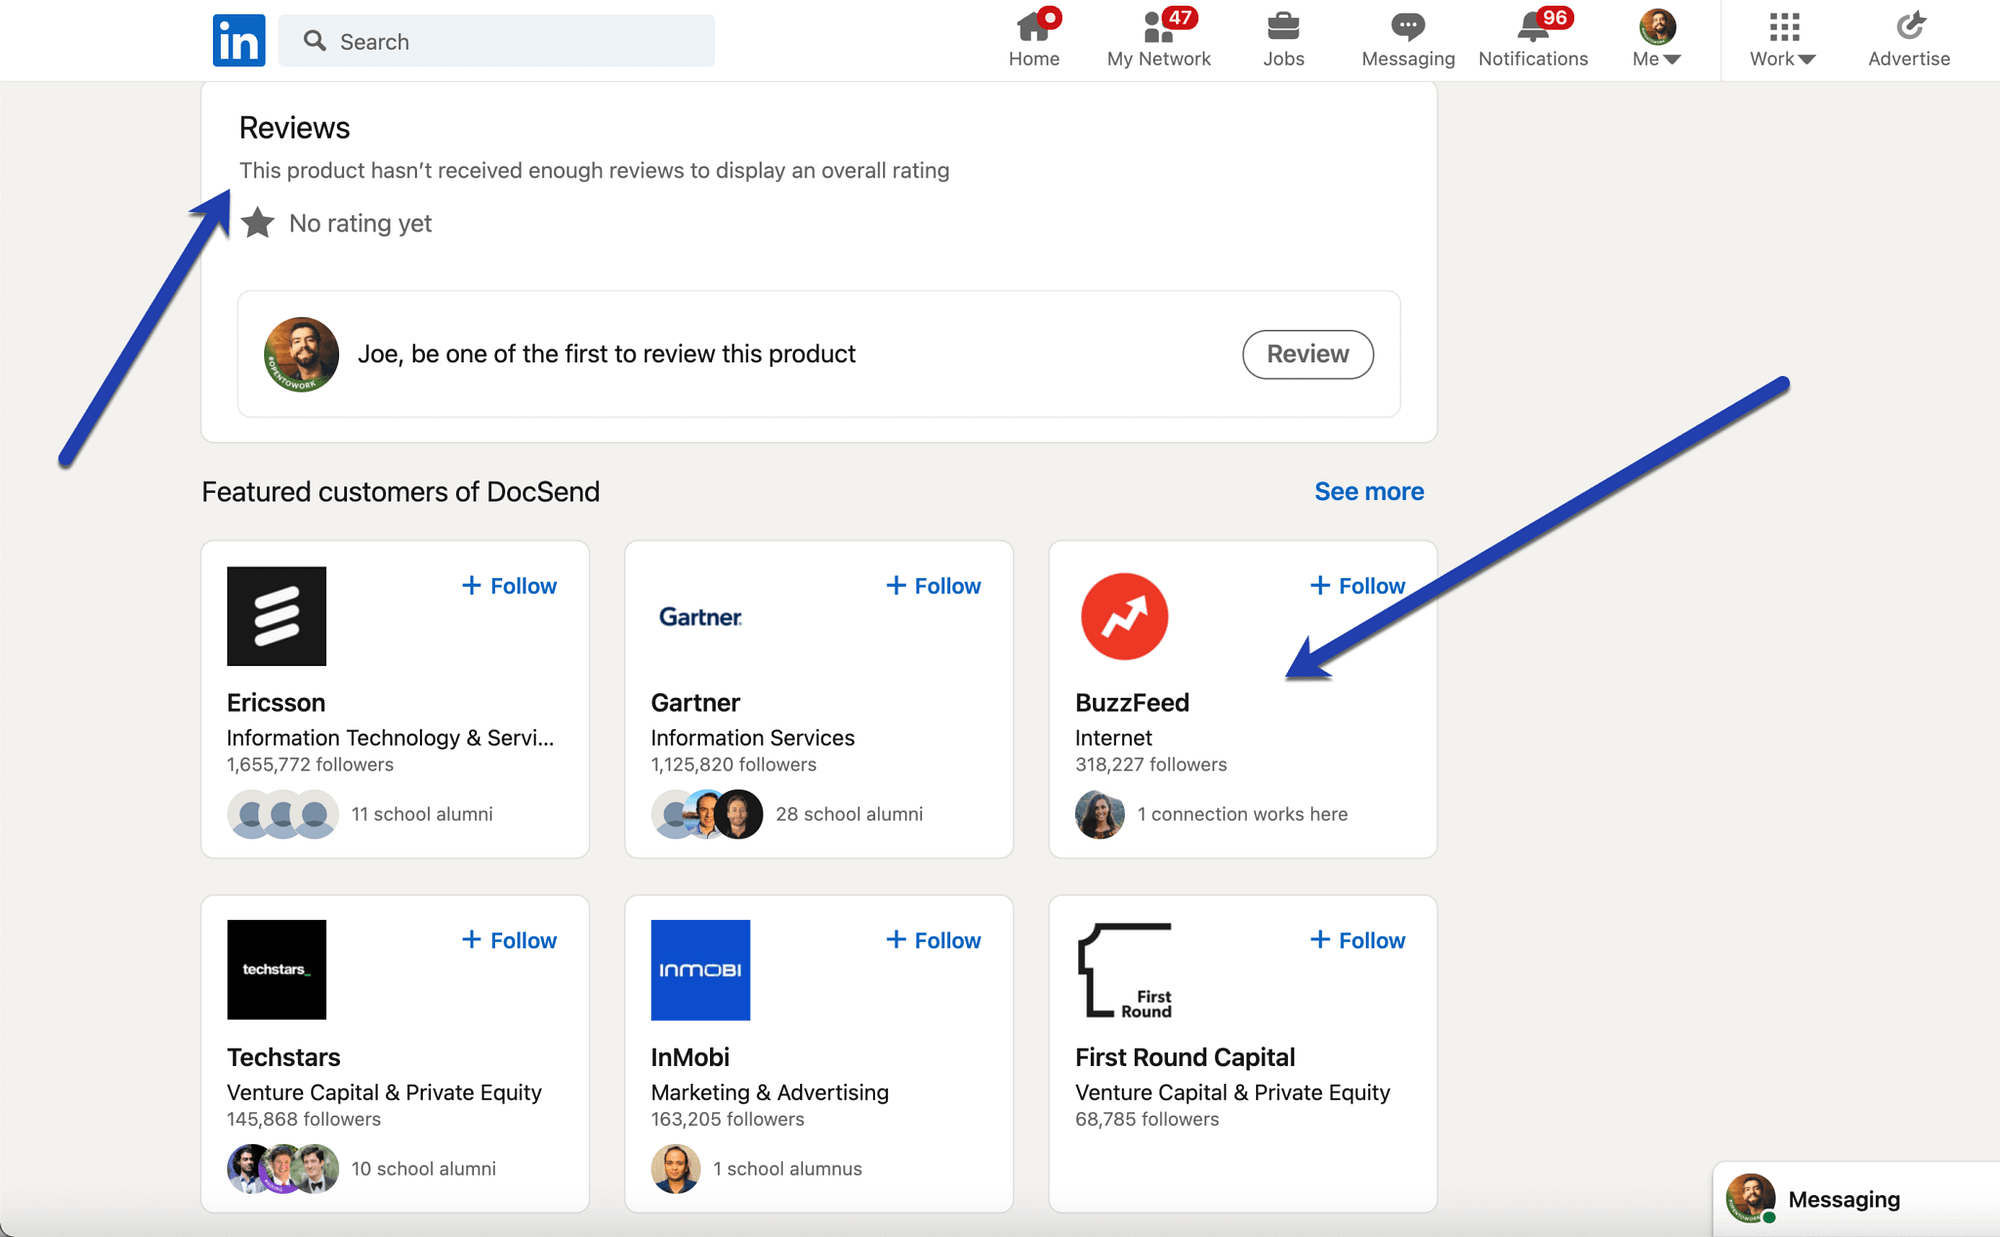
Before anything: make sure you can see the Products tab on LinkedIn
LinkedIn offered products and services pages a while back until they discontinued the feature in 2014. However, LinkedIn eventually launched a revamped version of the Product Pages.
As of right now, the Products tab is only available for B2B software companies. Therefore, you may not see the Products tab.

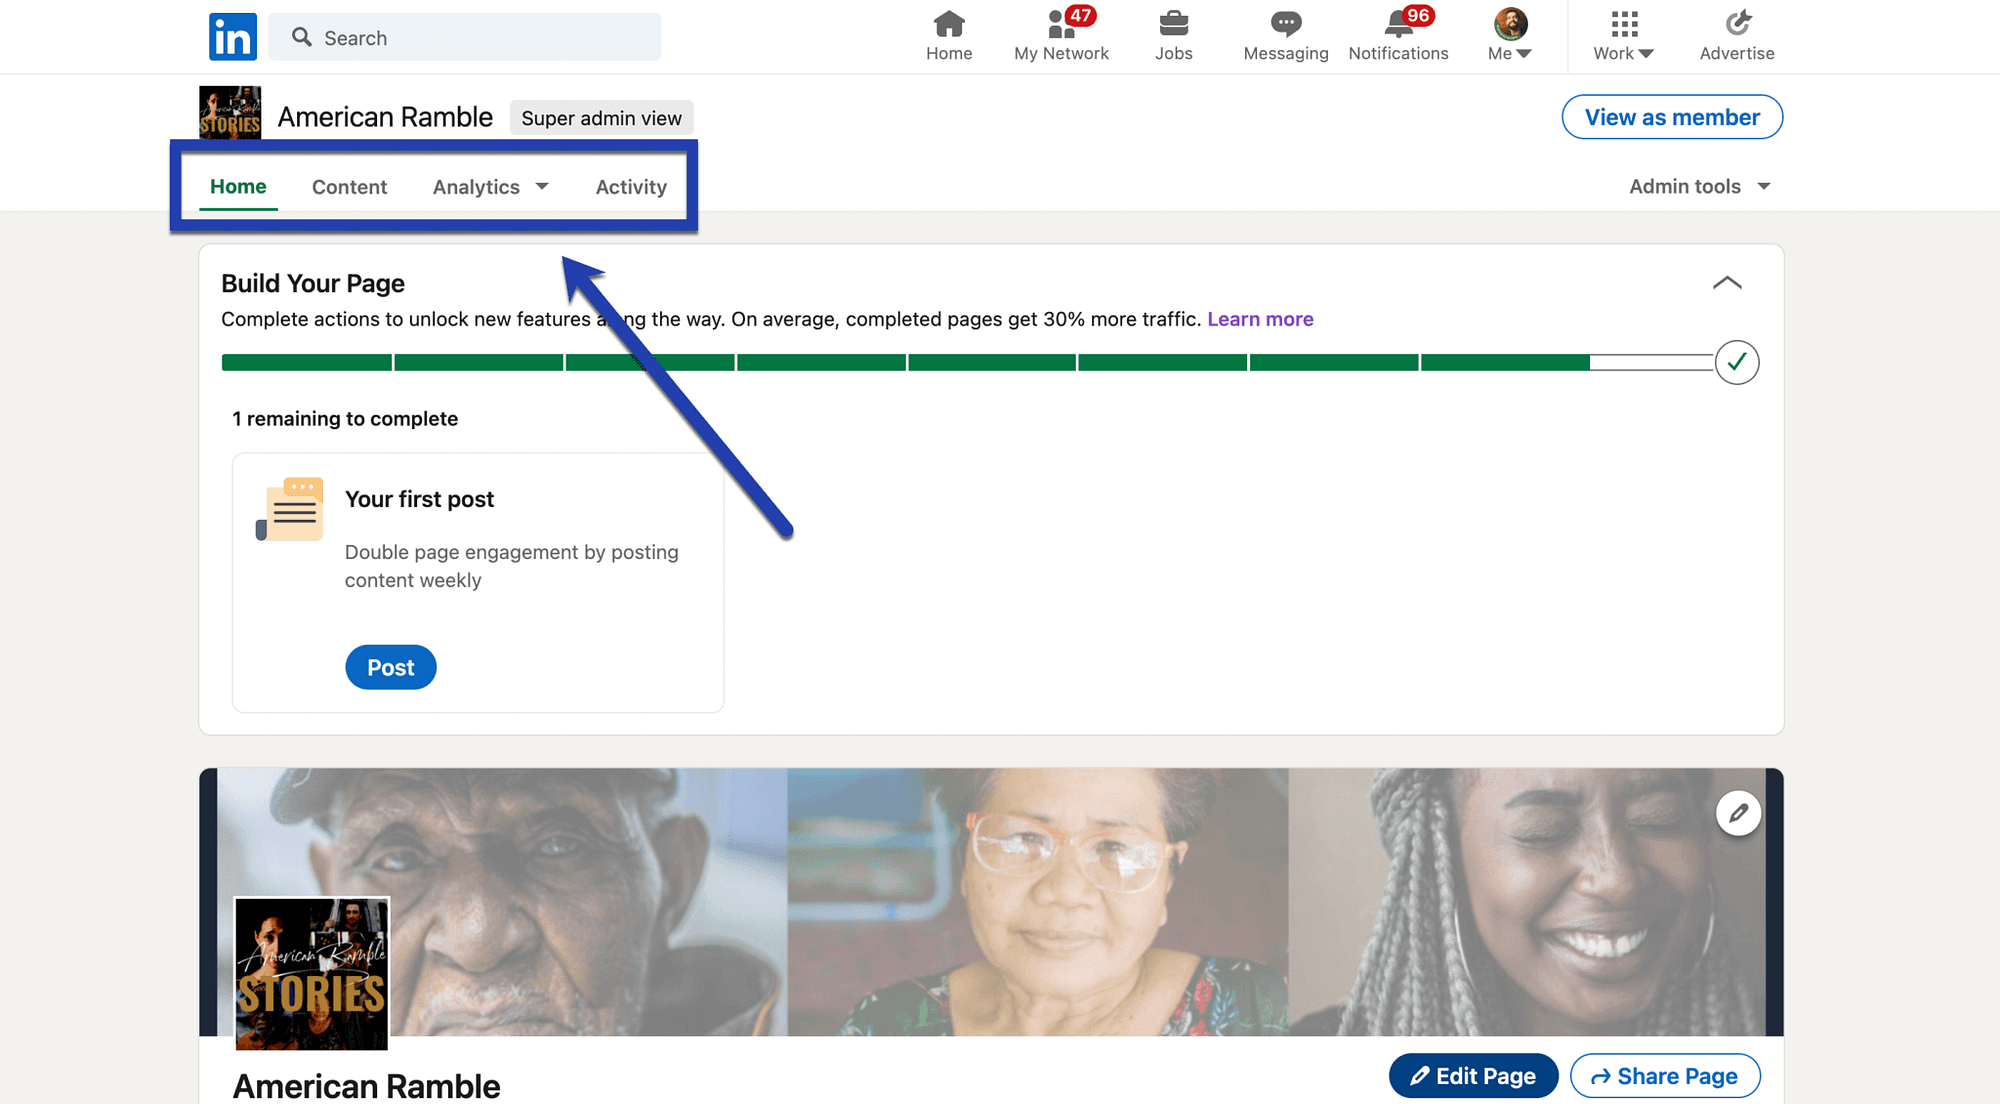
If you don’t see the Products tab on your Company page, yet you’re selling some sort of business software, follow these directions to add the Product tab:
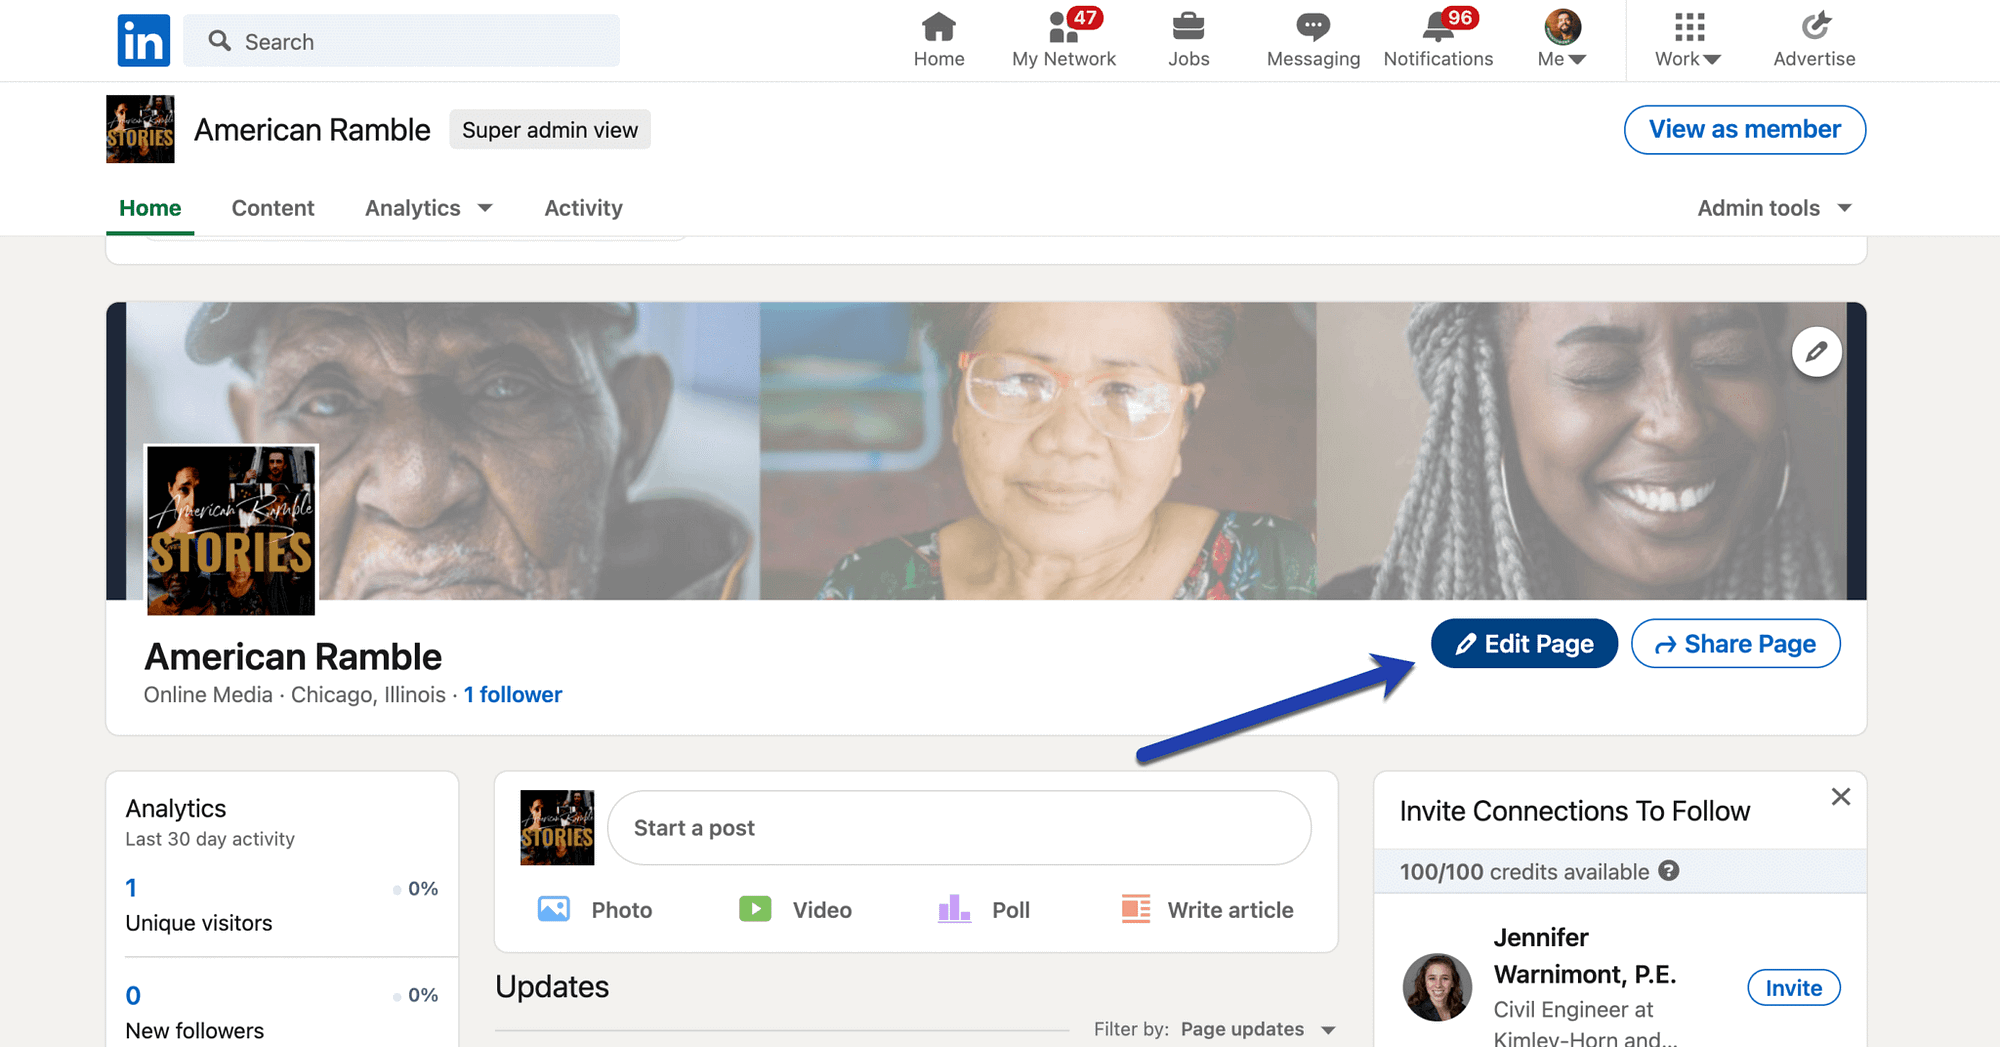
1. Edit the Company page
Click on the Edit Page button while inside the Admin view of your Company Page.
Note: You must have Super or Content Admin access to the page to make these changes.

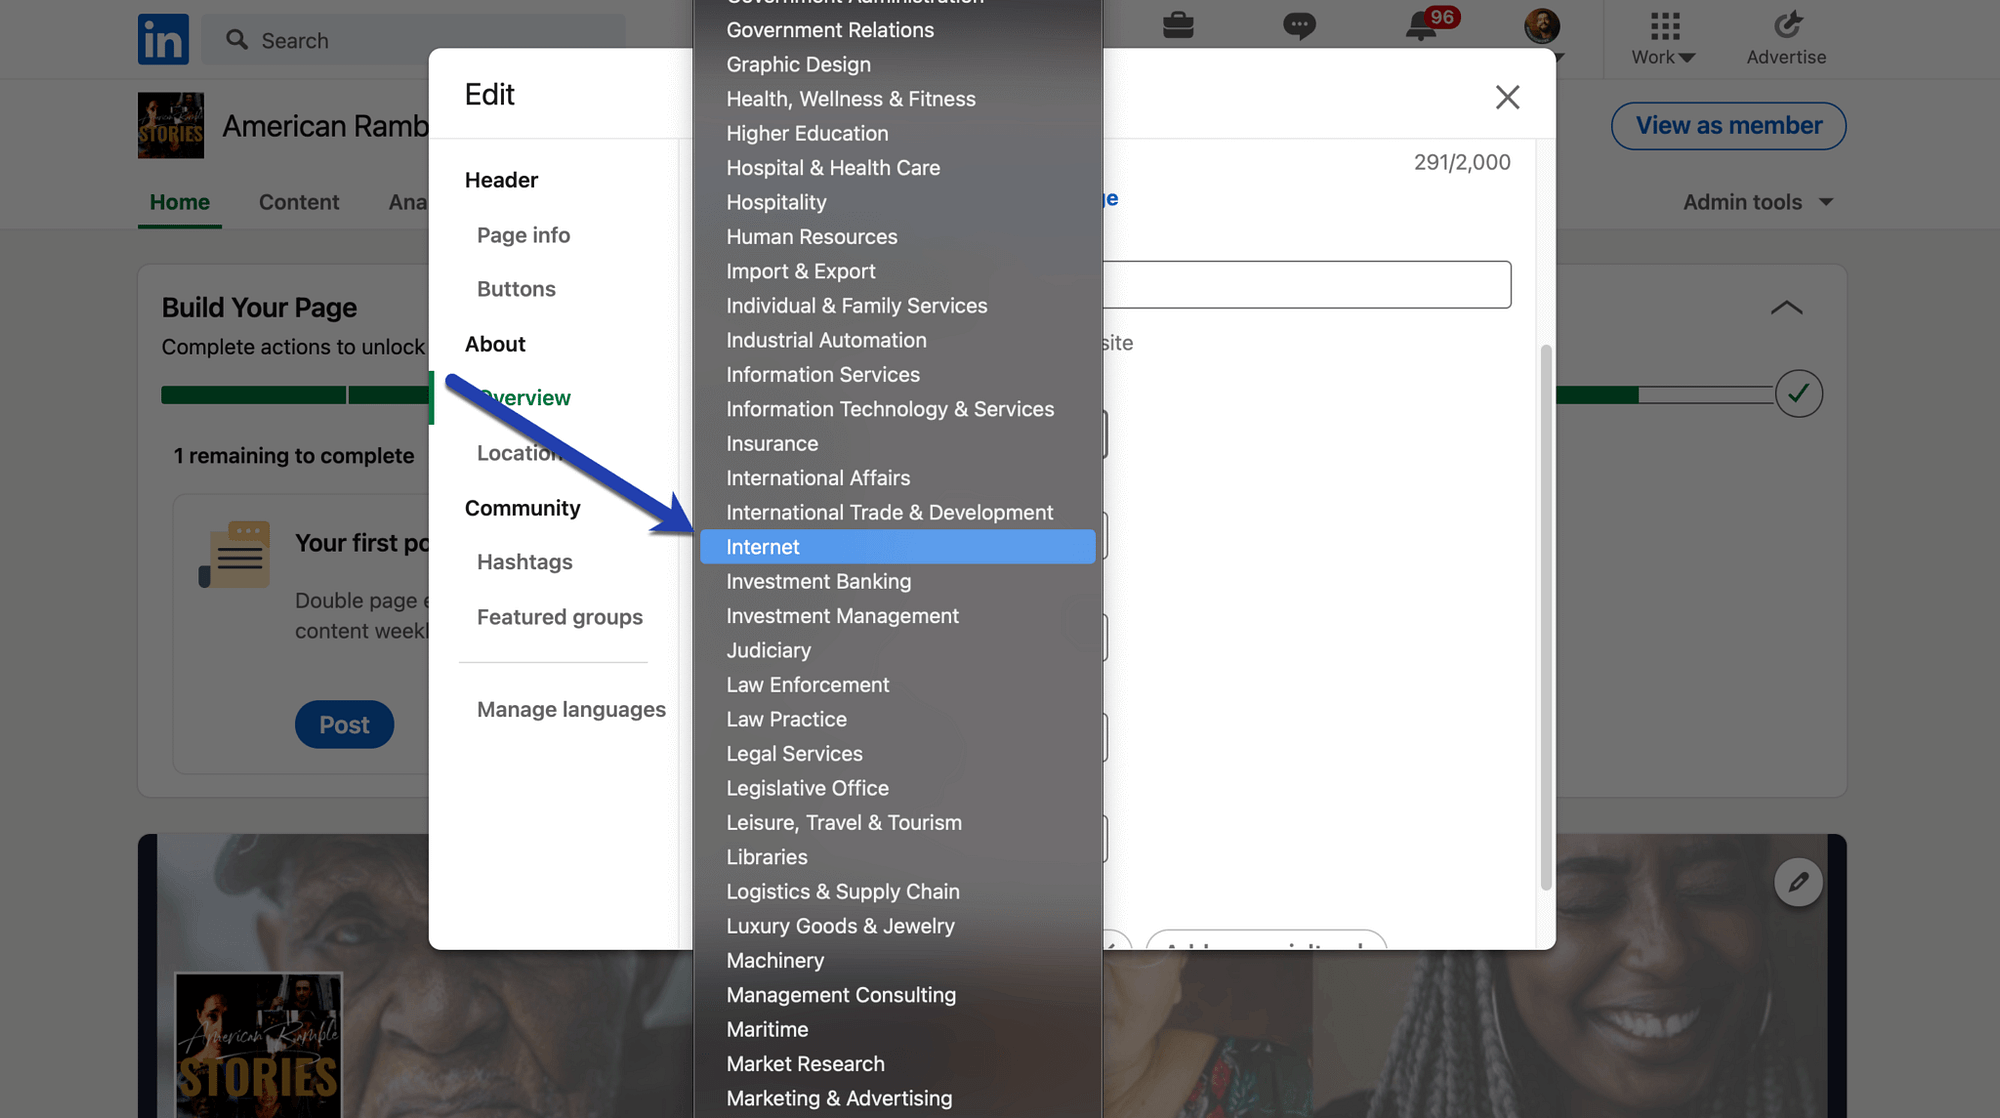
2. Change the Company Type to “Internet”
In the Overview section, click the Company Type dropdown menu.

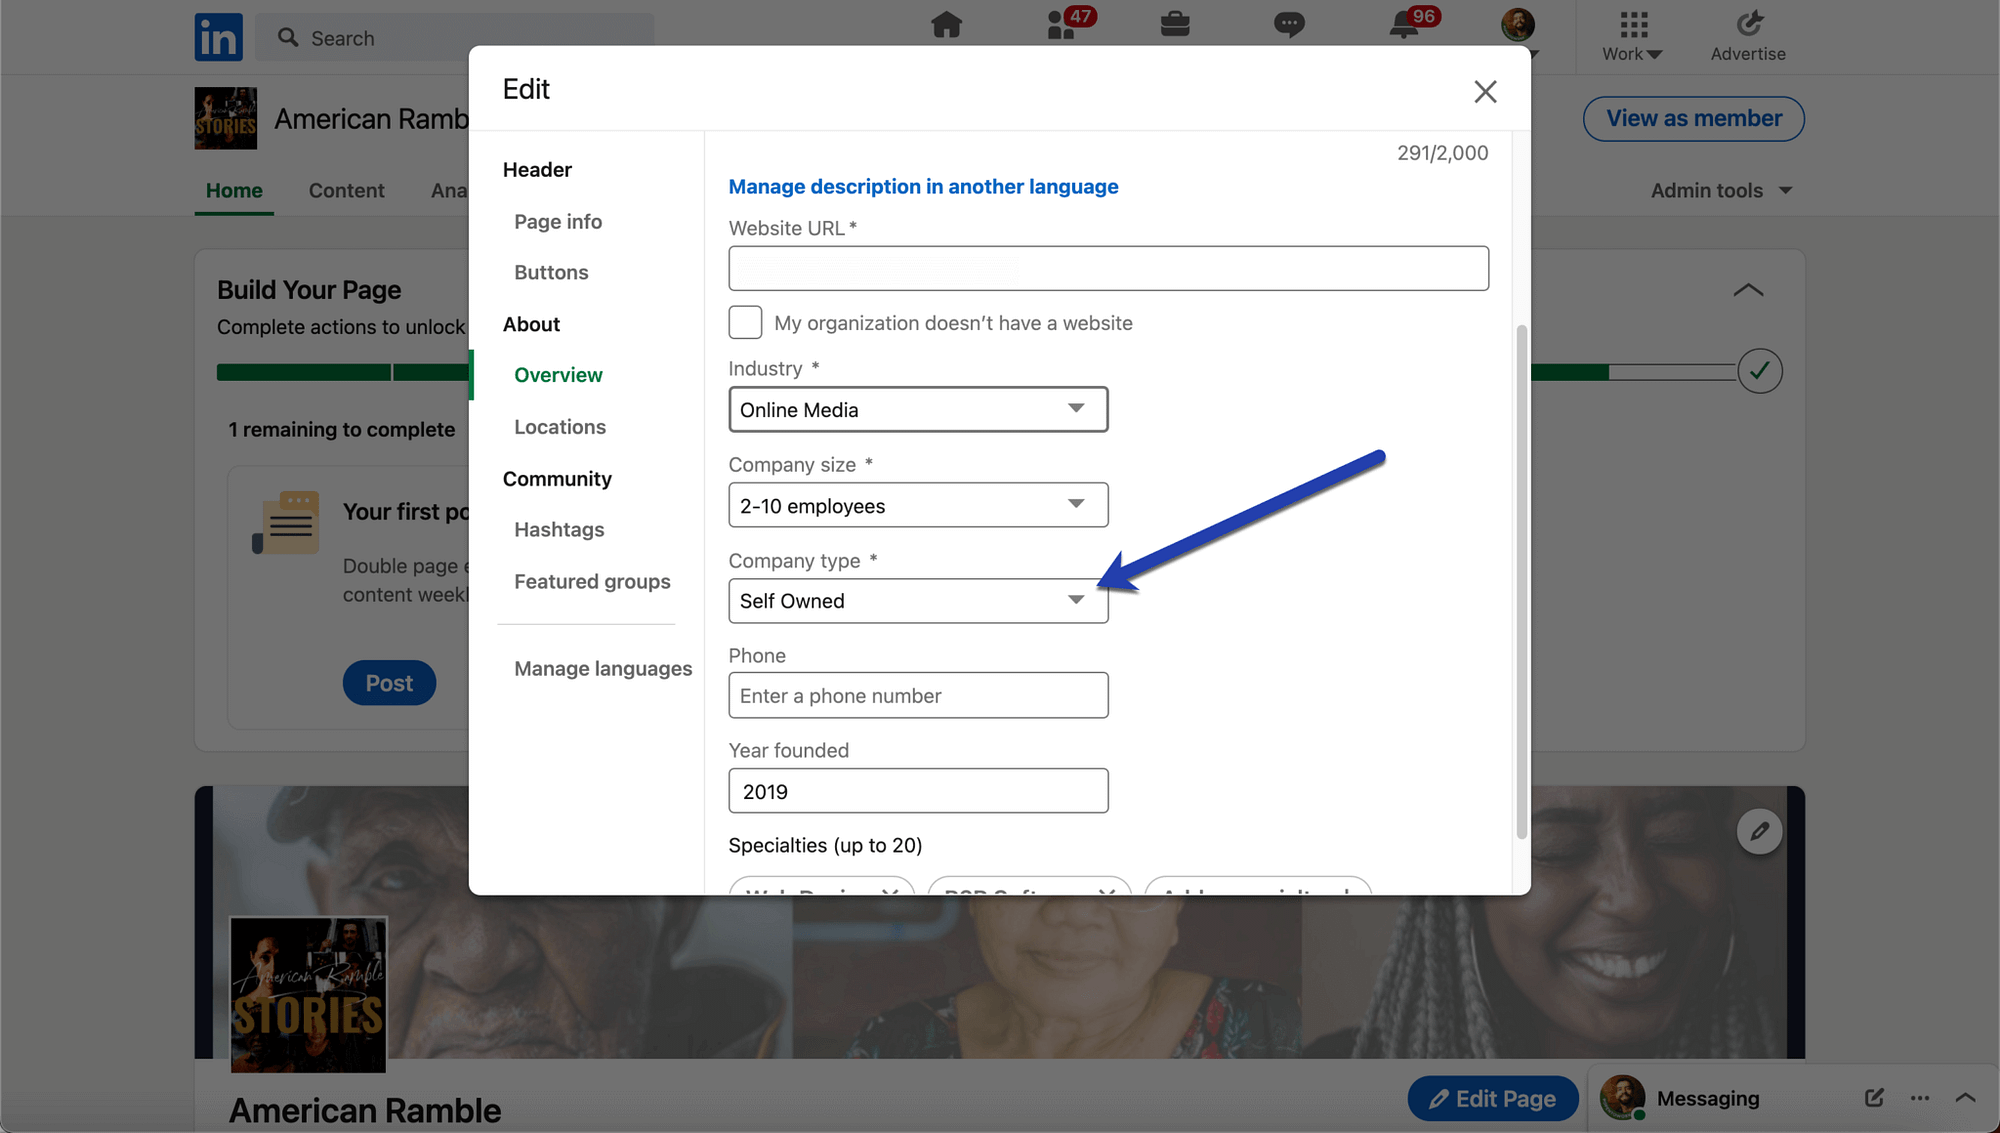
Select the Internet option in order to activate the Product Page tab.
Hopefully, this falls into the right category for your business, as it’s a rather over-encompassing category for many tech businesses. If not, LinkedIn has stated it plans on releasing Product Pages for more industries in the near future. We’ll also cover how to make a Services page further down in this article.

3. Save changes and check for the products tab
Upon saving the Internet Company Type, the Products tab should instantly appear in the Super Admin view of your Company page.

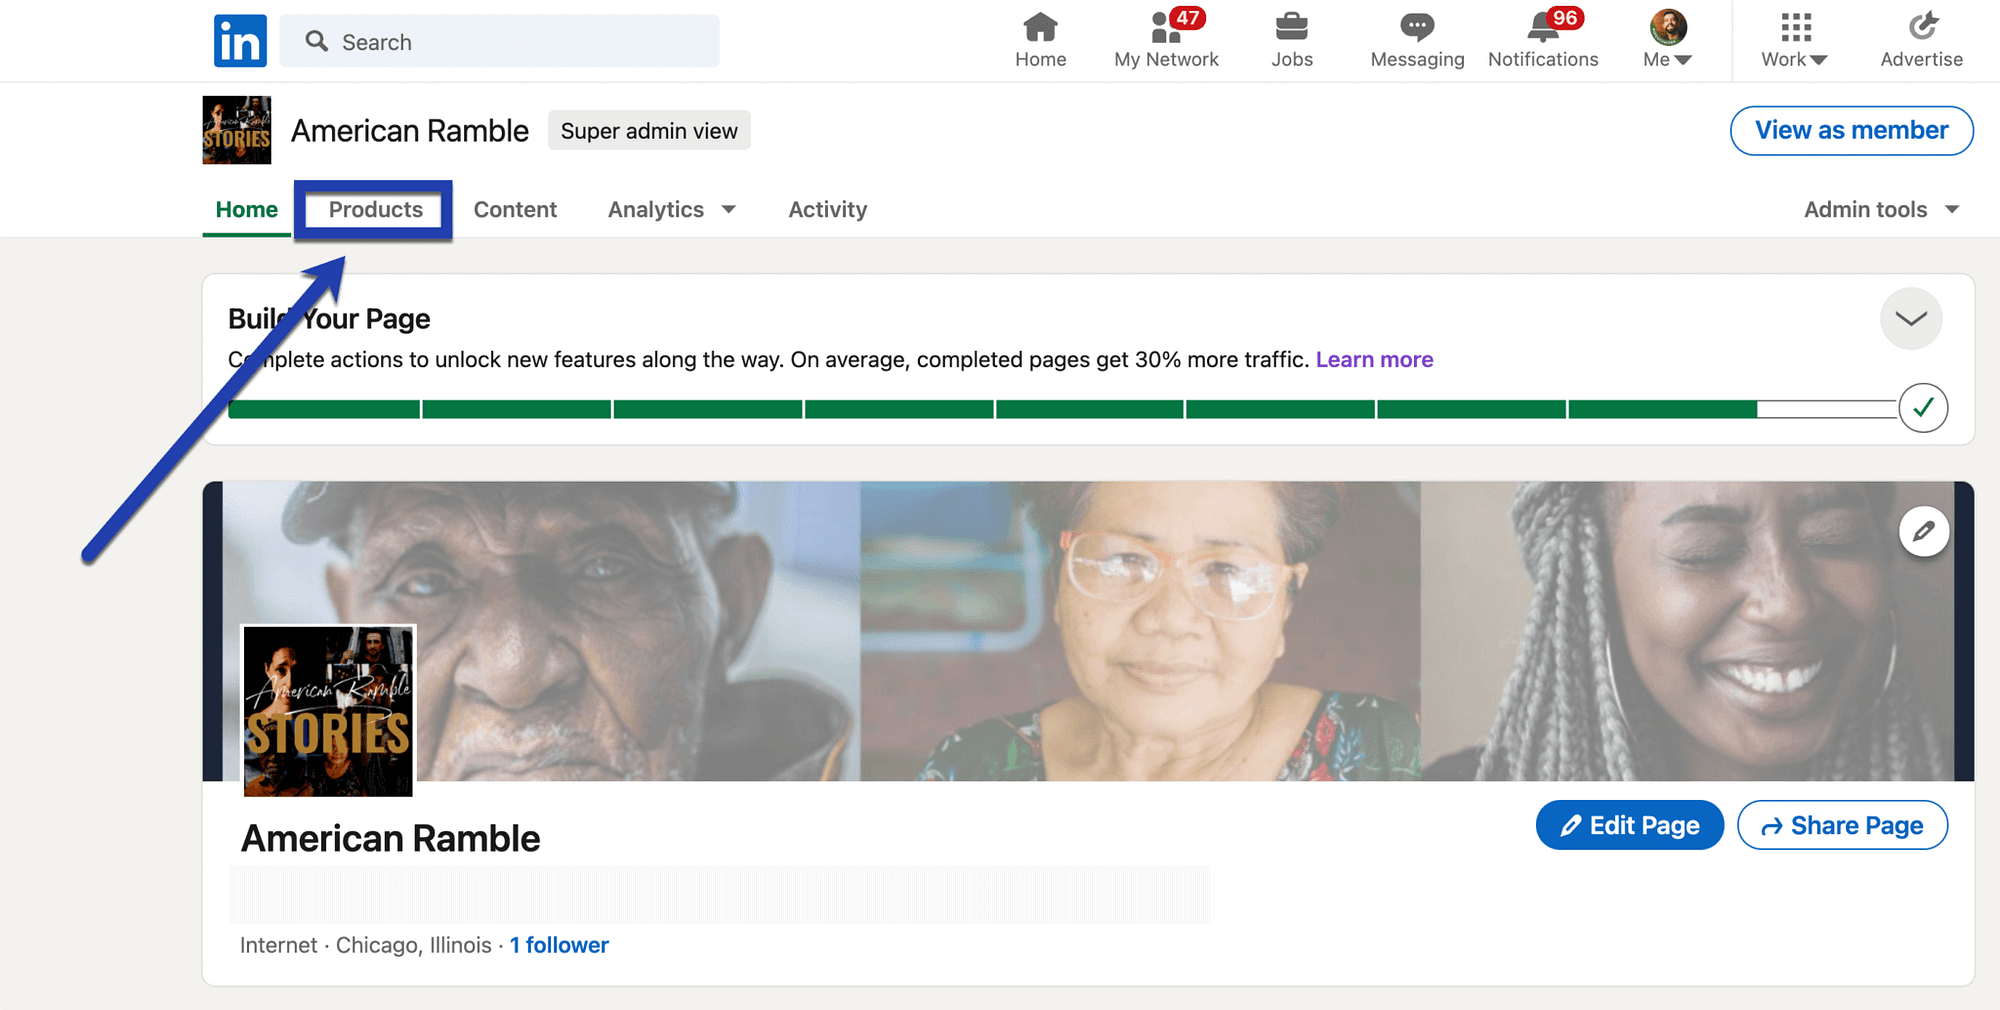
Now that you can see the Products tab, take the following steps to add LinkedIn Product Pages, incorporate media elements, and collect customer reviews.
How to make LinkedIn Product Pages
In order to start building LinkedIn Product Pages, you must go to the Super Admin view of your Company page.
1. Add a new product
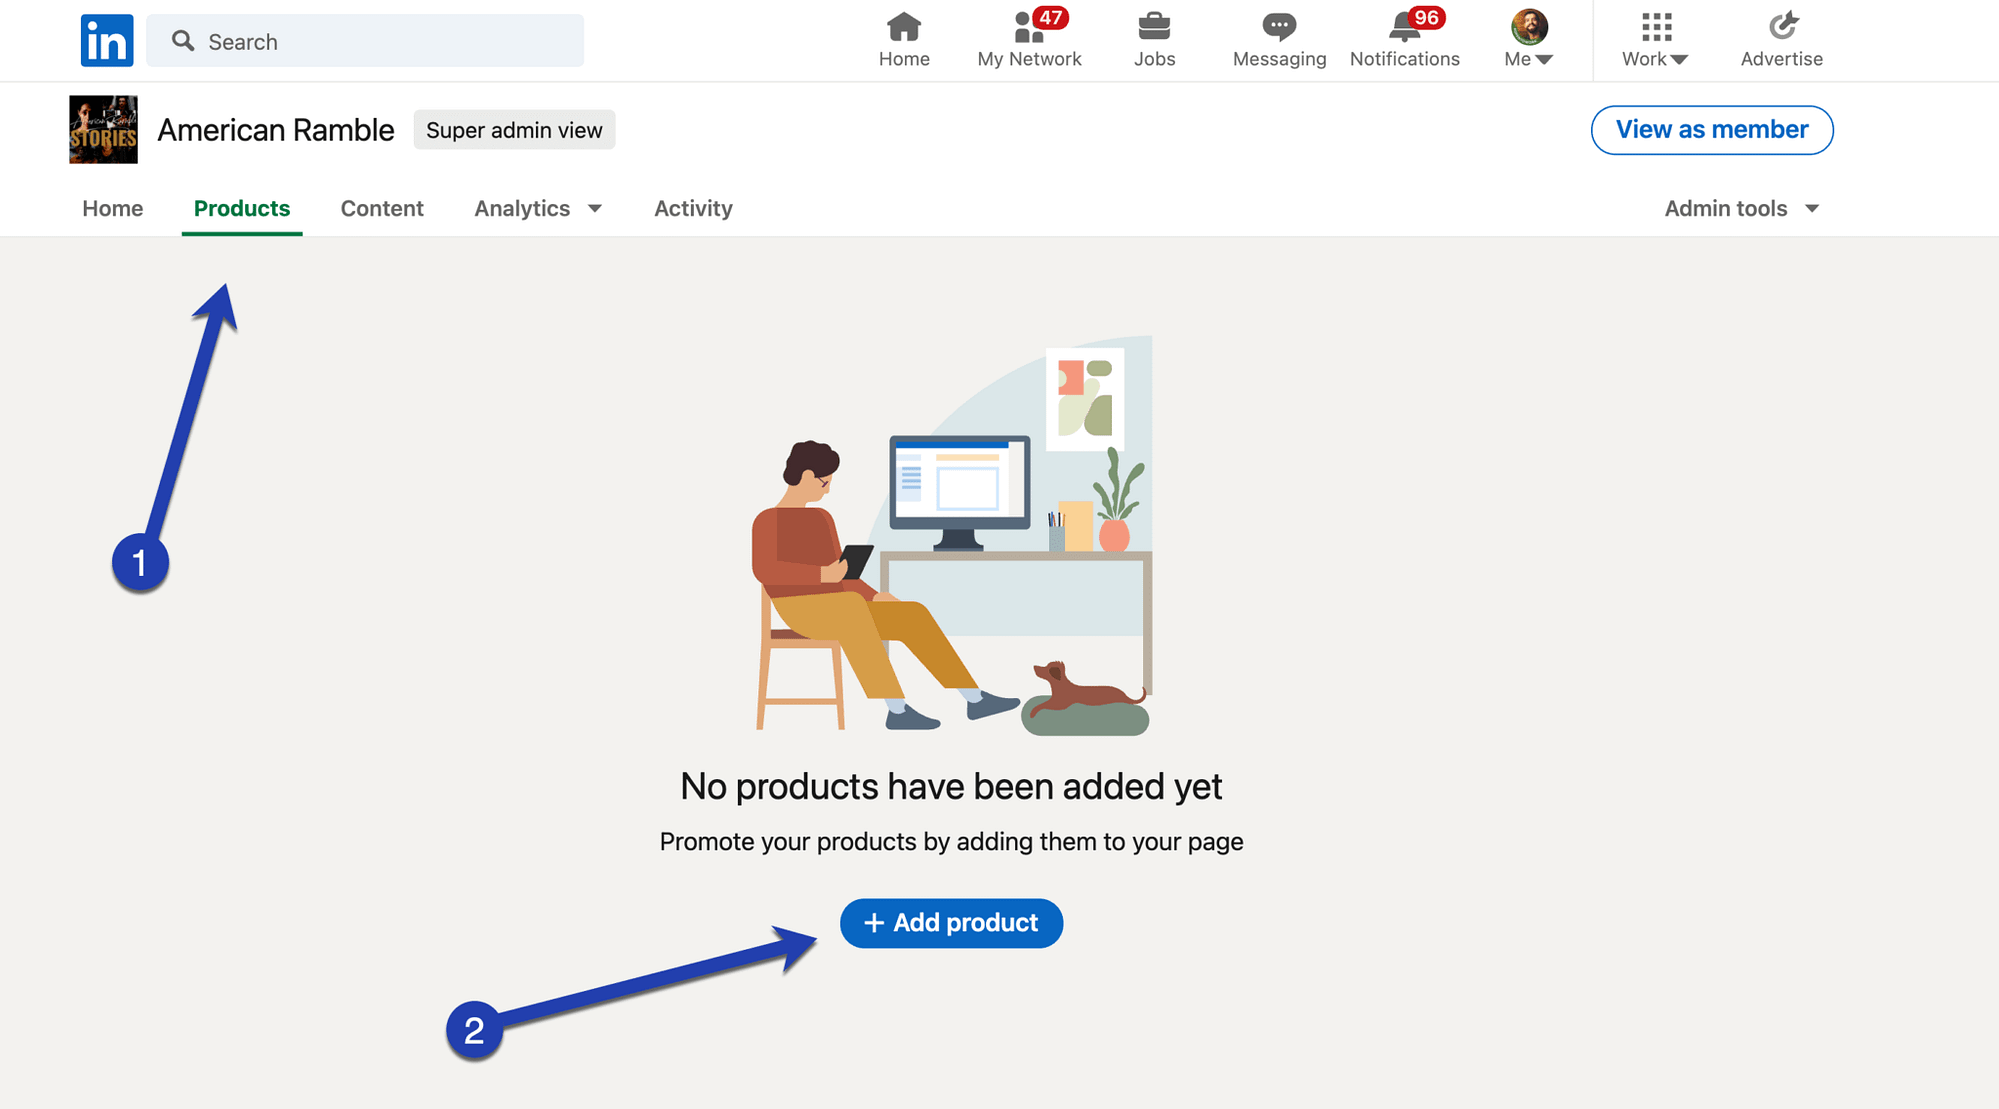
Select the Products tab to either view the products you already have on the page or to click on the Add Product button.
This button leads you to the wizard for adding all product information including a description, buttons, and customers.

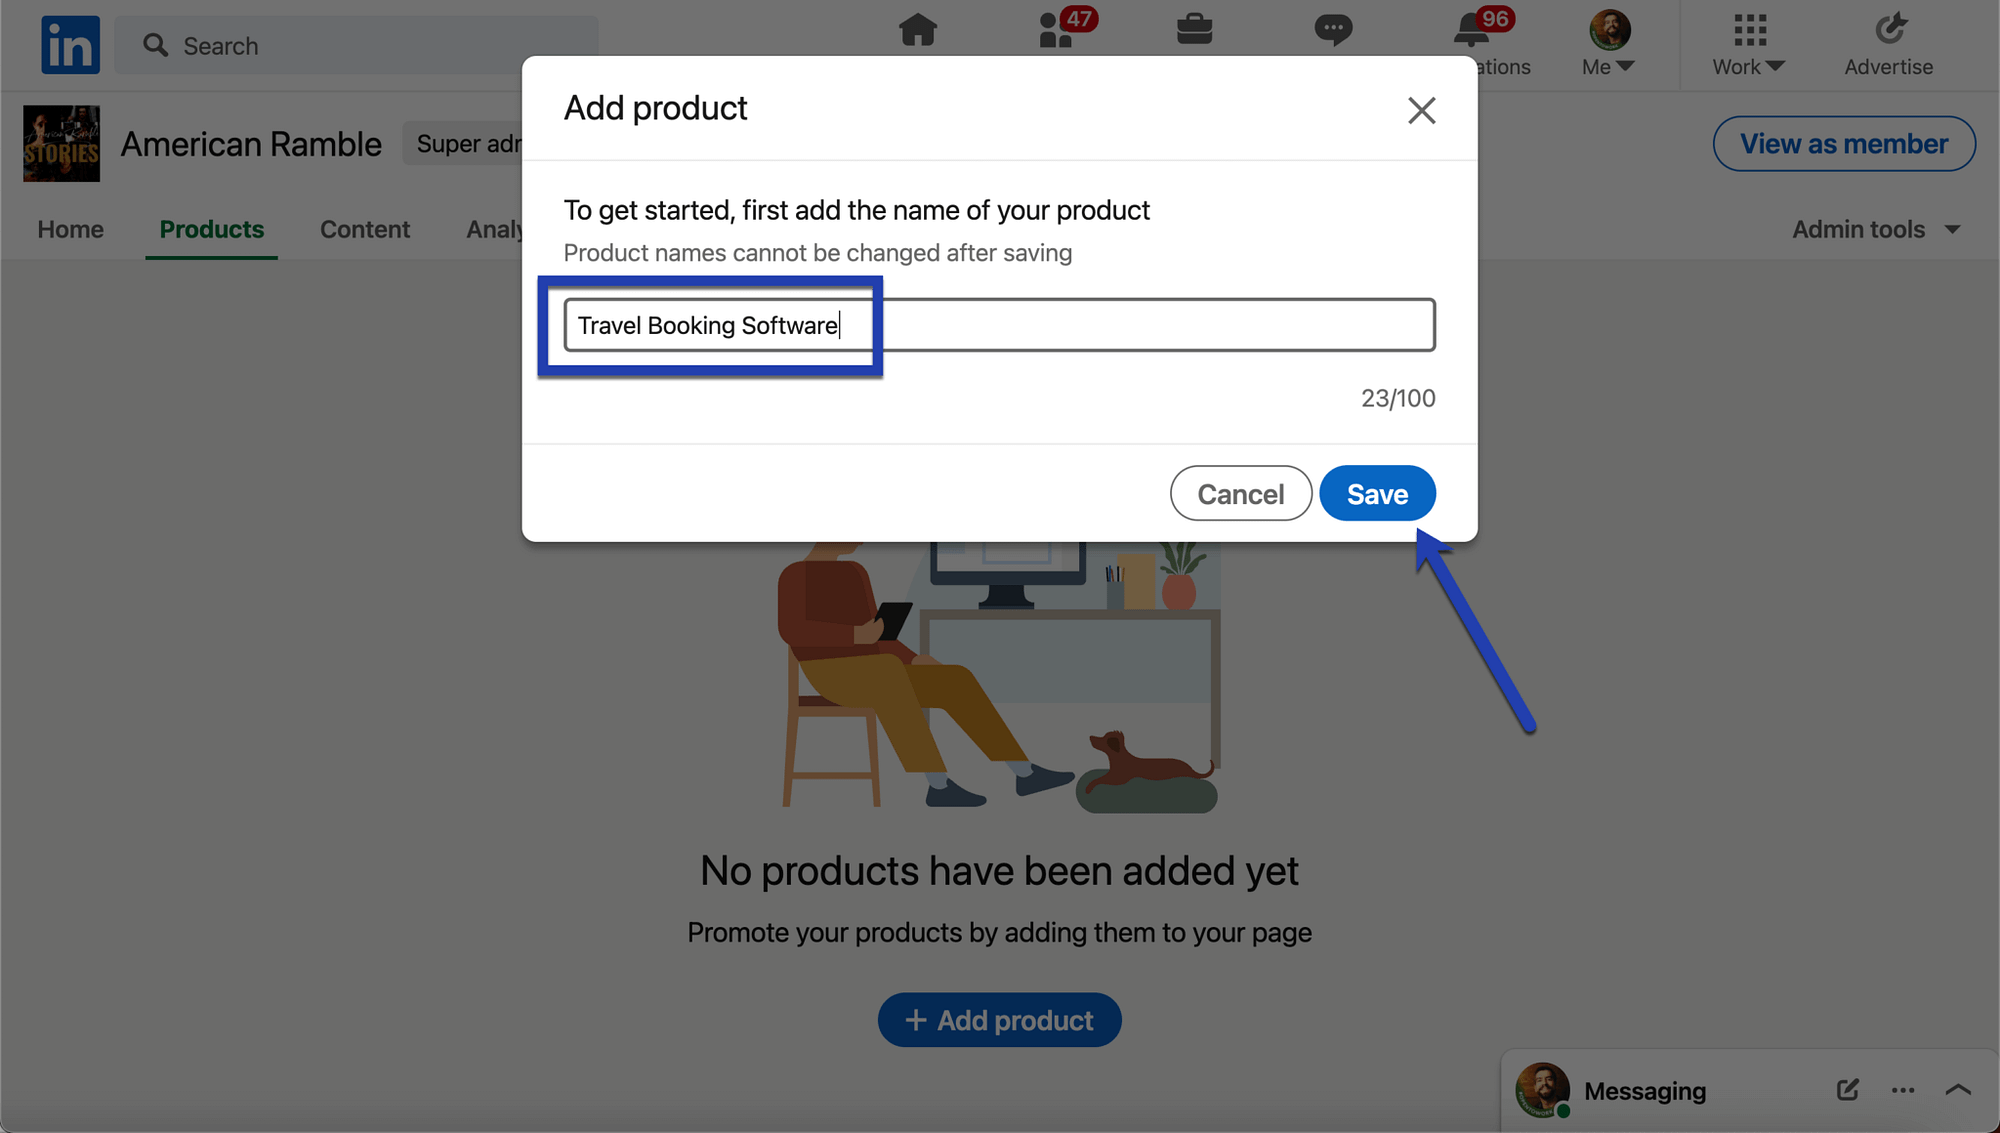
Type in the name of your product and click on the Save button.
Keep in mind that you can’t change the name of the product in the future, so try to make it perfect the first time.

The Product page is shown in an editing view where you can click on little Edit icons next to any section you want to change. However, selecting any of these buttons brings up the popup module that controls all of your details for the product, so you can click on any Edit (pencil) icon to proceed. It’s not a bad idea to begin with the product logo.

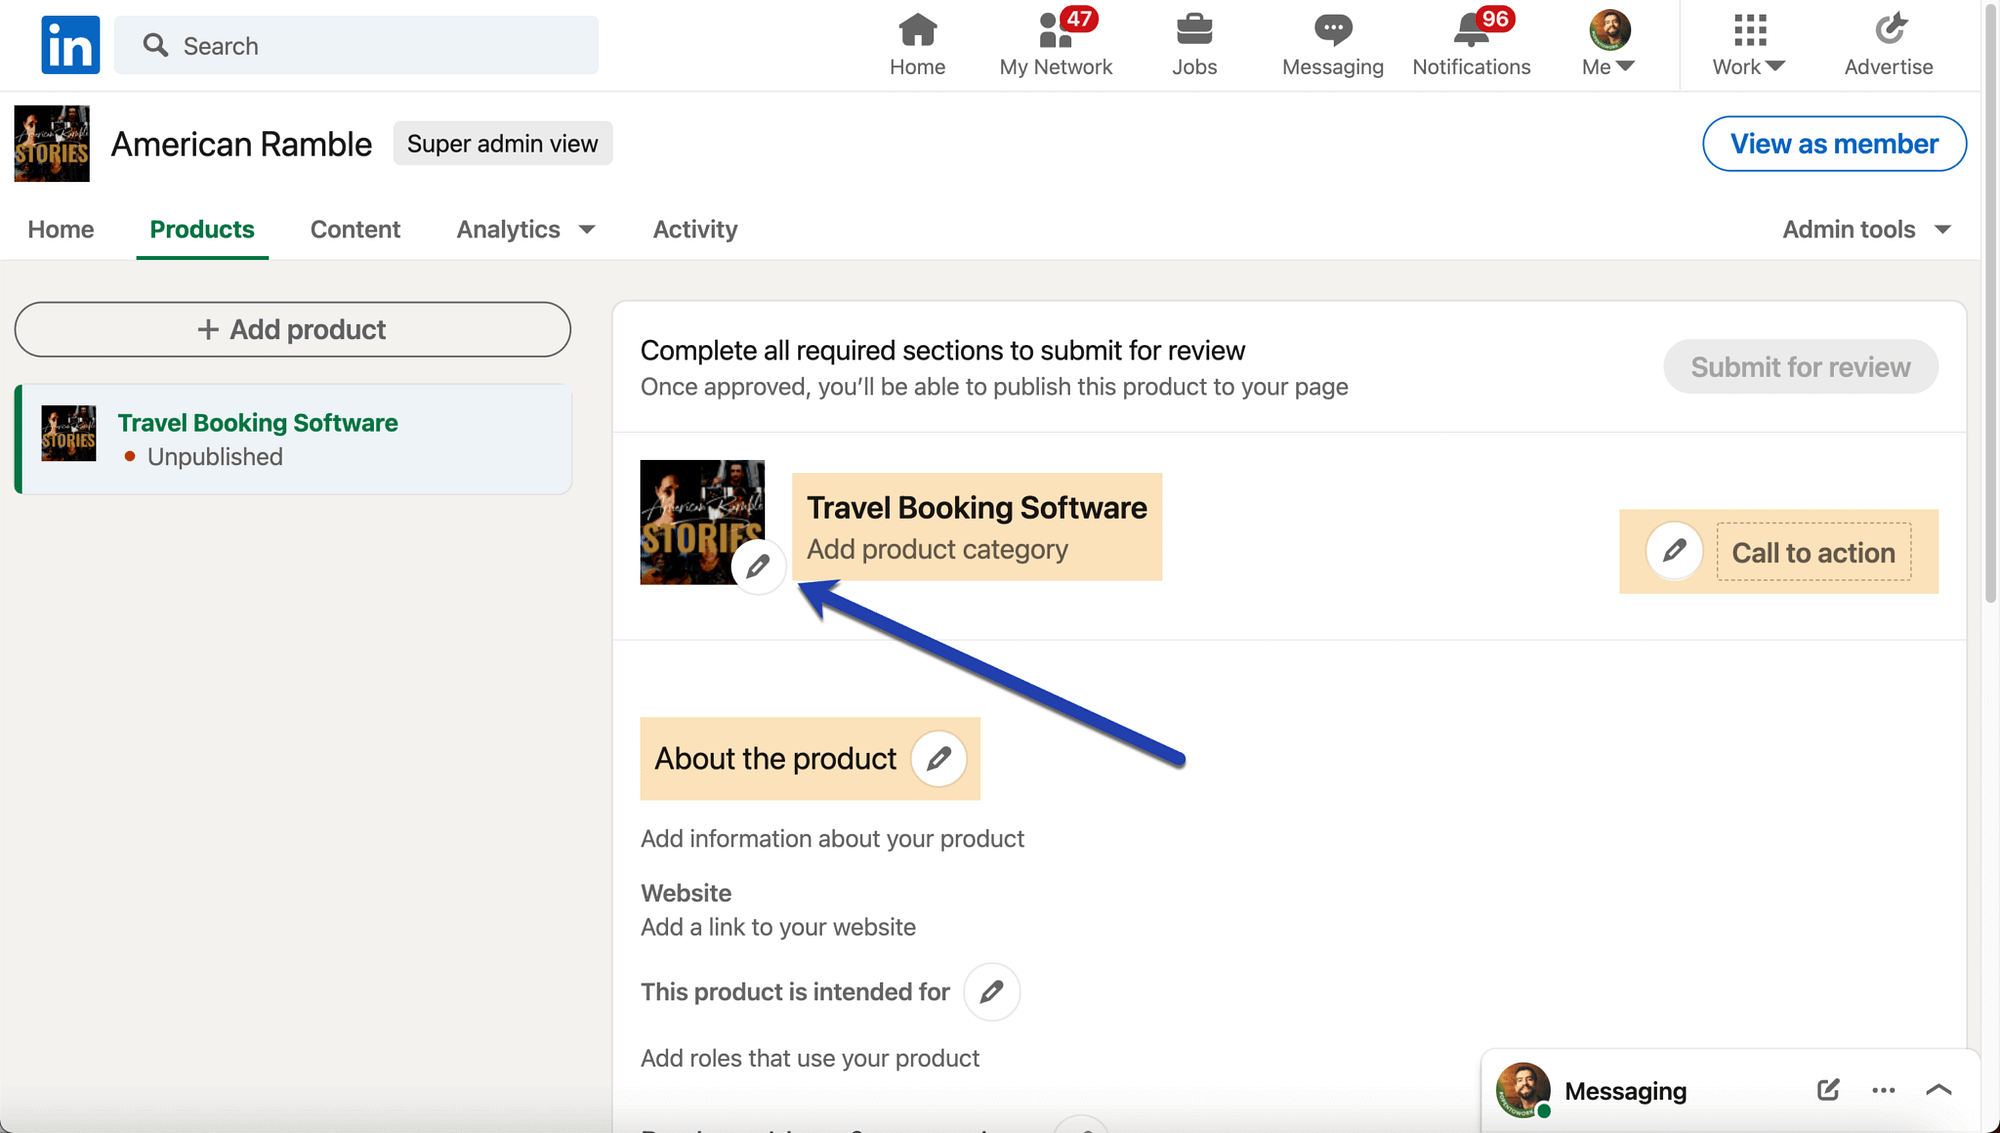
2. Upload a product logo and add a category
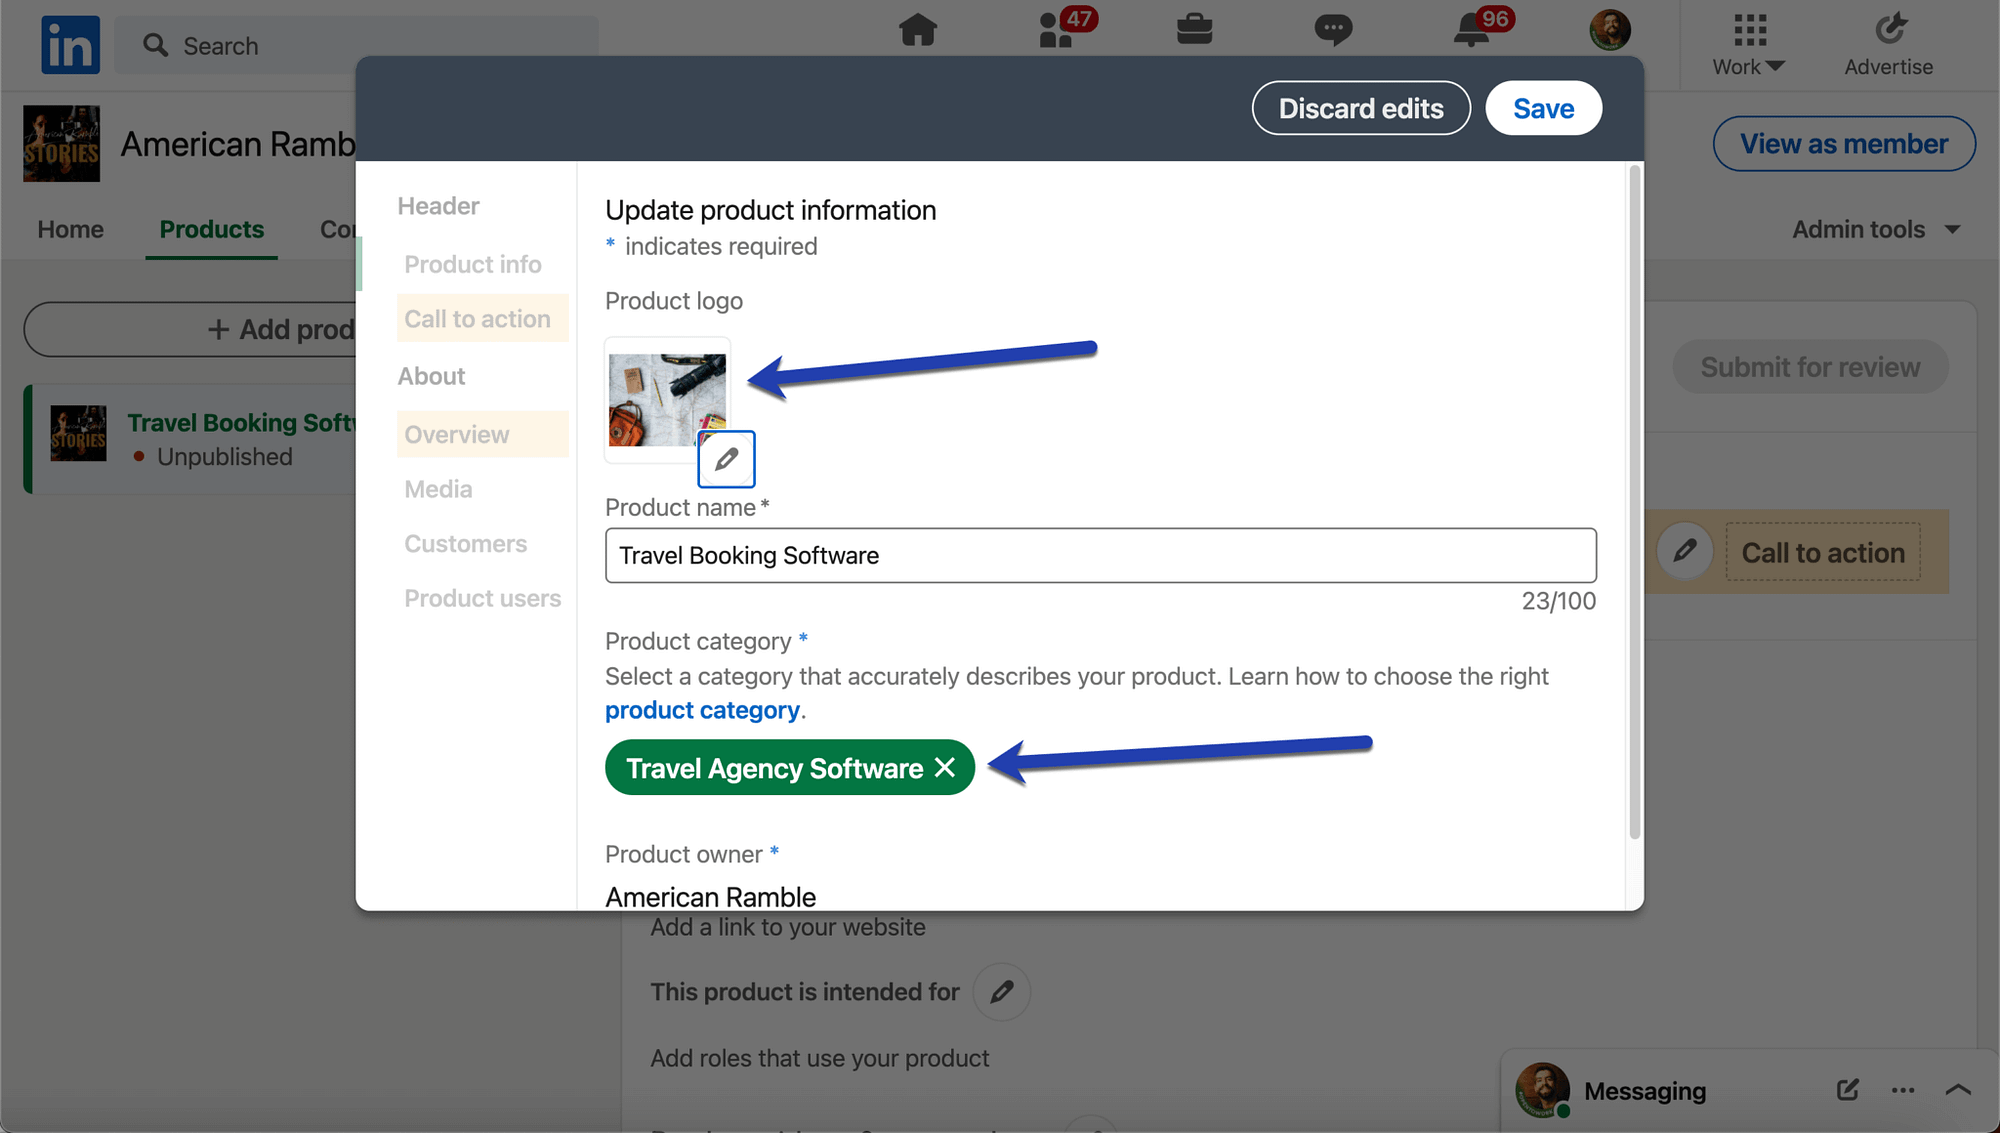
Select the Product Logo Edit button to upload any picture you’d like to use as your product’s logo. It’s wise to make it different from what you have as your company logo.
Under the Product Category section, start typing in keywords that reflect the nature of the product. LinkedIn will then suggest product categories that align with what’s typed into the field.
For example, we can choose Travel Agency Software as our main category and even incorporate additional categories if needed.
After each step, make sure you click on the Save button.

3. Make a call-to-action and add a URL
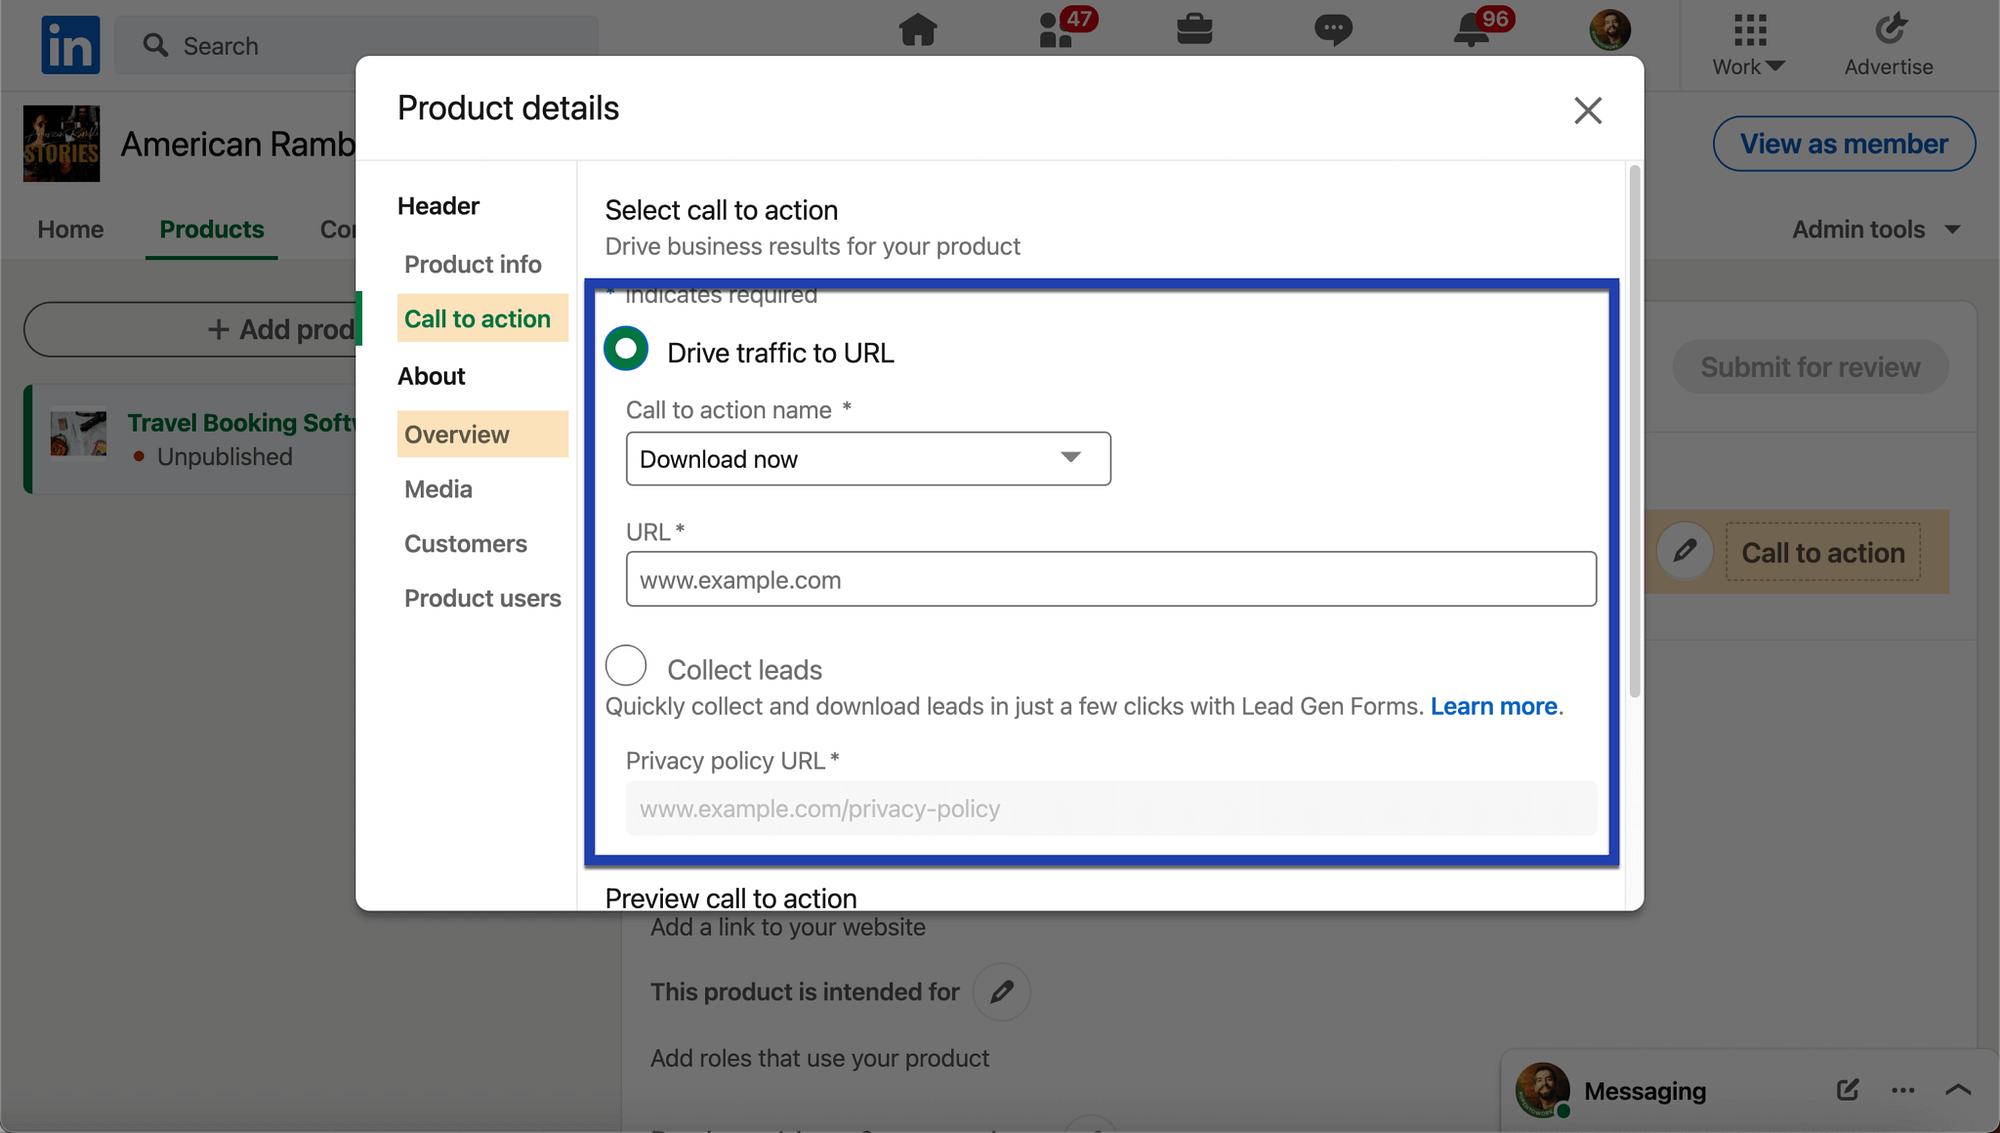
Select the Call To Action tab and choose whether you’d like to Drive Traffic to a URL or Collect Leads.
The first option asks for you to choose a Call To Action Name. This text shows up on the button. Options include:
- Download Now
- Request Demo
- Get Started
- Try Now
- Contact Us
- Learn More
You also want to paste in the desired URL to send people to a landing or product page when they click on the button.
The second Call To Action option is for Collecting Leads, where you utilize the Lead Gen Forms feature from LinkedIn to accumulate leads through your Business page.

4. Add product media items that improve your LinkedIn Product Pages
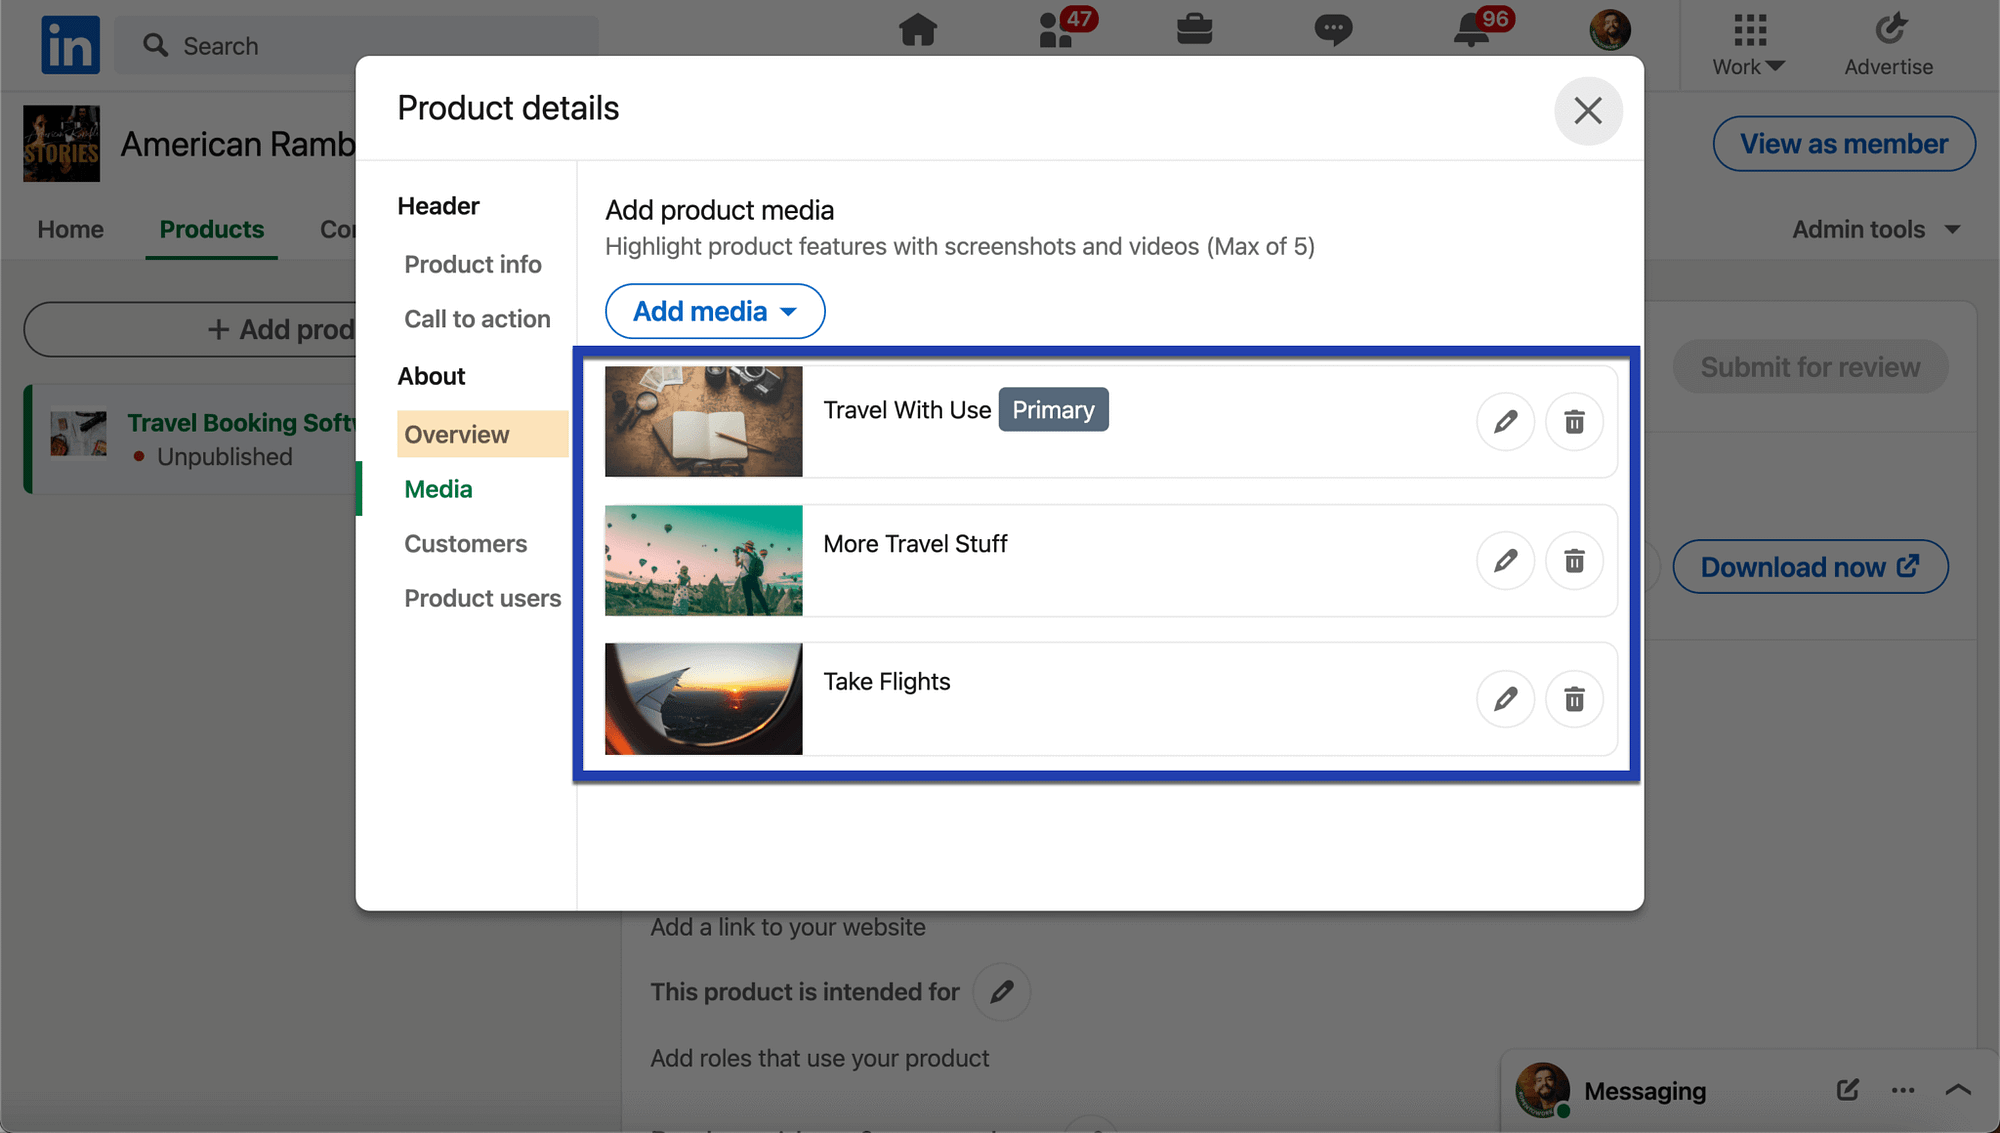
Next up, select the Media tab.
Click the Add Media dropdown menu to see your options.
You can add the following media elements:
- Locally uploaded images
- Locally uploaded videos
- Vimeo embeds
- YouTube embeds

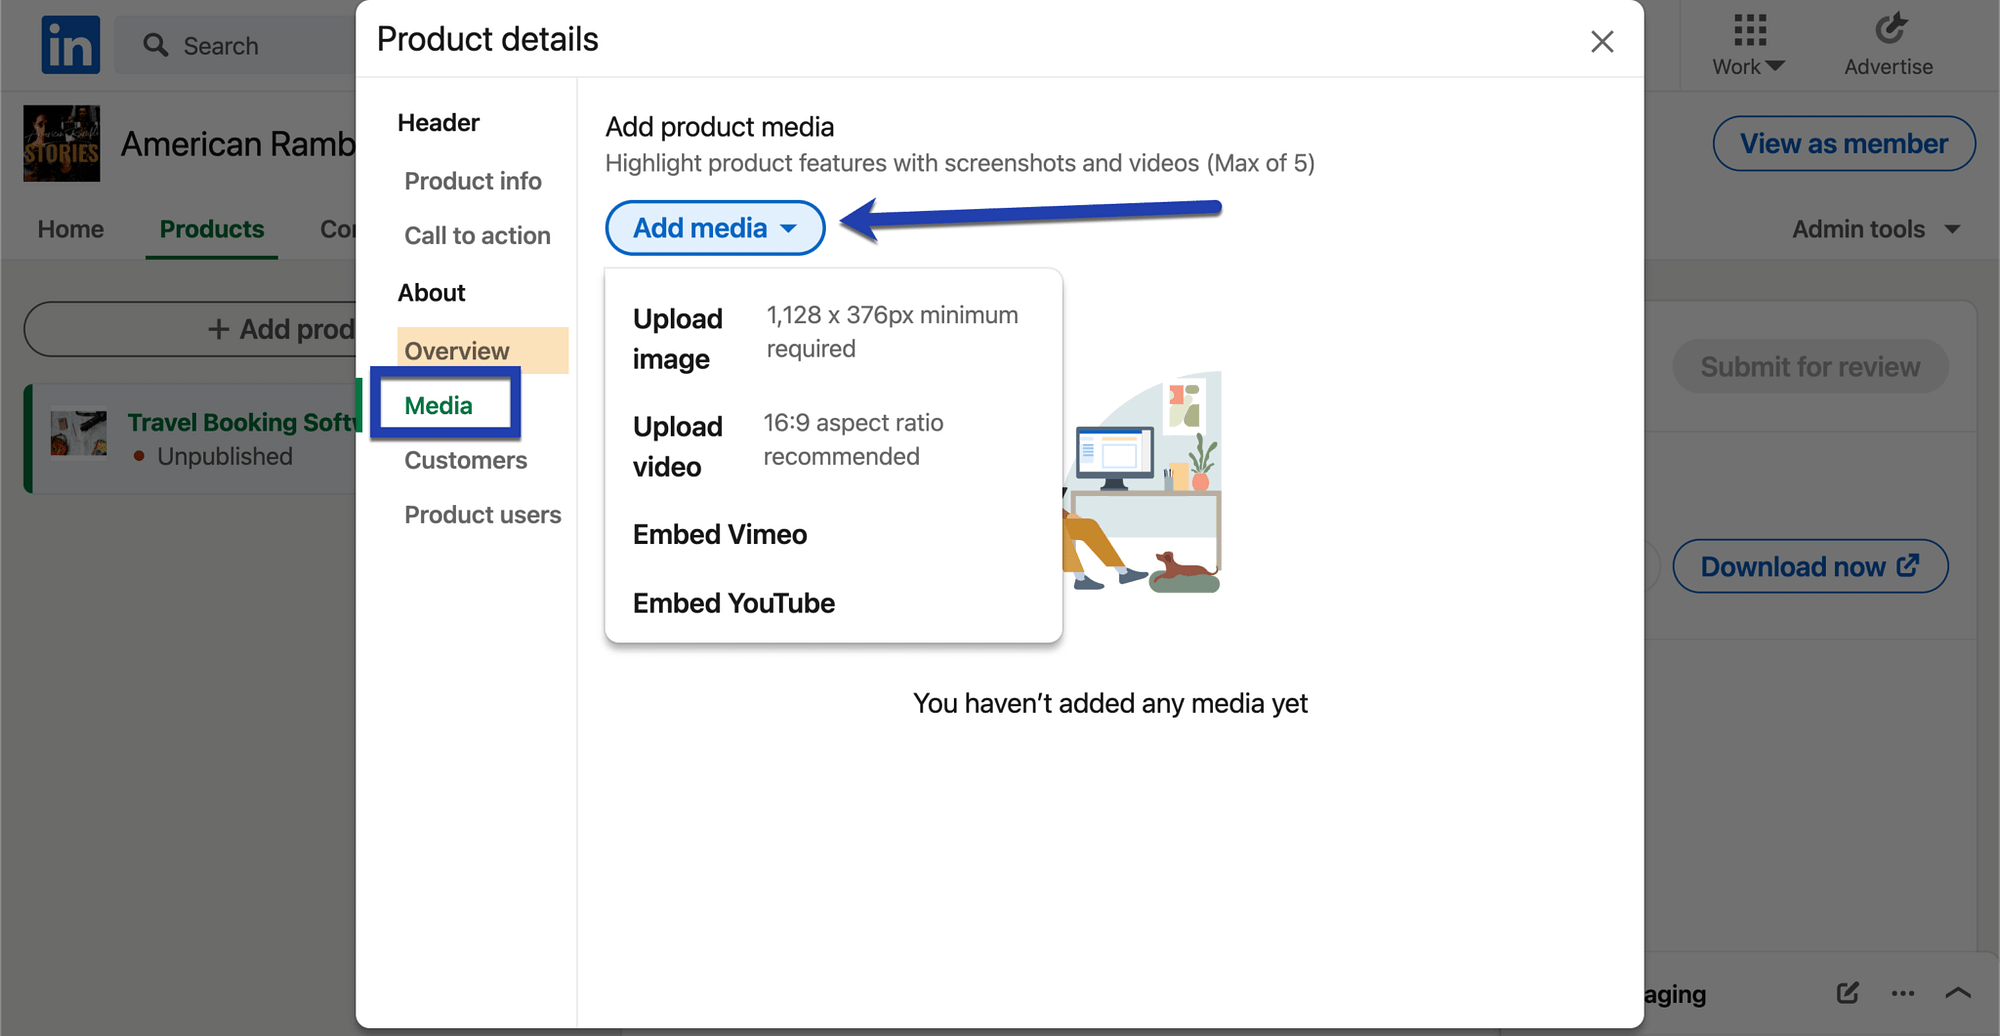
Upload whichever media items you find most appropriate for your product page. It makes sense to offer product demos, tutorials, or trailers to introduce customers to what the product does.
After uploading, you’ll see a list of all the media saved and ready for publication.

5. Attach loyal or notable customers
One way to stand out with LinkedIn Product Pages is to show customers that use your product. This serves as a way to prove that it’s actually being utilized, and it adds a bit of social credit to your page, potentially promoting other companies to follow along.
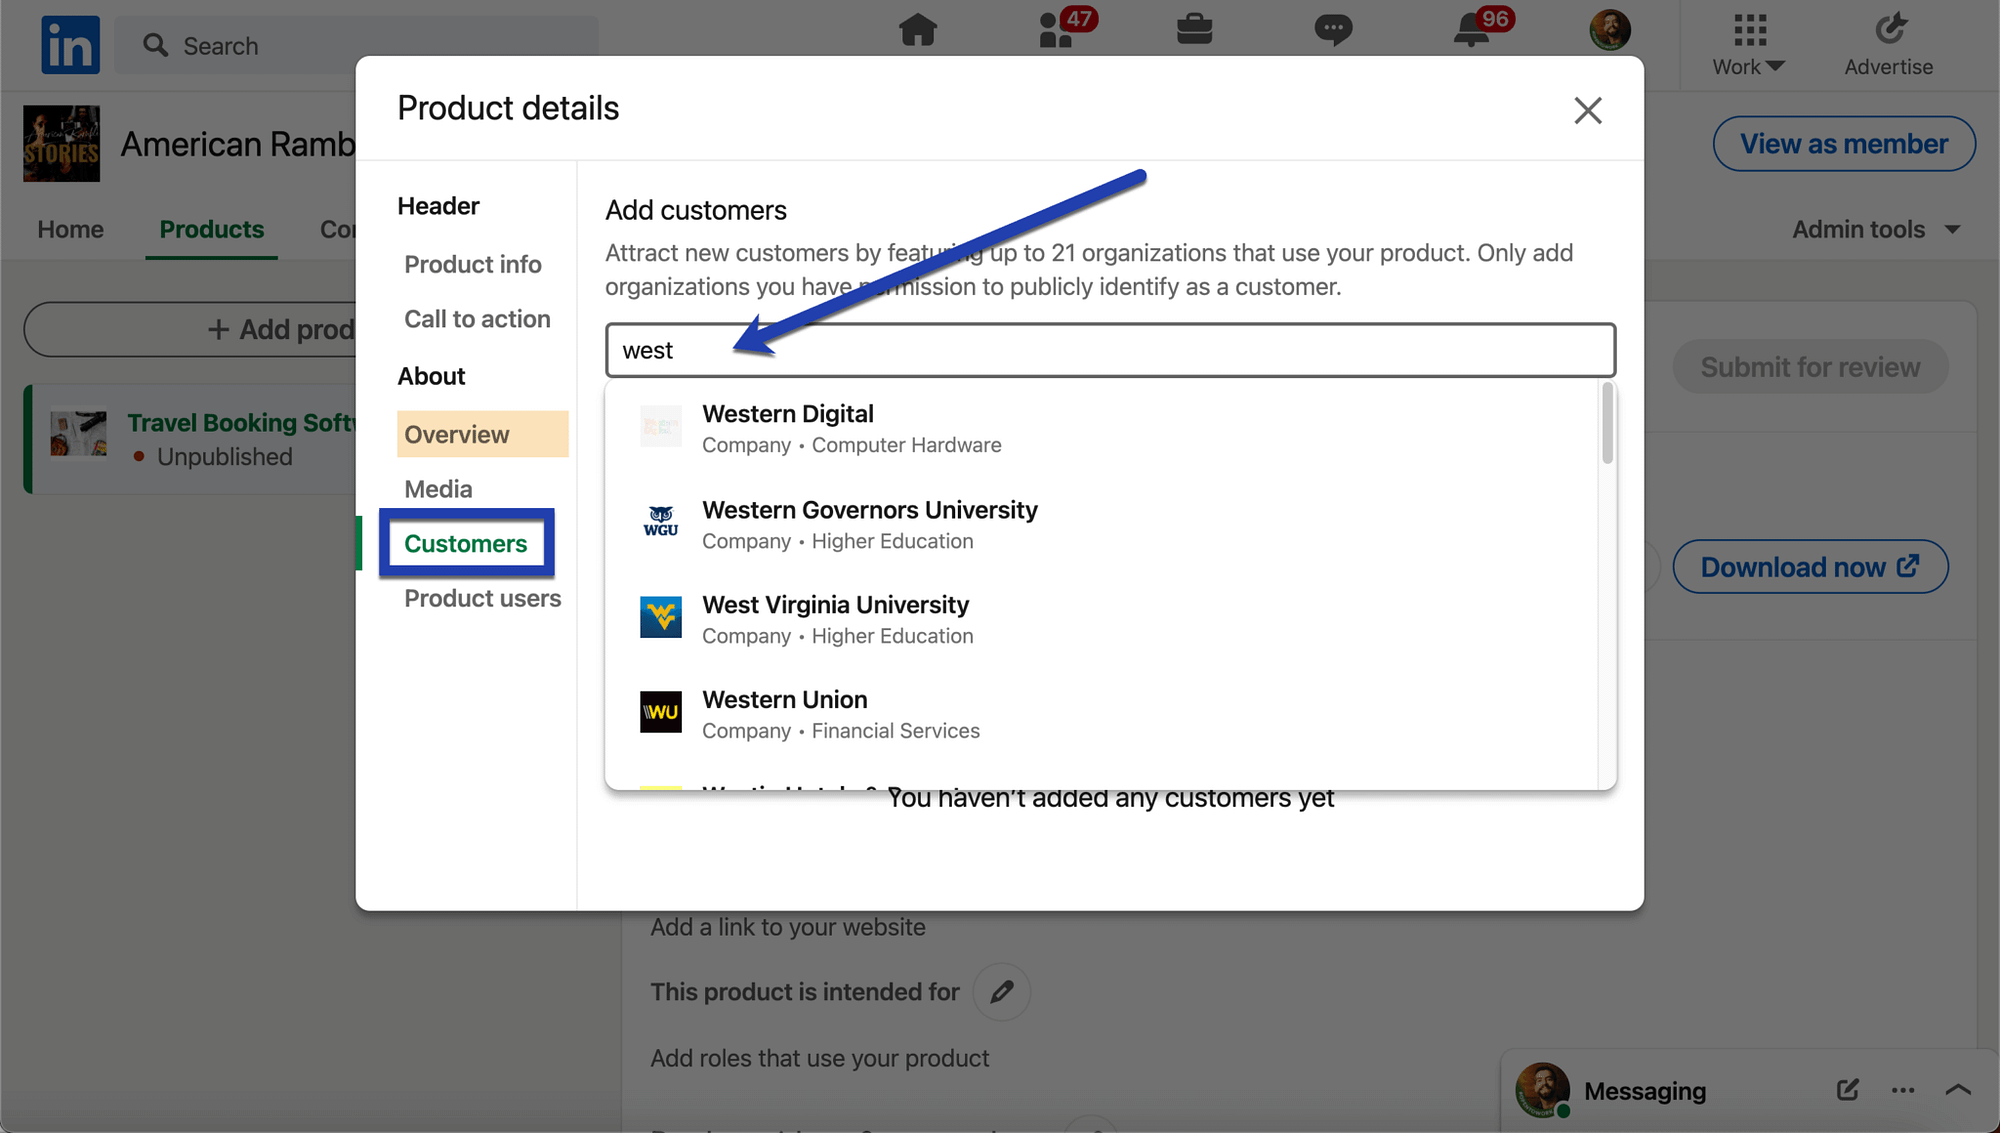
To add your list of customers, go to the Customers tab.
Type in the names of your customers to reveal company suggestions from LinkedIn. Choose ones that give your product a good name.
LinkedIn doesn’t allow you to list any companies unless you get permission from said companies. Therefore, we suggest reaching out to your customers and clients prior to adding them to your product pages.

6. Suggest the types of product users
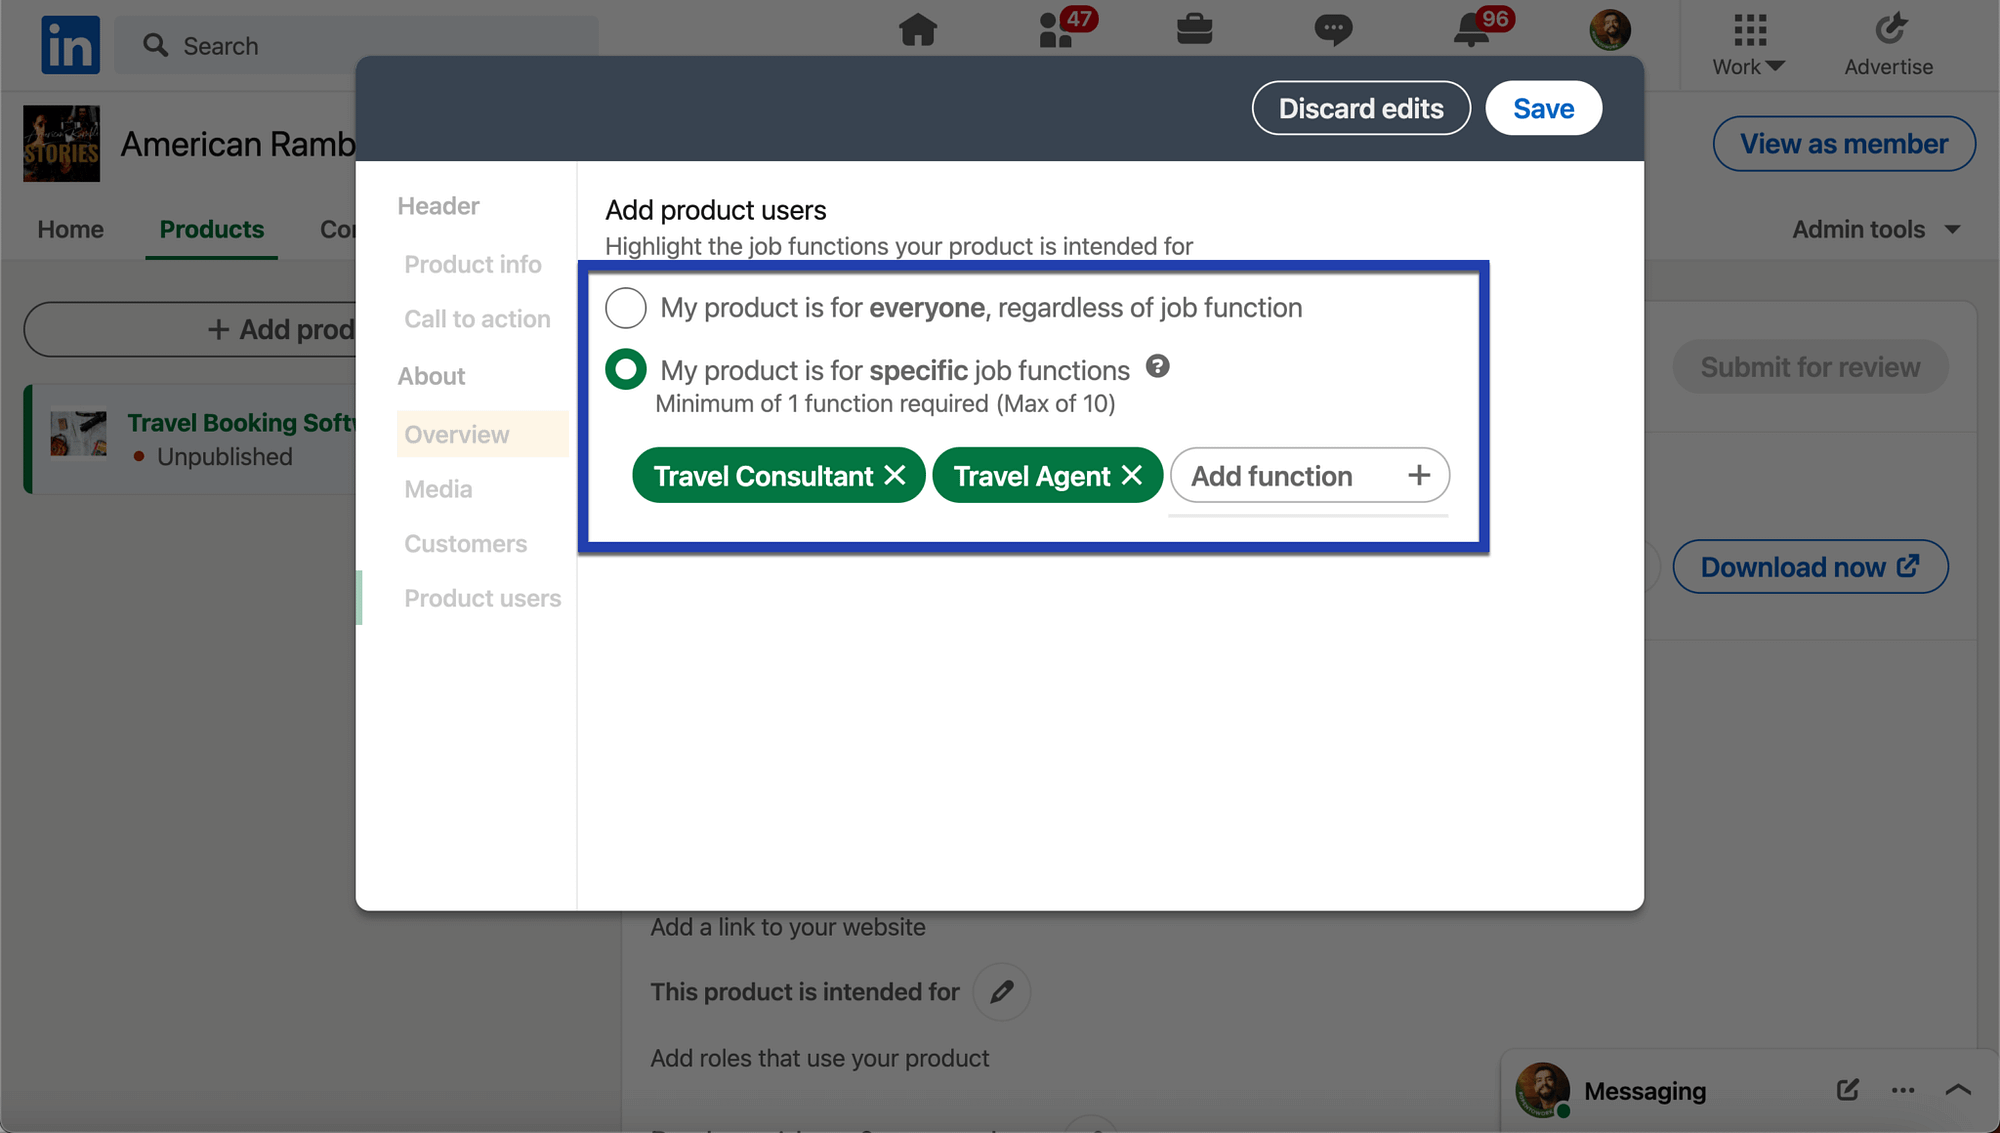
Moving on, go to the Product Users tab.
This area allows you to specify the types of people and companies that use your product. This way, people can search for products on LinkedIn based on their professions or industries and land on your pages. It’s an excellent way to expand your reach on LinkedIn.
One option is to state that the product is for everyone, regardless of their job function. In most instances, however, a more specific definition of Product Users will be more effective for generating relevant leads.
To get more specific, select the option that states My Product is for Specific Functions. Then, type in the job functions to show a list of options that relate to your product.
For instance, we can show Travel Consultant and Travel Agent for our example travel software product.

7. Don’t forget the details for your LinkedIn Product Pages
The product details relay information about what your product does for its customers and the problems it solves. You can also link directly to your primary website as a complementary way to bring people to your store.
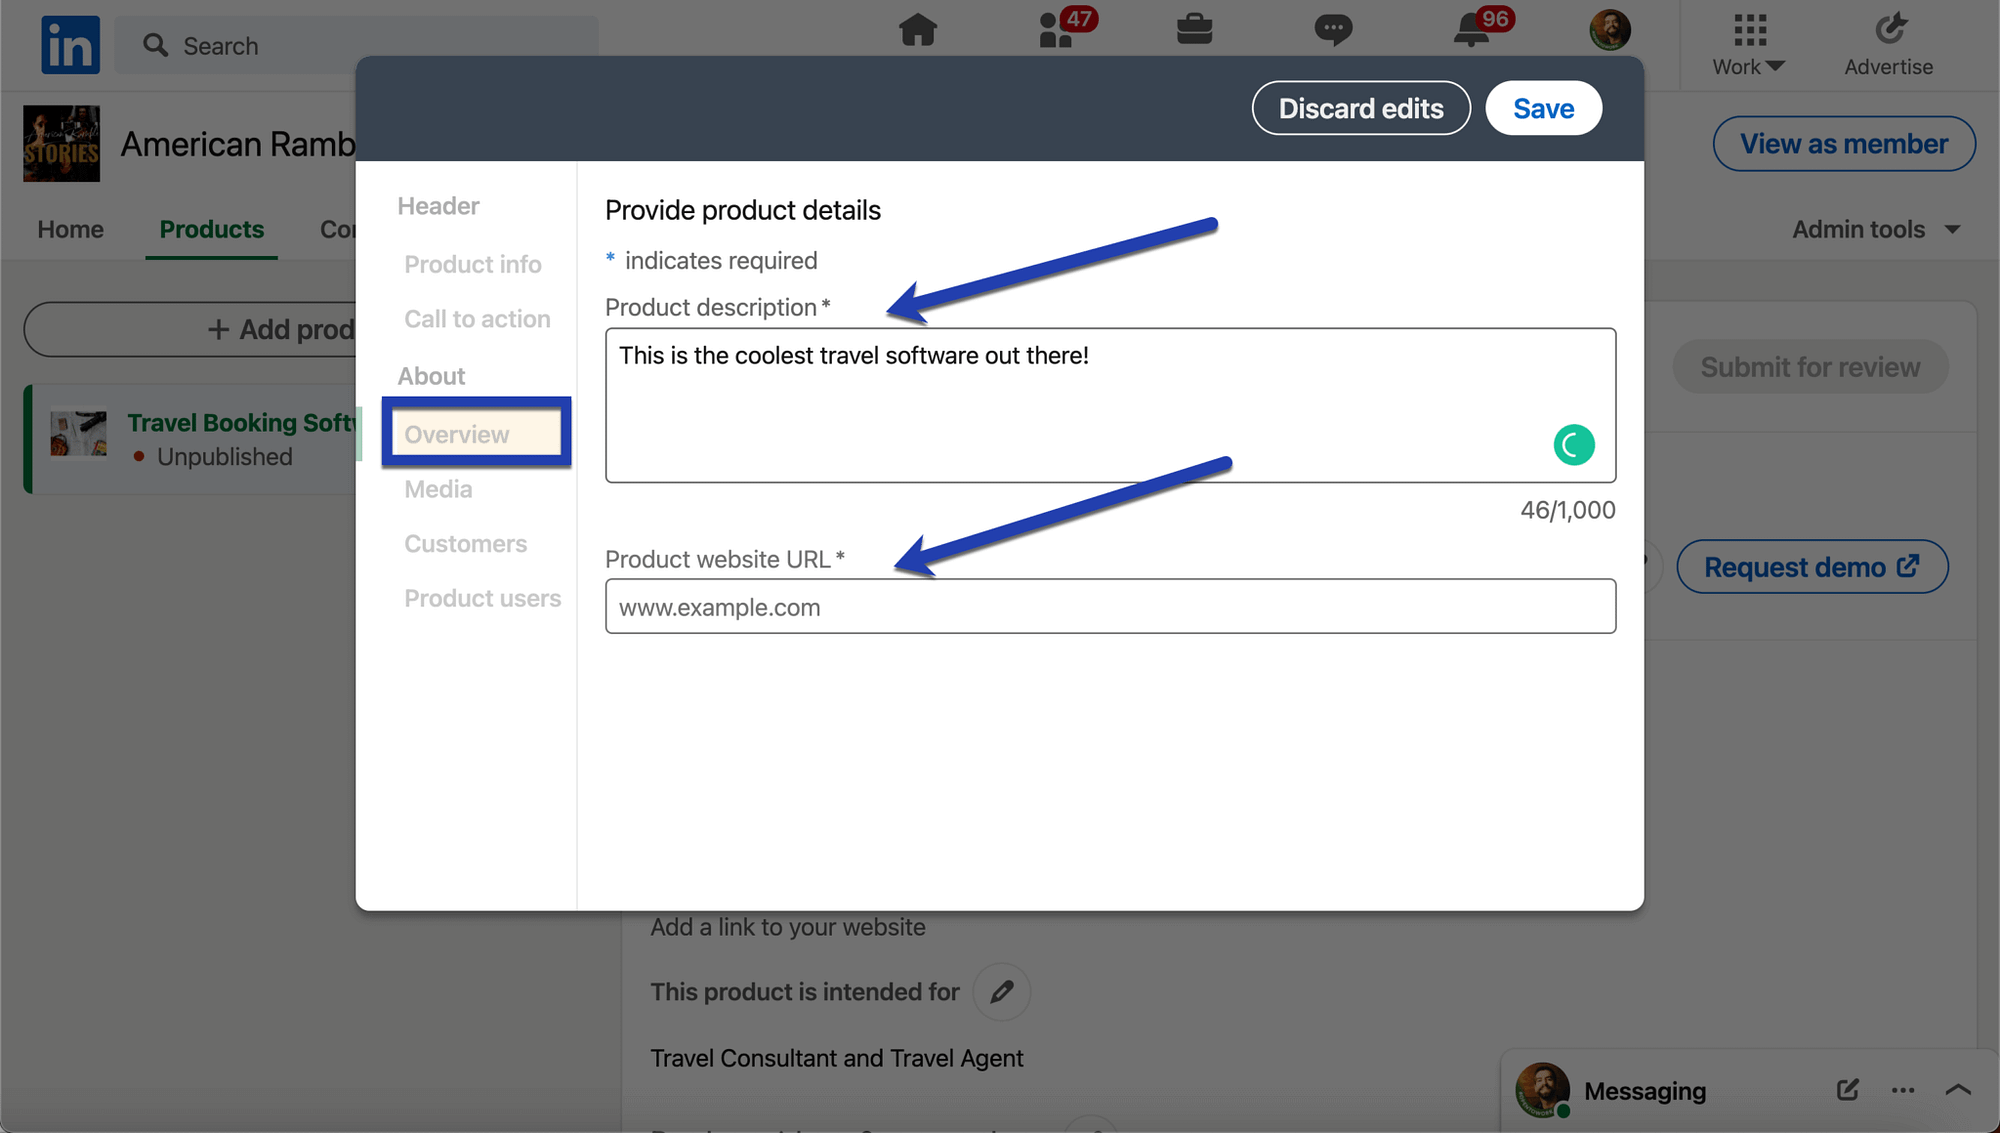
To fill in these details, go to the Overview tab in the same popup window.
Type in a Product Description and paste in your website URL.
To complete the entire process, click on the Save button.

8. Check that you filled in everything and submit your LinkedIn Product Pages for review
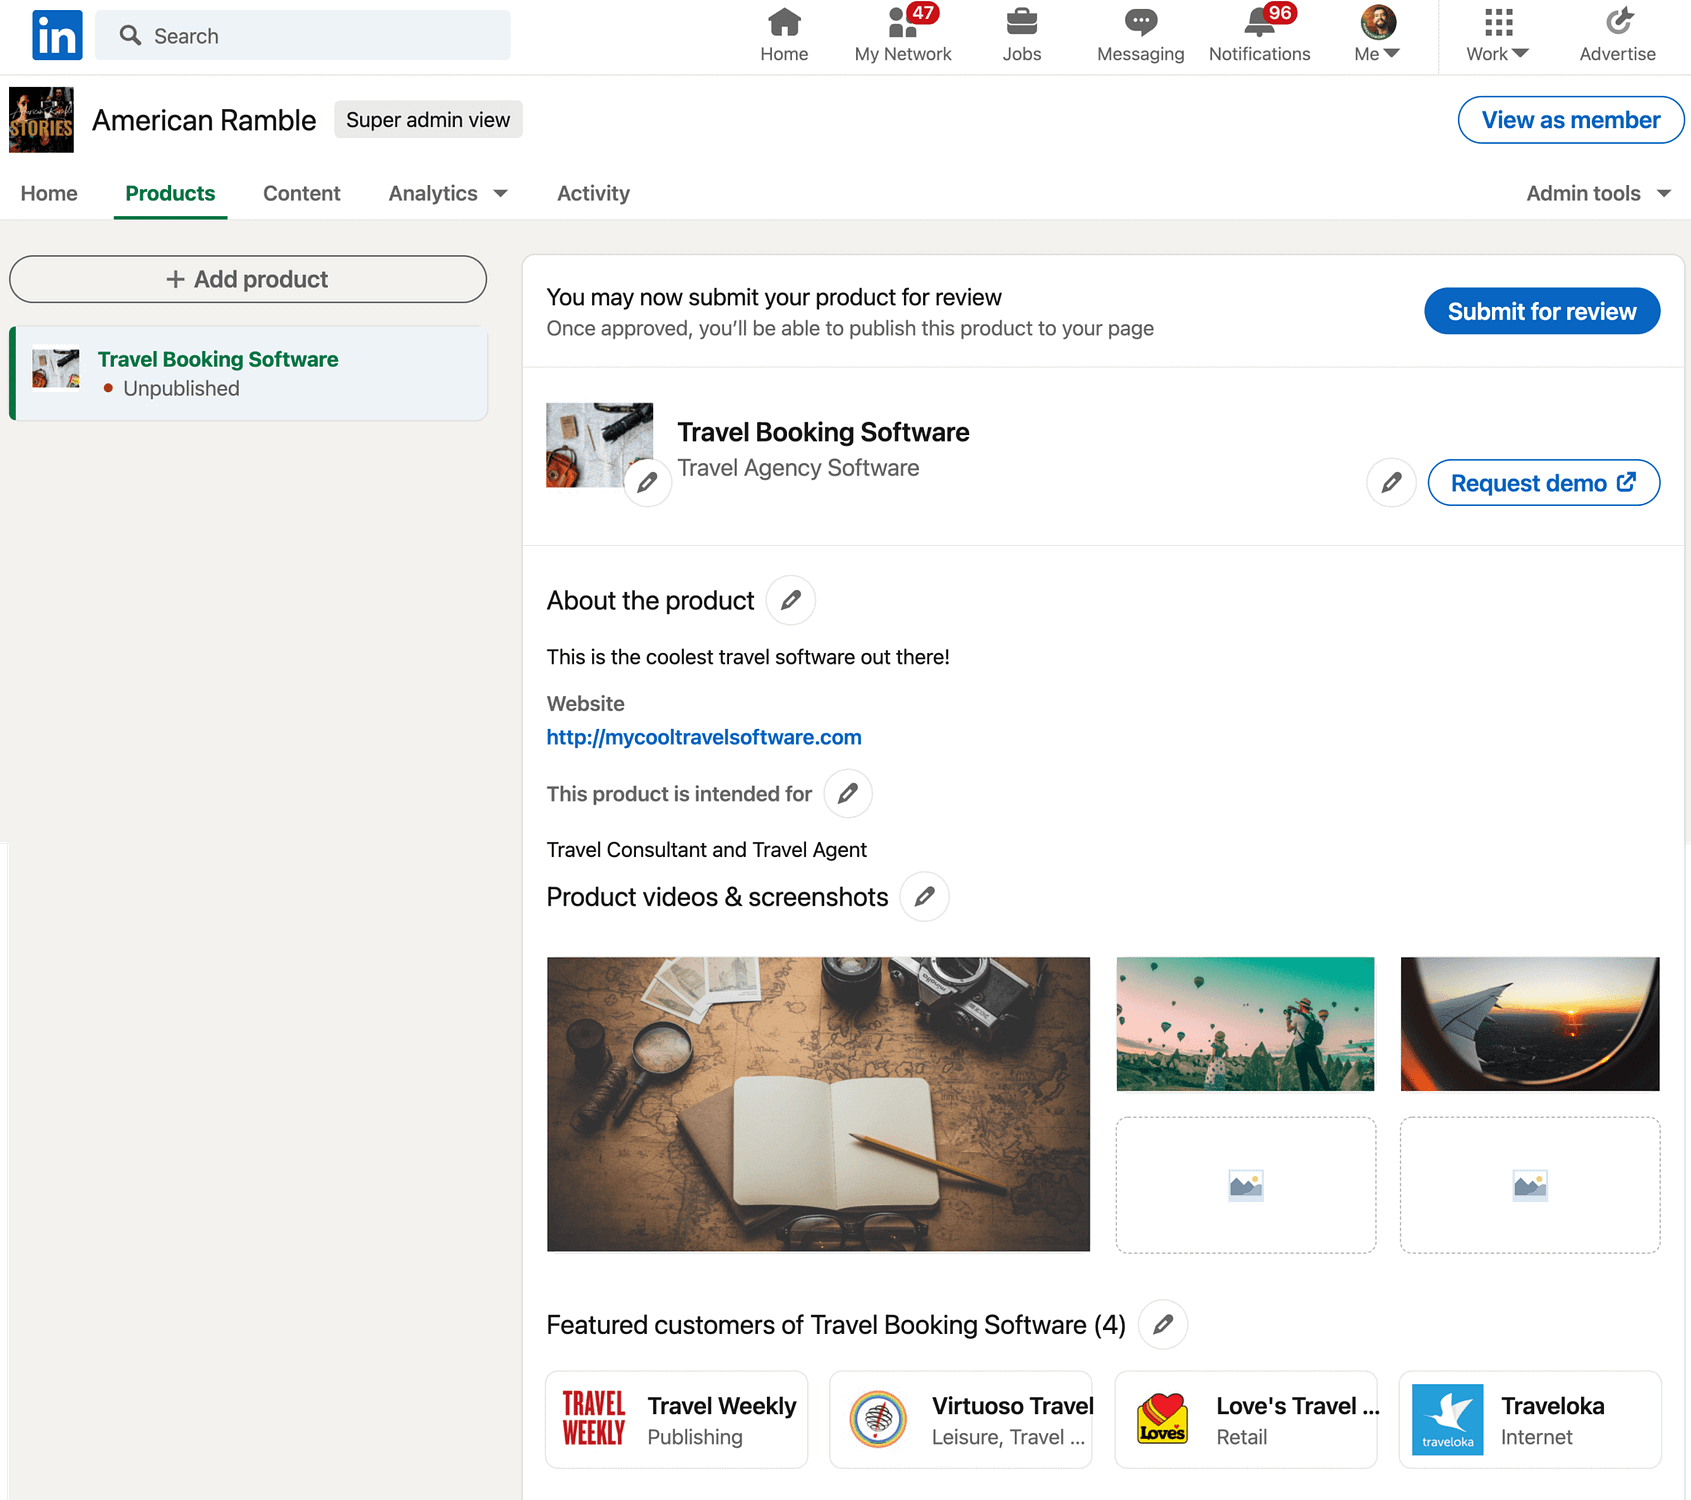
LinkedIn sends you back to the general editor which presents your product page in a similar format as the layout customers will see when they visit your product page.
On this page, you can continue to click on the Edit icons to adjust what was typed in from before.
As you can see from the screenshot below, we now have a complete LinkedIn Product Page with a title, category, call-to-action button, description, website link, userbase reference, product images, and a list of our top customers at the very bottom.
After the page gets published you’ll also see an area for customers to come to the page and write their own user reviews.

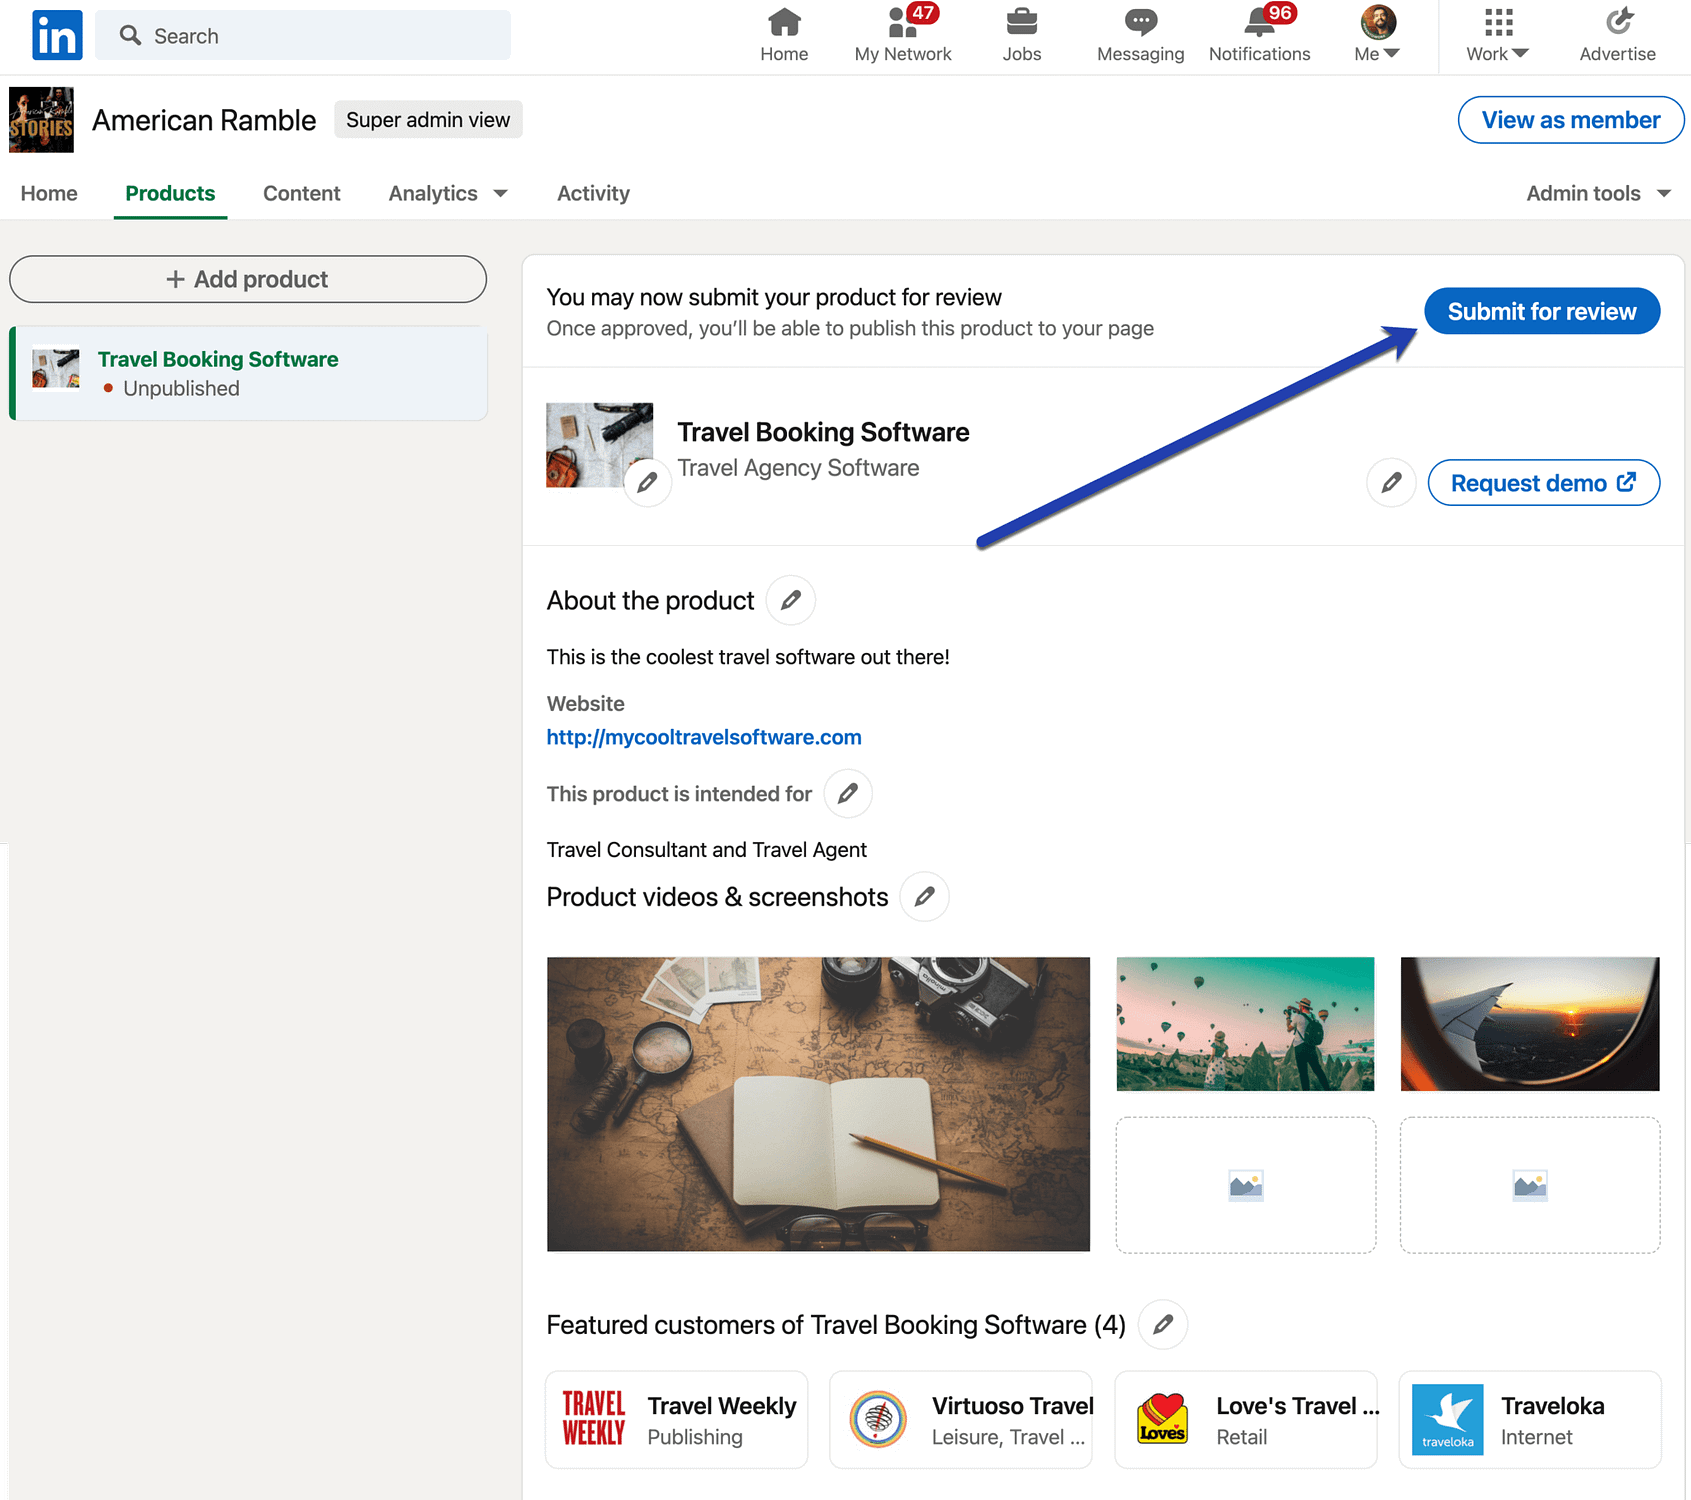
LinkedIn has an evaluation process of its own to make sure that all product pages follow its guidelines, but this isn’t something to be overly concerned about. As long as you complete the entire product page, and it’s a legitimate product, you should have no problem getting through this review process.
Click on the Submit for Review button when you’re happy with the status of your LinkedIn Product Page.

How to add a LinkedIn Services Page
We mentioned earlier in the article that it’s possible for multiple industries to make product and services pages. The official product pages are limited to B2B Software companies for now, but you can still make a section on your personal profile for selling any type of service.
So, if you have a web design, writing, or cleaning service, any of those are eligible to launch a Services page. The Services pages are mainly reserved for Personal LinkedIn profiles, but we may see them available for Business pages in the future.
1. Select the “Open To” button on your Personal LinkedIn page
Begin this process by opening the editor view for your personal LinkedIn profile.
Underneath your profile picture and contact information, look for the Open To button.
Select that button to open a dropdown menu. You can state on your profile that you’re Open To Hiring, but we’re more interested in the Open To Providing Services option. Choose that one.

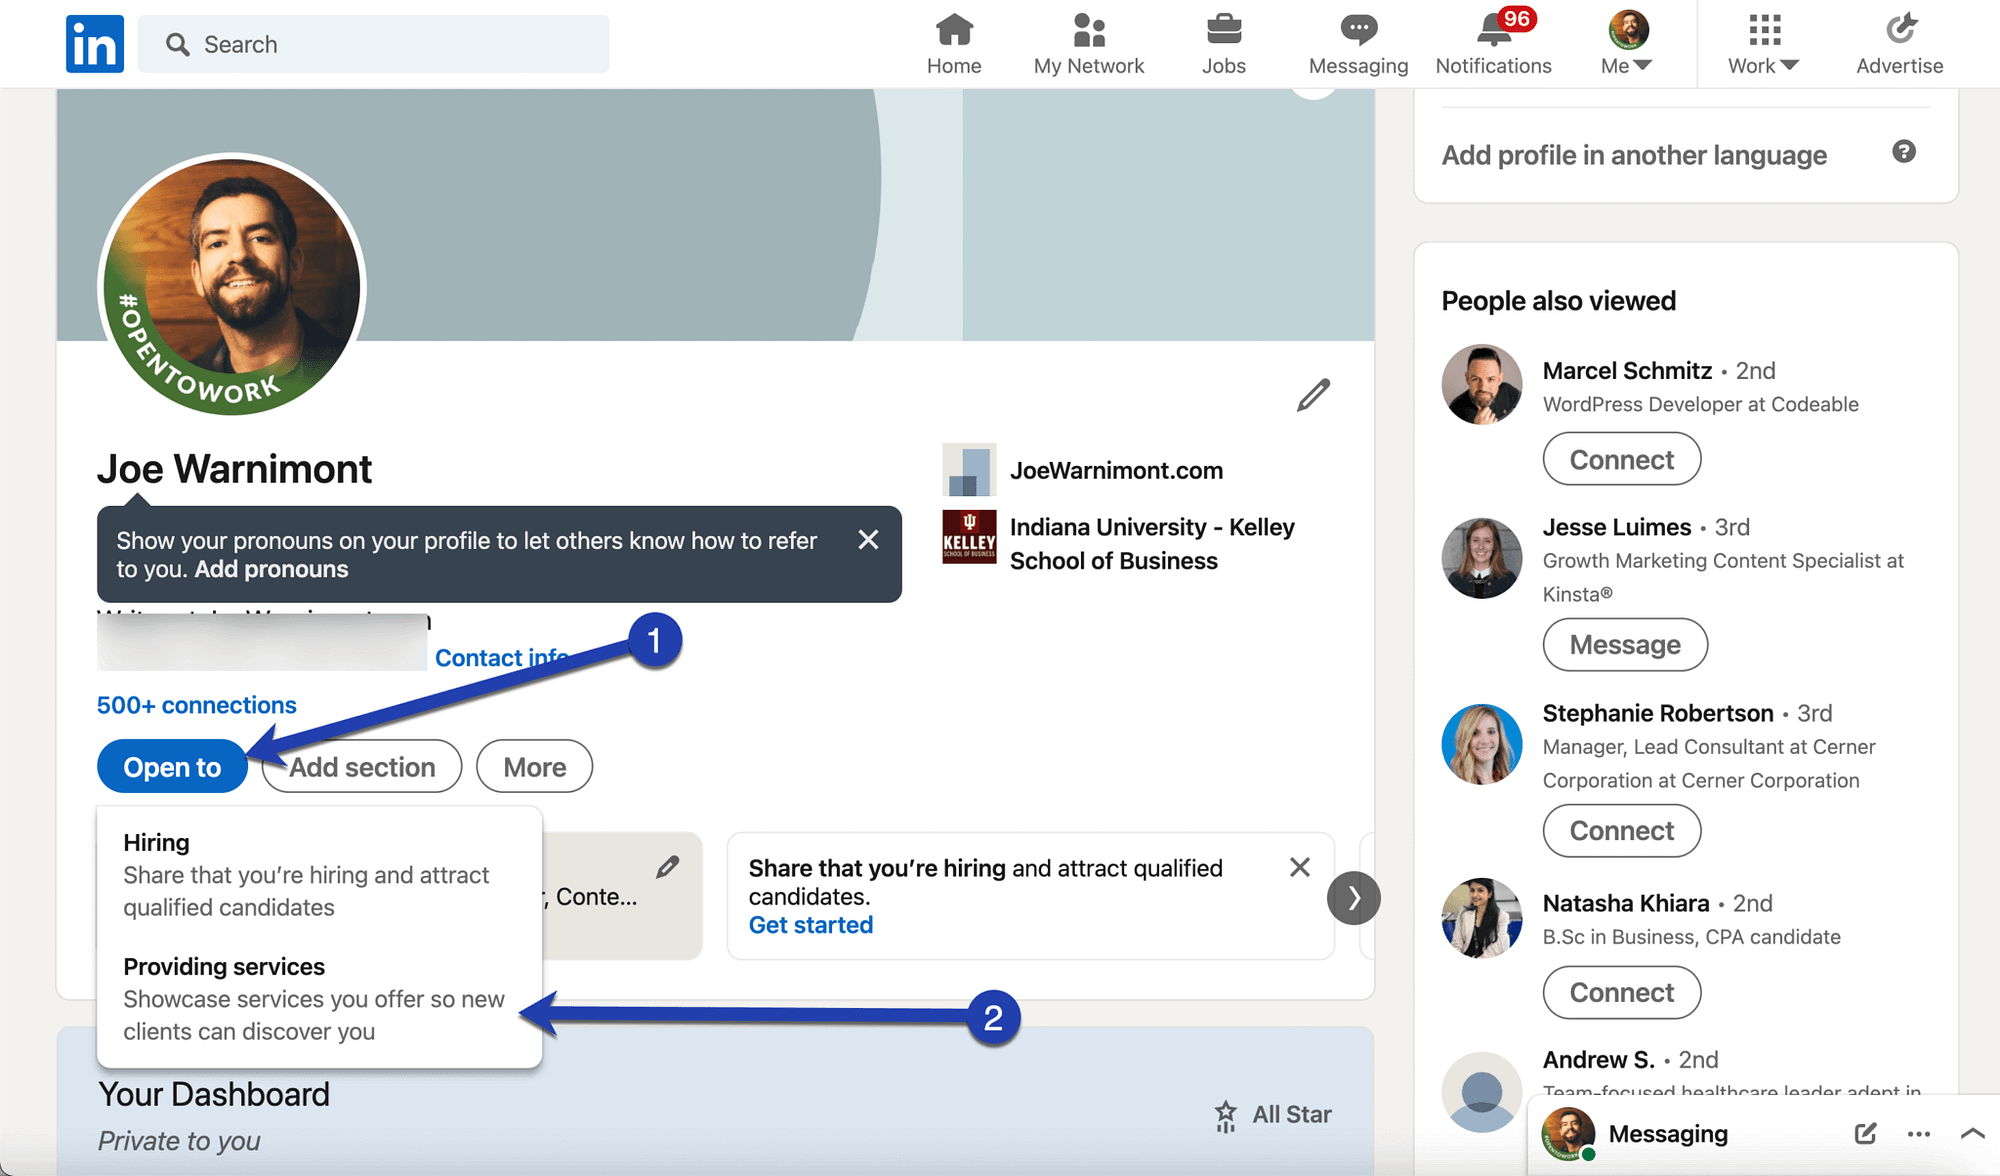
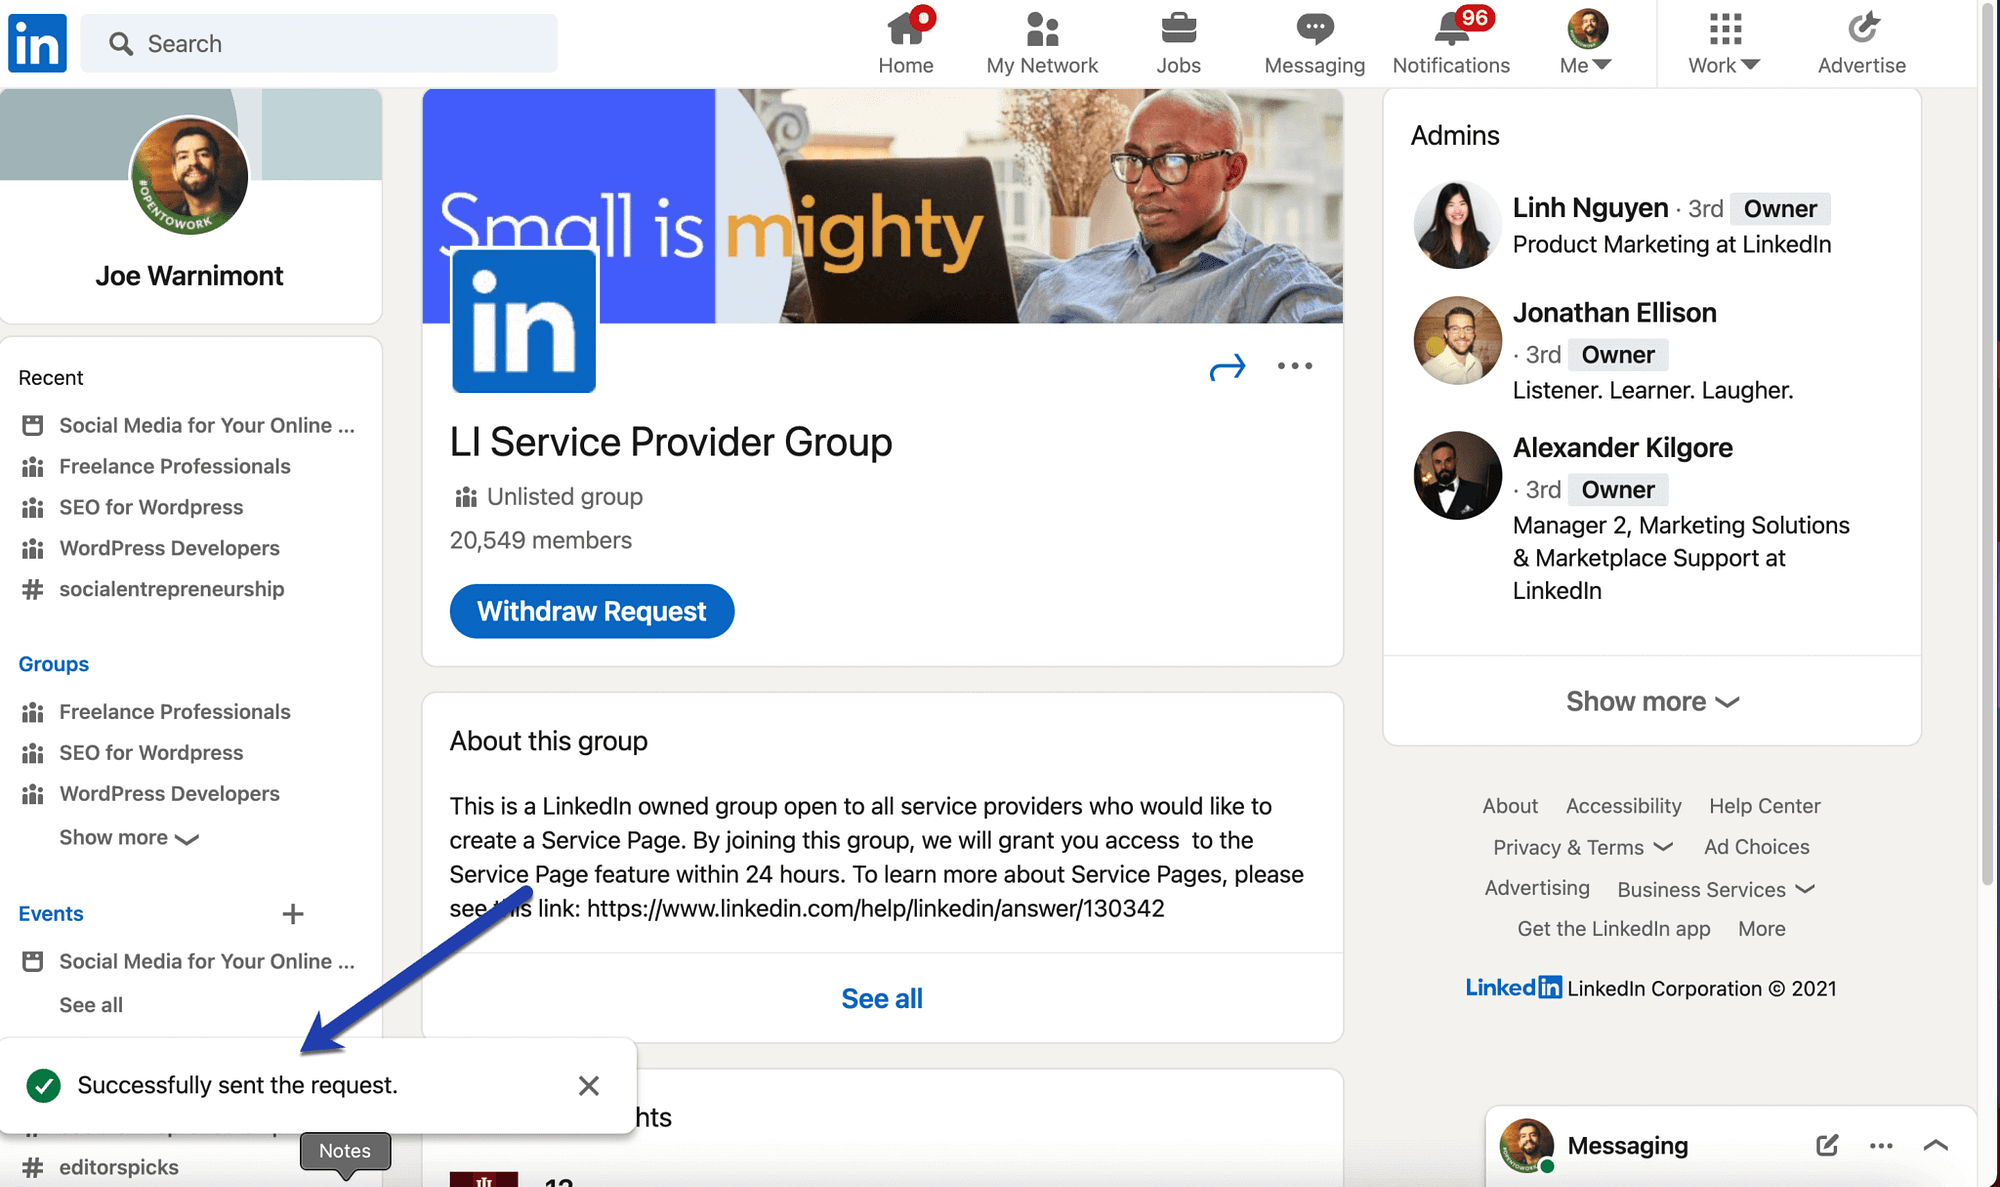
Tip: If you don’t currently see the Open To button inside your personal profile, join the LI Service Provider Group. LinkedIn states that this group is the only way to get the feature activated if it wasn’t automatically added.

2. Specify services and the details
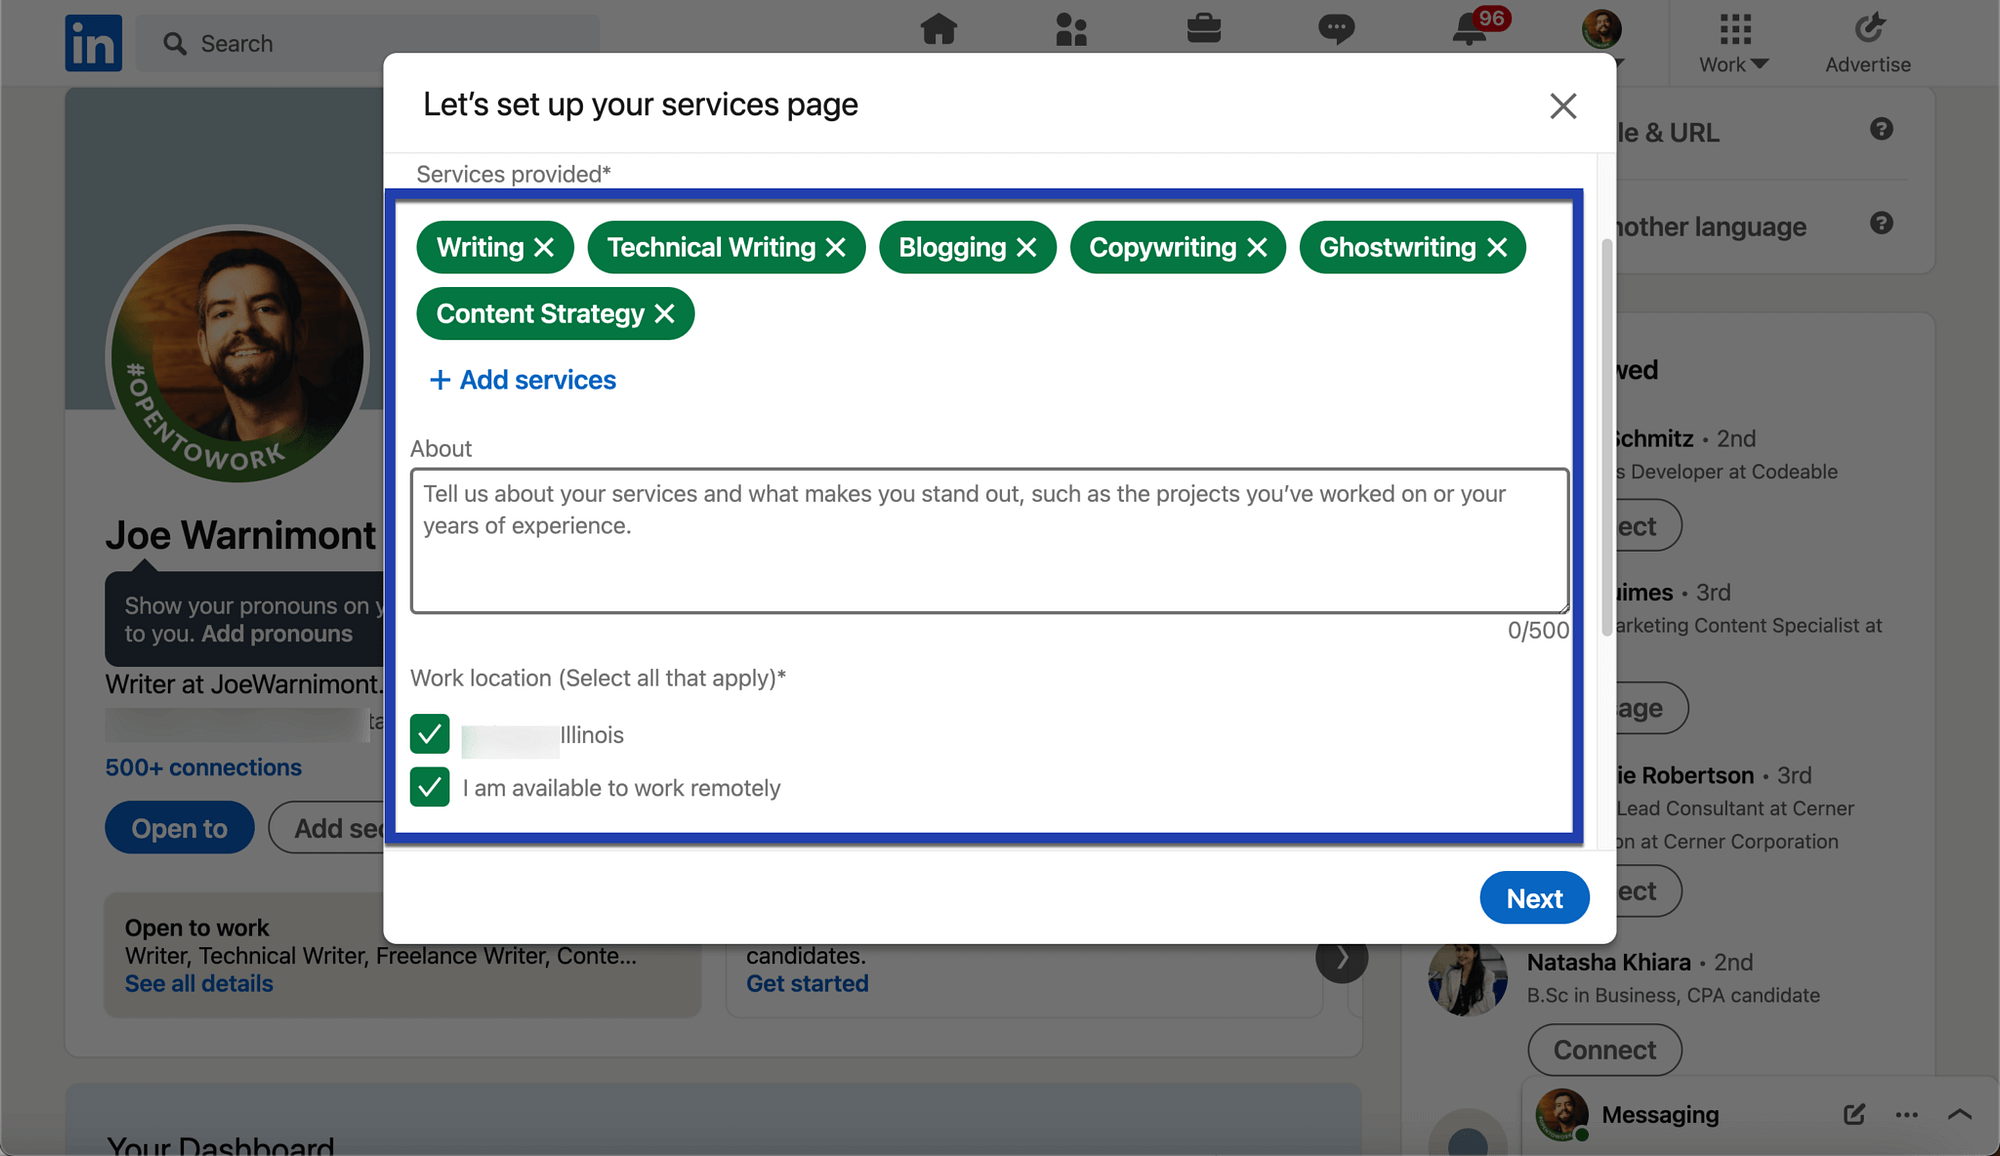
In the popup window, type in your list of services and choose from the recommended and related services that people are more likely to search for on LinkedIn. These are all accessible under the Add Services link.
Next, fill in the About field with the specifics about your company and services. You can talk about your location, the number of years you’ve offered these services, and even clients you’ve helped in the past.
Towards the bottom of the popup window, mark your desired work location. For instance, you can tell people that you’re only available in a certain city or region, or you may say that you’re willing to work remotely.
There’s also the option to choose both.

3. Allow messages and full visibility
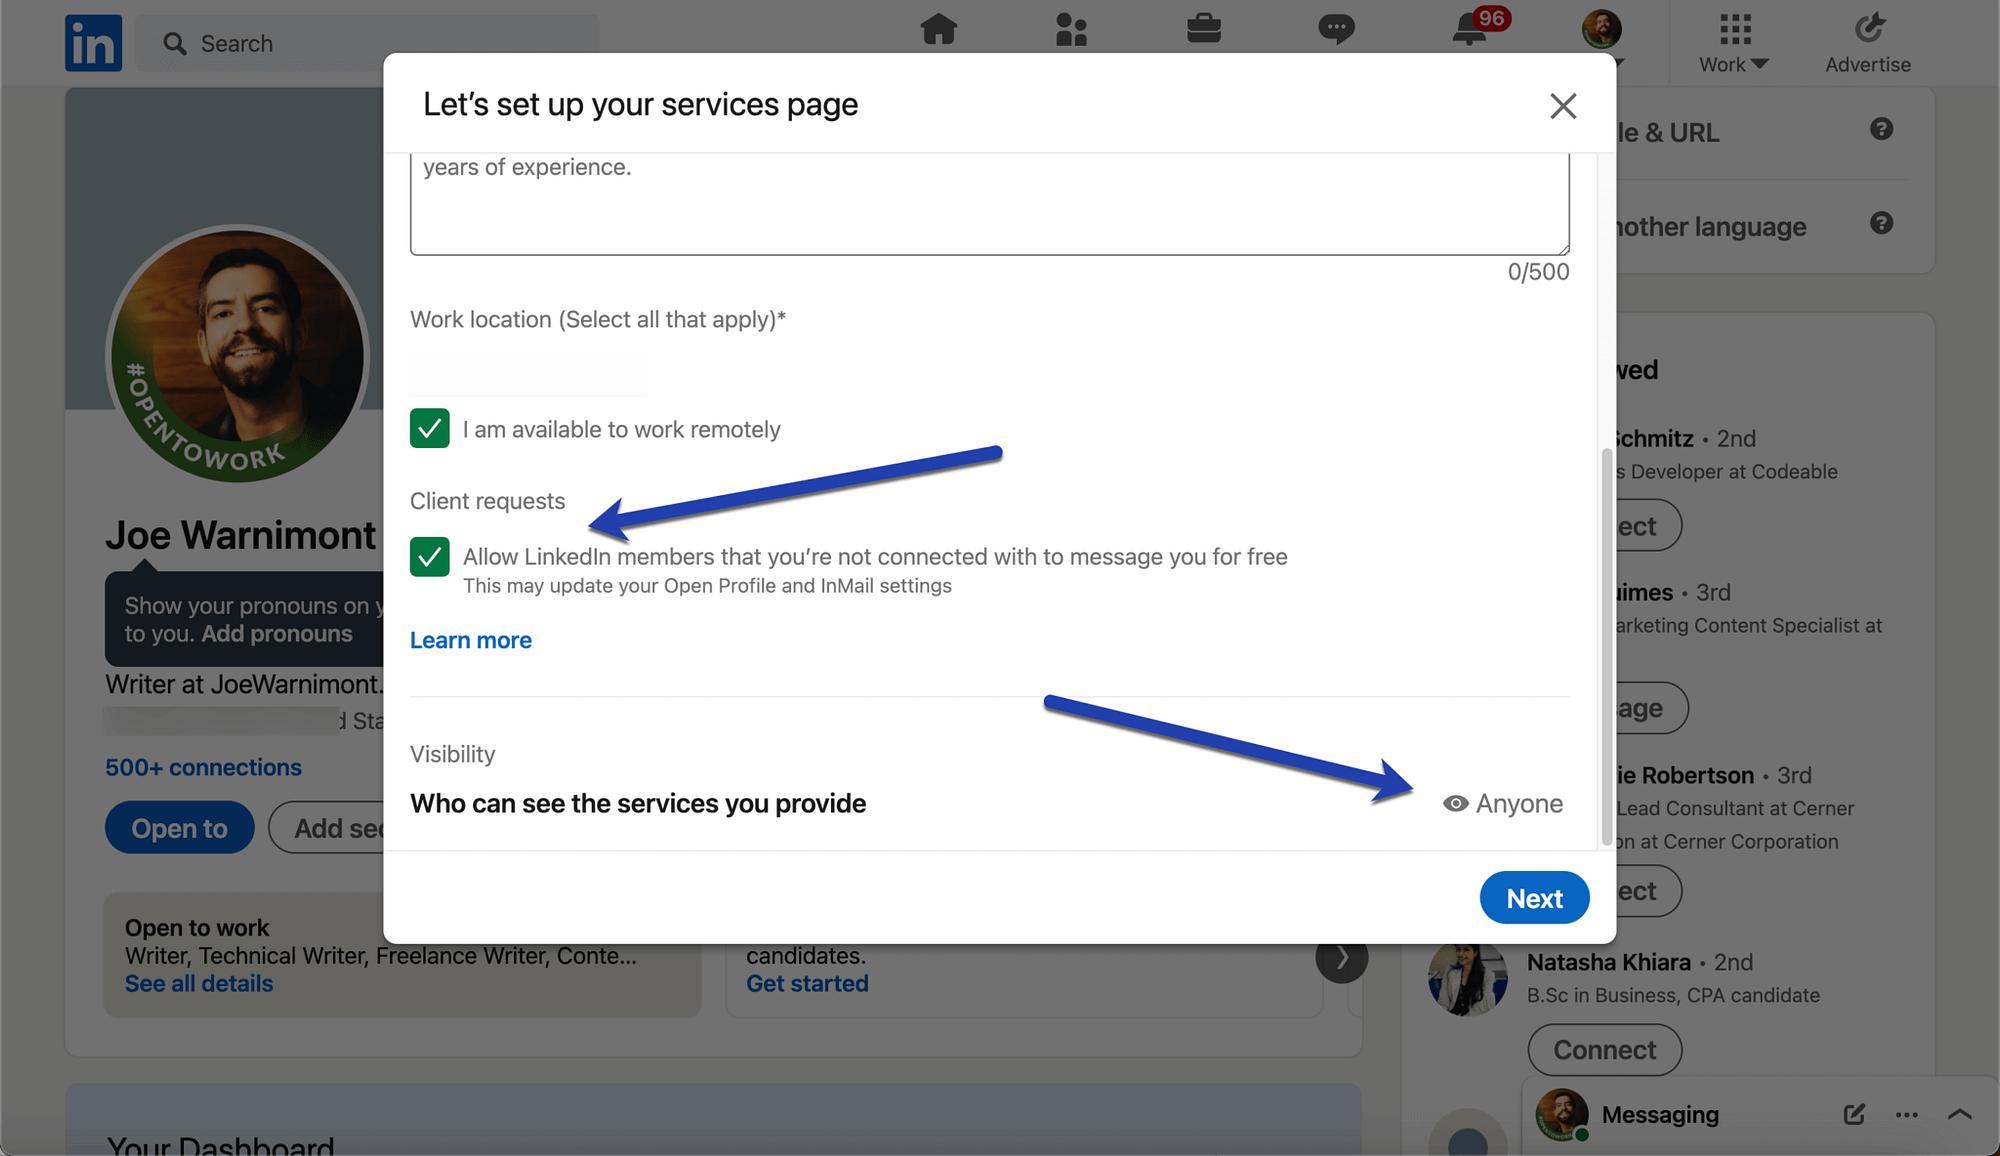
The final part of setting up a Services page is to mark who can see the Services page and reach out to you for hire.
Be sure to check the box that allows LinkedIn members to message you (even if you’re not connected).
You can also set the Visibility section to Anyone for the most exposure.

Any questions about LinkedIn Product Pages?
As time goes on, we expect to see improved support for more industries to use the LinkedIn Product pages. But for now, we encourage all B2B software companies to implement the feature for a wonderful lead opportunity. It’s also not a bad idea for service-based businesses to look into the Services pages.
Do you have any questions about LinkedIn Product Pages? Ask away in the comments section!
The post How to Create LinkedIn Product Pages: A Beginner’s Guide appeared first on Revive Social.
