As a business owner, you’re likely already familiar with social media marketing. However, many companies only focus on traditional platforms such as Facebook and Twitter. Yet there are numerous other sites out there that offer just as much potential value – such as Pinterest for business.
A platform known for its ‘mood boards’, Pinterest may seem a little off the beaten track as a business tool. However, it has a large following and offers you the chance to create visually-focused ads. This can make it the perfect place to promote your products.
In this post, we’ll discuss the benefits of using Pinterest as a tool to communicate with customers and improve your visibility. We’ll then walk you through how to set up a Pinterest business account and create your first ad. Let’s get started!
An introduction to Pinterest (and how it works)
Although well-known social media sites such as Instagram, Twitter, and Facebook all serve their purpose, it’s important to keep your marketing strategy varied. Failing to acknowledge alternate options could mean that you miss out on some potentially exciting opportunities.
Consider Pinterest, for example. Pinterest is an online sharing platform where users can find inspiration and ideas for their interests and hobbies. Visual content is shared via the use of ‘pins’. These are central to the Pinterest experience, as they enable users to discover new content.
Each pin will usually contain an image, infographic, or video, as well as a link back to the original source. Pinterest users add these to their own personal boards, as a source of inspiration for whatever projects they’re working on. This use of pins and boards means that Pinterest is an incredibly visual platform. As such, it has numerous uses, particularly from a business perspective.
Why Pinterest is a valuable marketing tool
Although it isn’t as ubiquitous as certain other social platforms, Pinterest actually has a huge audience of engaged ‘pinners’. The platform boasts around 200 million monthly users – and tapping into this market could mean great things for your website.
The pins that users upload will always include a link back to their original source. This means that any time your content is ‘pinned’ by users, it can instantly be traced back to your site. If a pin containing your content gains popularity, it can lead an entirely new audience to your content and products.
As with any social platform, Pinterest users also have their own unique usage patterns. Studies have shown that Pinterest drives 3.8 times more sales than other social media sites – with 70% of users discovering new products on Pinterest. 93% of users even visit Pinterest specifically to plan purchases.
In other words, many users log in to Pinterest with the intention of buying something – which means that your audience on the platform is already engaged and ready to convert. Plus, 40% of those who frequently visit Pinterest have a household income of $100K or more – that’s a huge audience with a lot of spending power.
Last but certainly not least, Pinterest can also make it easier to understand your customers. Users create pins based on their current interests and display them publicly on their personal boards. So with this platform, you can easily find out what topics and products get your chosen audience talking.
How to get started with marketing on Pinterest (in 4 steps)
With all of the above in mind, it’s time to get practical. Let’s begin by exploring the most crucial step required to use Pinterest for business effectively.
1. Set up a business account
In order to use Pinterest as a marketing tool, you’ll first want to set up a business account. That’s because a standard personal account won’t give you access to certain key features, including:
- Analytics
- Rich pins
- Promoted posts
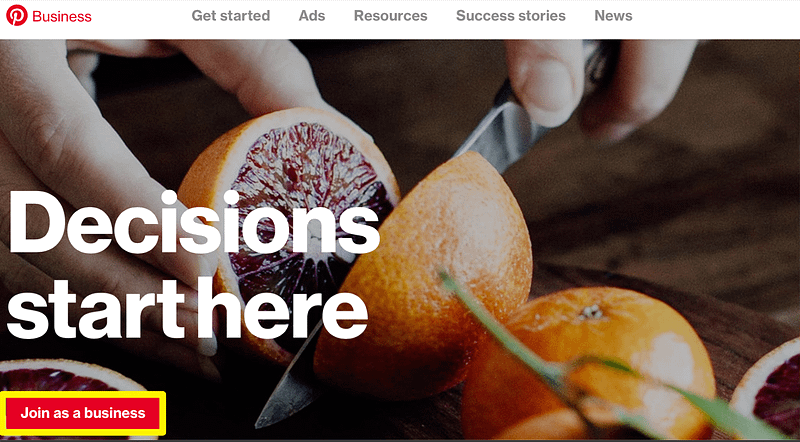
Fortunately, it’s relatively simple to get started. After logging out of your personal account (if you have one), visit the Pinterest for Business page. Then, select Join as a Business to continue:

After that, you can begin the registration process – entering the name, location, and industry of your business. You’ll also be asked to enter your website’s URL, and to connect any existing social media accounts.
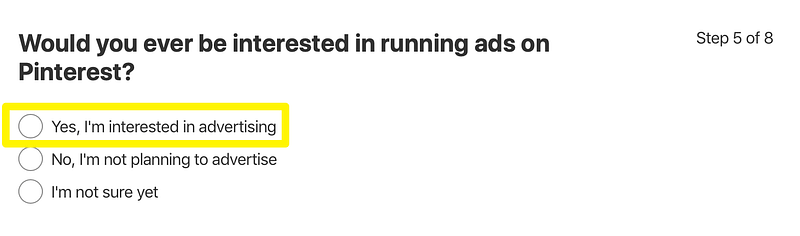
Next, you’ll be asked whether you’re interested in running ads on Pinterest. Make sure that you select Yes, I’m interested in advertising, or the next steps will be a little more tricky:

The final stage of the registration process is to choose the category that best suits your business. There are numerous options, so take time to look through them all and select the ones that are most closely related to your industry. You’ll also have the opportunity to create some starting pins from the existing content on your website.
2. Optimize your business profile
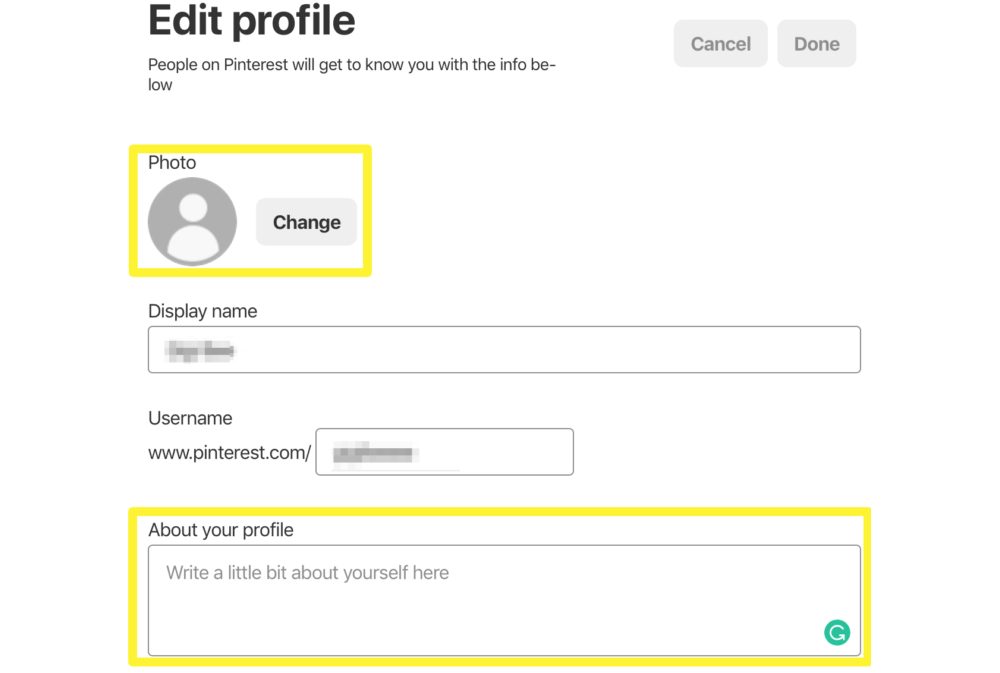
Once you’ve created a new business account, you’ll need to optimize your profile in order to generate the best results. This process will ensure that your business is discoverable on Pinterest, and will help it appear more legitimate.
You can begin by navigating to the Settings section of your business profile. Here, you’ll be able to enter all of your business’ details, and create an interesting bio. You’re only allotted 160 characters for your Pinterest bio, so you’ll want to make each letter count. It’s smart to try and add relevant keywords to your bio as well, since this will improve the visibility of your profile:

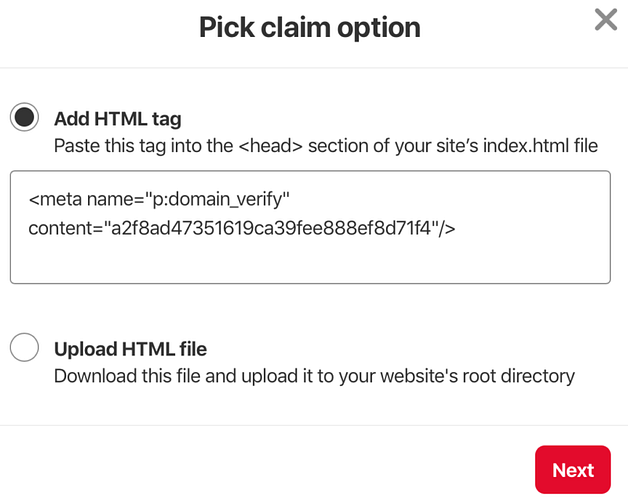
The settings page will also enable you to claim your company’s website. This is essential, as it will mean any pins that are created from your content (by you or by other users) will automatically be attributed to your business. Pinterest will also use information from your website to generate more targeted pin recommendations.
After clicking on the Claim button next to your site’s URL, you’ll be asked to pick a claim option. Select Add HTML tag, then copy and paste the resulting code into the <head> section of your site:

Pinterest will then submit your claim for review – a process that usually takes around 24 hours.
3. Put together your first pins and boards
Now that the technical tasks are out of the way, it’s time to get to work. As we discussed earlier, pins and boards are a huge part of the Pinterest experience. In fact, there are over 50 billion Pinterest pins on the website.
Let’s begin by exploring boards. This is where you’ll display the pins that are connected to your website. From your Pinterest profile, click the Boards tab, and then select the red plus sign to create a new board. You can add a descriptive name – you’ll want to keep this to a minimum of 20 characters, to ensure that it doesn’t get cut off.
You can also enter the email addresses of other people who will be working on your account. This will give them access to the board, and enable them to add or remove content. When you’re done configuring these settings, click on Create:
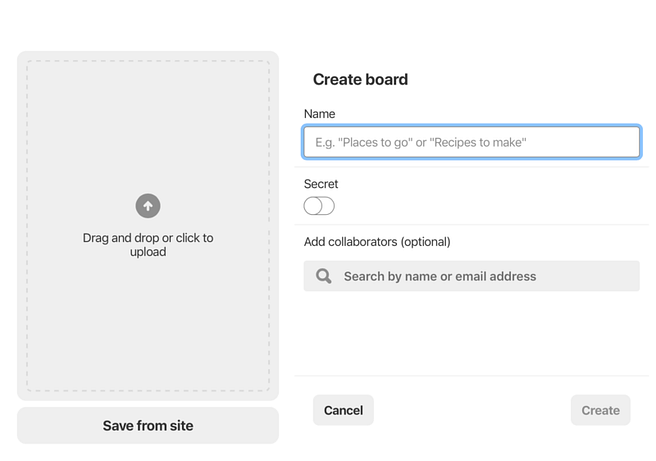

You now have a place to store your pins. Remember, you can always add more boards at a later date.
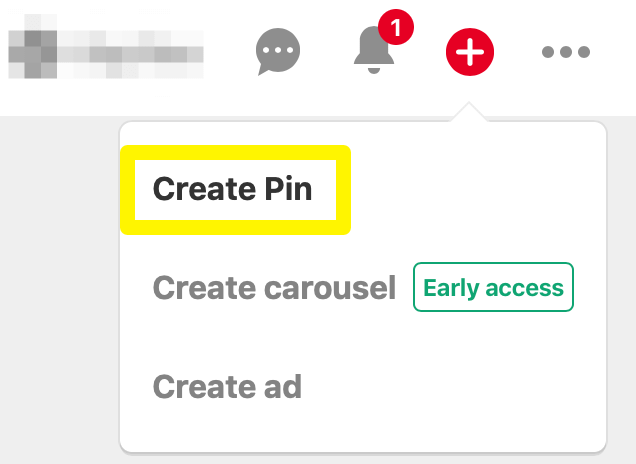
Next, you’ll create your first pin. You can do this manually, by entering a new image and any information you like. However, as a business owner, it’s much simpler to create pins from your existing website content. To do this, navigate to the Create Pin option at the top of your Pinterest home page:

On the resulting screen, you’ll see the option to Save From Site. If your website has been approved, Pinterest will then grab any ‘pinnable’ content from its pages. Select the image you’d like to pin, and enter a title and a relevant description:


For example, if you’re pinning a picture of a meal you’ve made, this is where you’d include the recipe. Don’t forget to hit Save when you’re done.
4. Select your paid Pinterest ads
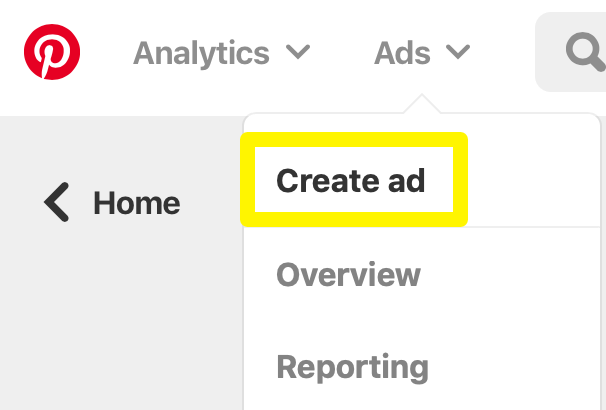
The final step is to put together your first Pinterest advertising campaign. To do this, select Create ad from the Ads menu at the top of your home page. This will open the ad campaign dashboard:

Here, you can select the objective of your advertising campaign. This can include driving traffic to your website, building brand awareness, and so on:
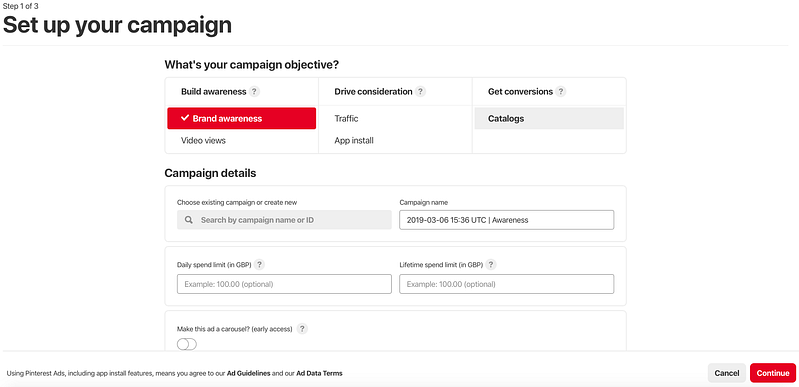

Hovering over each option will display further information about what it offers, so select the one that best suits the needs of your business. You can then add your campaign’s name, and set up your daily and lifetime spending limits.
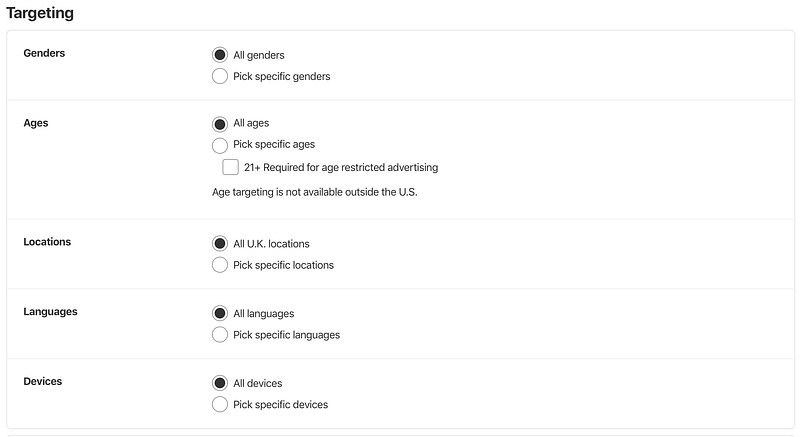
After that, you can create a new ad group. Ad groups collect your promoted pins into one location, making them easier to access. This screen is also where you’ll customize your target audience. You’ll want to enter the ages, genders, interests, and locations of your chosen market – as well as any relevant keywords you want to focus on:

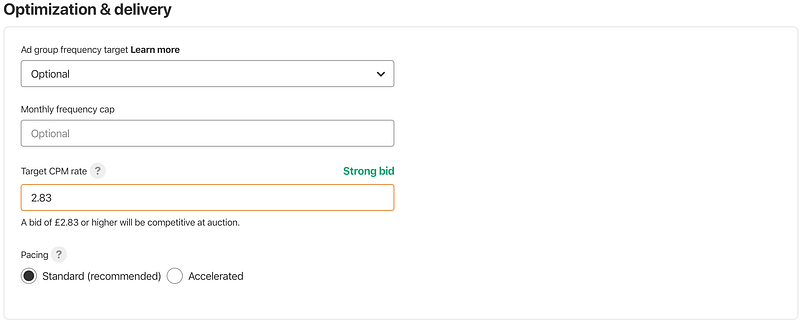
Next, you’ll need to adjust the Optimization & delivery section. This is where you’ll set a maximum bid for your Pinterest ads. A bid lets Pinterest know how much you are willing to pay for desired actions, such as clicks or impressions.
There’s also the option to set a pace for your campaign. Standard pacing aligns your bids with your overall spending and campaign duration. Accelerated pacing delivers faster results, but will drain your budget more quickly. For now, select Standard, and then hit Continue:

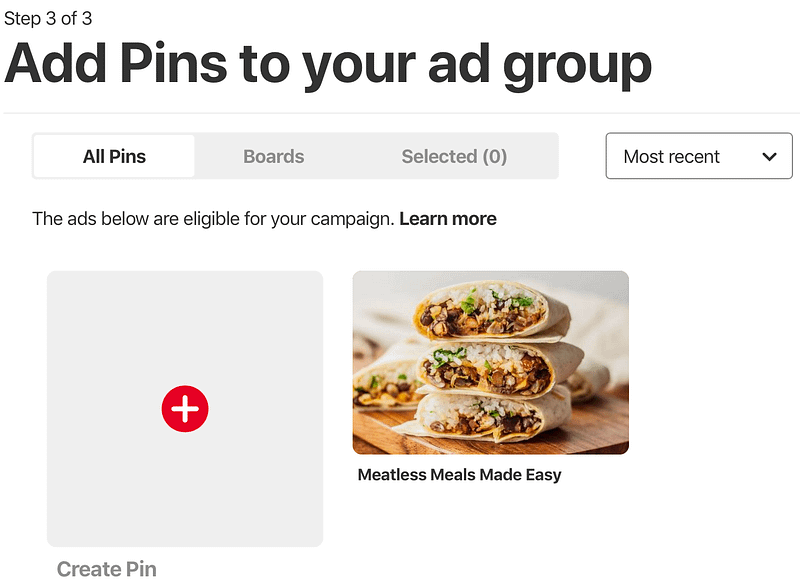
Finally, you can choose the pins you’d like to promote. You can add as many as you’d like, although you’ll generally want to try and include two to four pins per ad group. To complete the process, click on Launch:

Throughout the duration of your campaign, you can assess your efforts via the Ads section of your profile. Regularly monitoring your results will help you shape future campaigns, and better optimize content.
Bonus tip: automate Pinterest with Revive Old Post
Social media automation is usually discussed in relation to Facebook and Twitter, but it can be a powerful way to optimize your Pinterest marketing as well. You can use our very own Revive Old Post plugin to automatically share images from your WordPress archives, along with links to the articles those images come from. This will ensure that your old blog posts continue bringing in new traffic as well as helping you maintain a regular publishing schedule on Pinterest.
Conclusion
Facebook, Instagram and Twitter are powerful marketing tools, but leveraging alternative platforms may help you deliver more effective results. Pinterest is a top option for businesses that are looking to promote their websites to a large and engaged audience.
#Pinterest is an ideal choice for businesses looking to reach a large, highly engaged audience
Click To Tweet
To get started with Pinterest for business, you’ll just need to:
- Set up a business account.
- Optimize your business profile.
- Put together your first pins and boards.
- Select your paid Pinterest ads.
Do you have any further questions about using Pinterest for business? Let us know in the comments section below!
The post How to Use Pinterest for Business: A Beginner’s Guide appeared first on Revive Social.