LinkedIn is a place for professionals, where you can target ads based on industries. What’s more, LinkedIn Ads have incredible tools for obtaining leads through those connections. That’s where LinkedIn lead generation forms come into play, and we’re here to help you figure out how to use them.
By the time you’re finished reading, you’ll have all of the knowledge you need to start collecting leads from LinkedIn.
In this guide, we’ll explore:
- What’s a LinkedIn lead generation form?
- How to make a LinkedIn lead generation form through the Ad Builder
- How to download contact information from leads
What’s a LinkedIn lead generation form?
A LinkedIn lead generation form is connected to a sponsored content ad campaign. It functions as a complementary, optional form for people who see the ad to fill out.
From your perspective, lead generation forms serve as a way to obtain further information about prospective clients, eventgoers, or customers.
The greatest advantage of a LinkedIn lead generation form is that it removes the extra steps of someone clicking through your advertisement, waiting for the landing page to load, then finding the form on your landing page to type in their information.
With LinkedIn, the lead generation is all done on LinkedIn with no need to go to an external website. Not to mention, the form gets automatically filled in with the person’s LinkedIn profile data. Theoretically, this setup should improve your conversions.
How to make a LinkedIn lead generation form through the Ad Builder
Making an advertisement is required to include a LinkedIn lead generation form. Therefore, you must walk through the process of creating an ad account, group, and the advertisement content itself.
We’ll quickly walk through how to start your lead generation ad below, but you can also read our in-depth guide to LinkedIn ads here.
Step 1: Start an advertisement
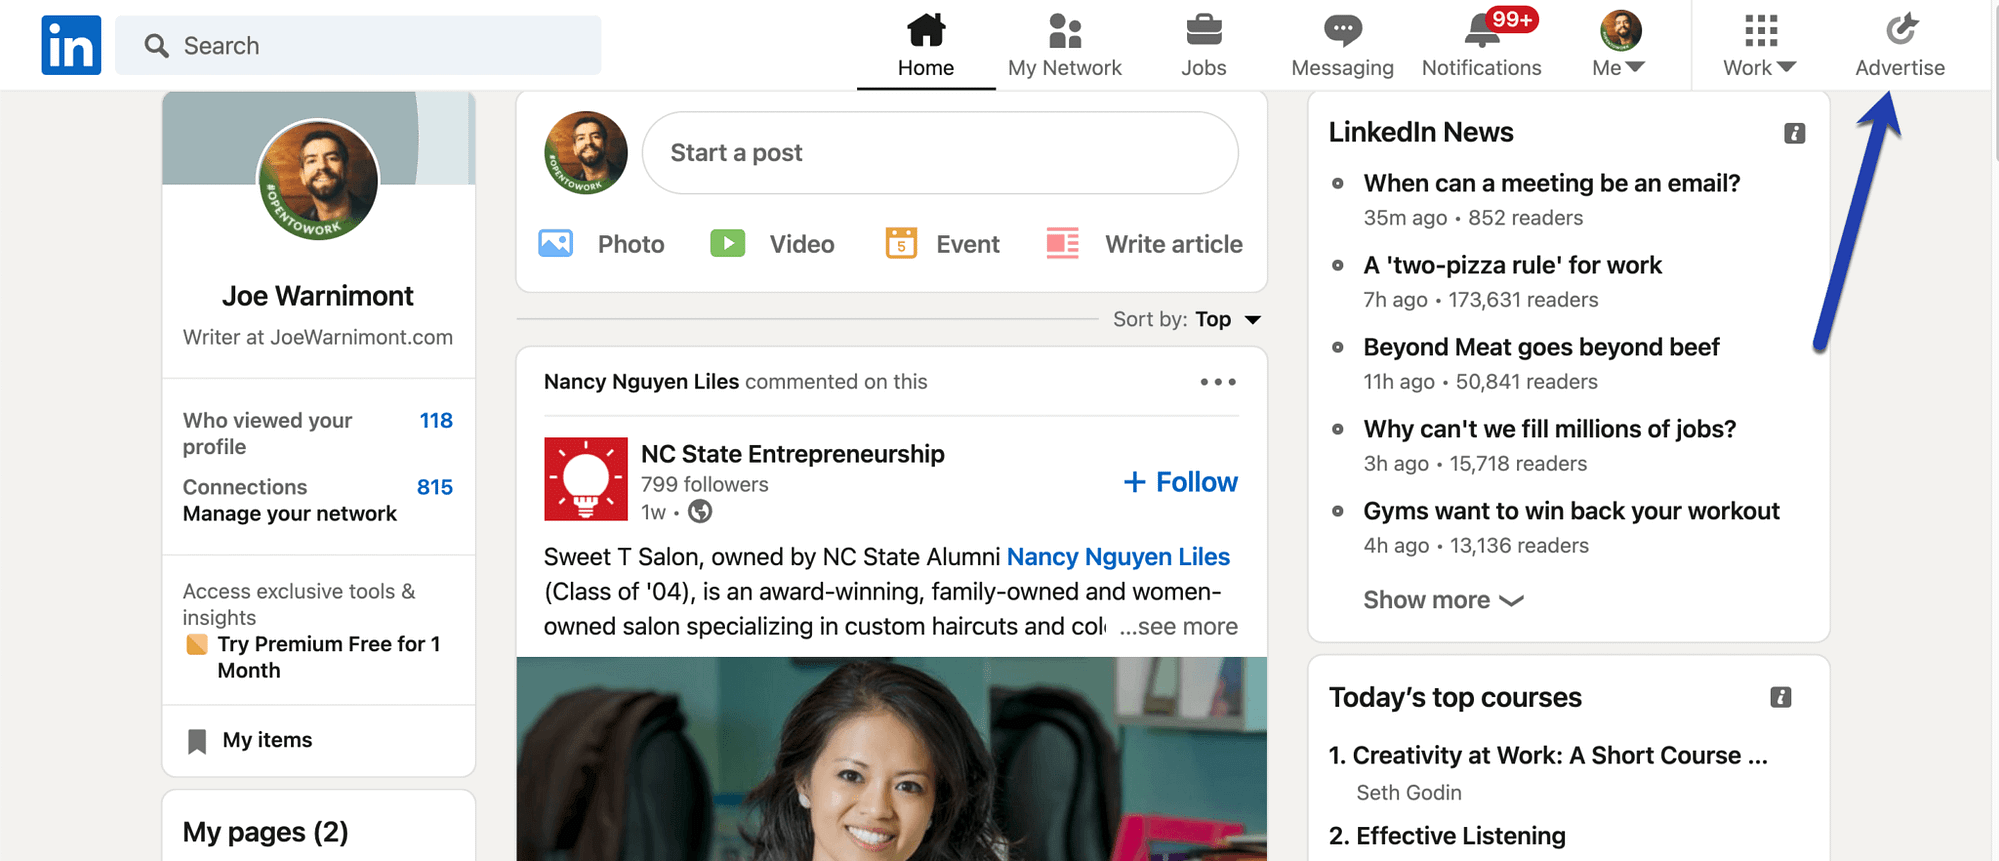
To begin, go to your LinkedIn feed and click on the Advertise button.

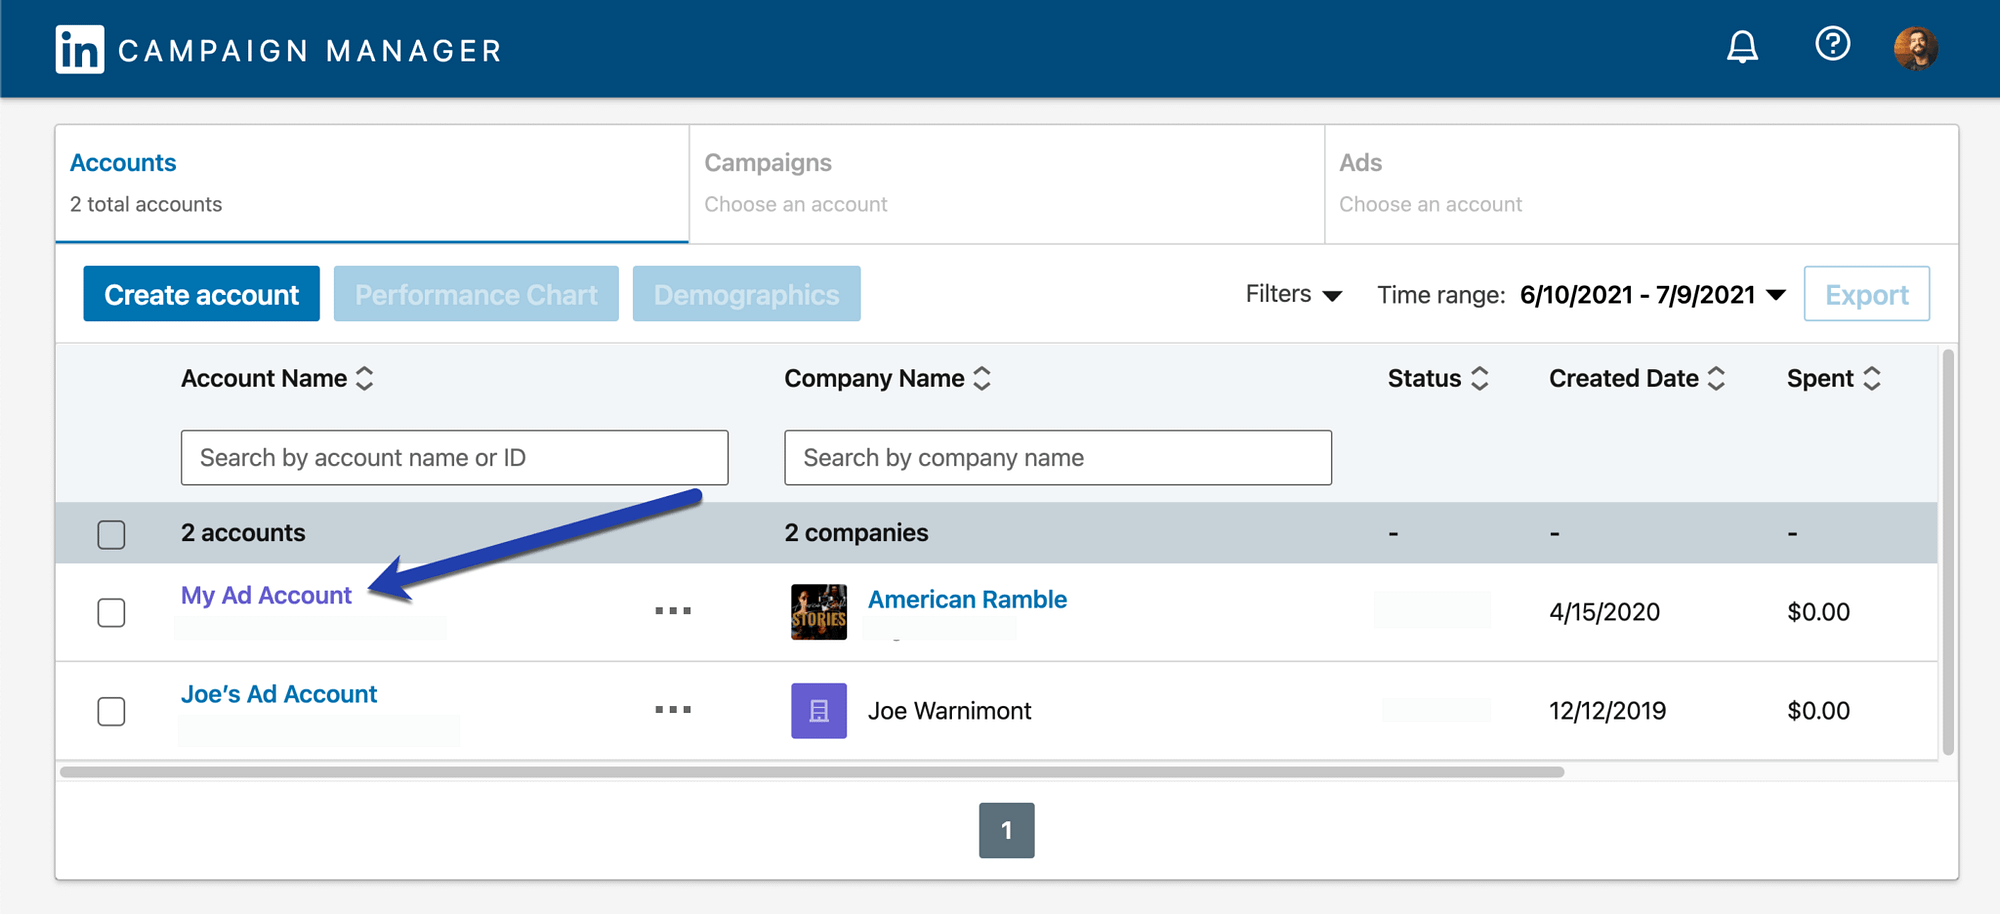
This leads you to the LinkedIn Campaign Manager, where you can either choose an existing Ad Account or click the Create Account button to make a new one.

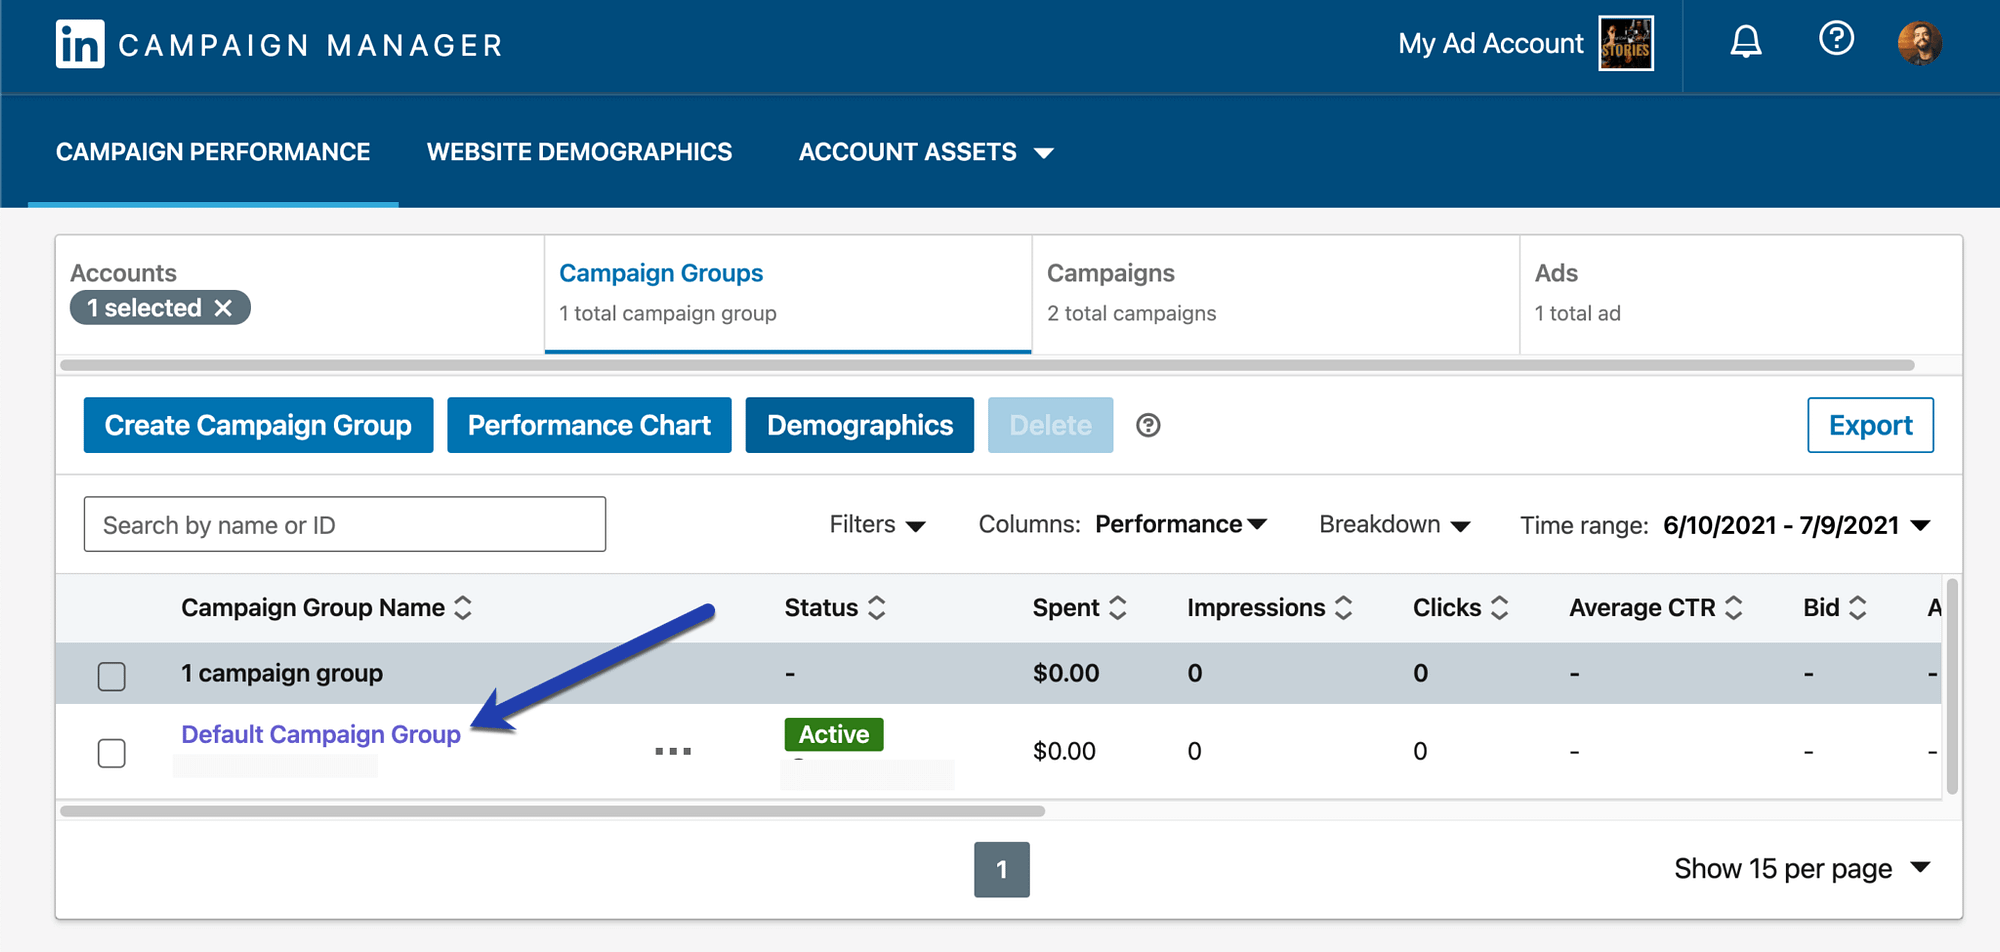
Next, create or choose a campaign group.
Campaign groups help you categorize advertisements based on what they’re used for in your organization. You don’t have to make multiple groups if you don’t need them.

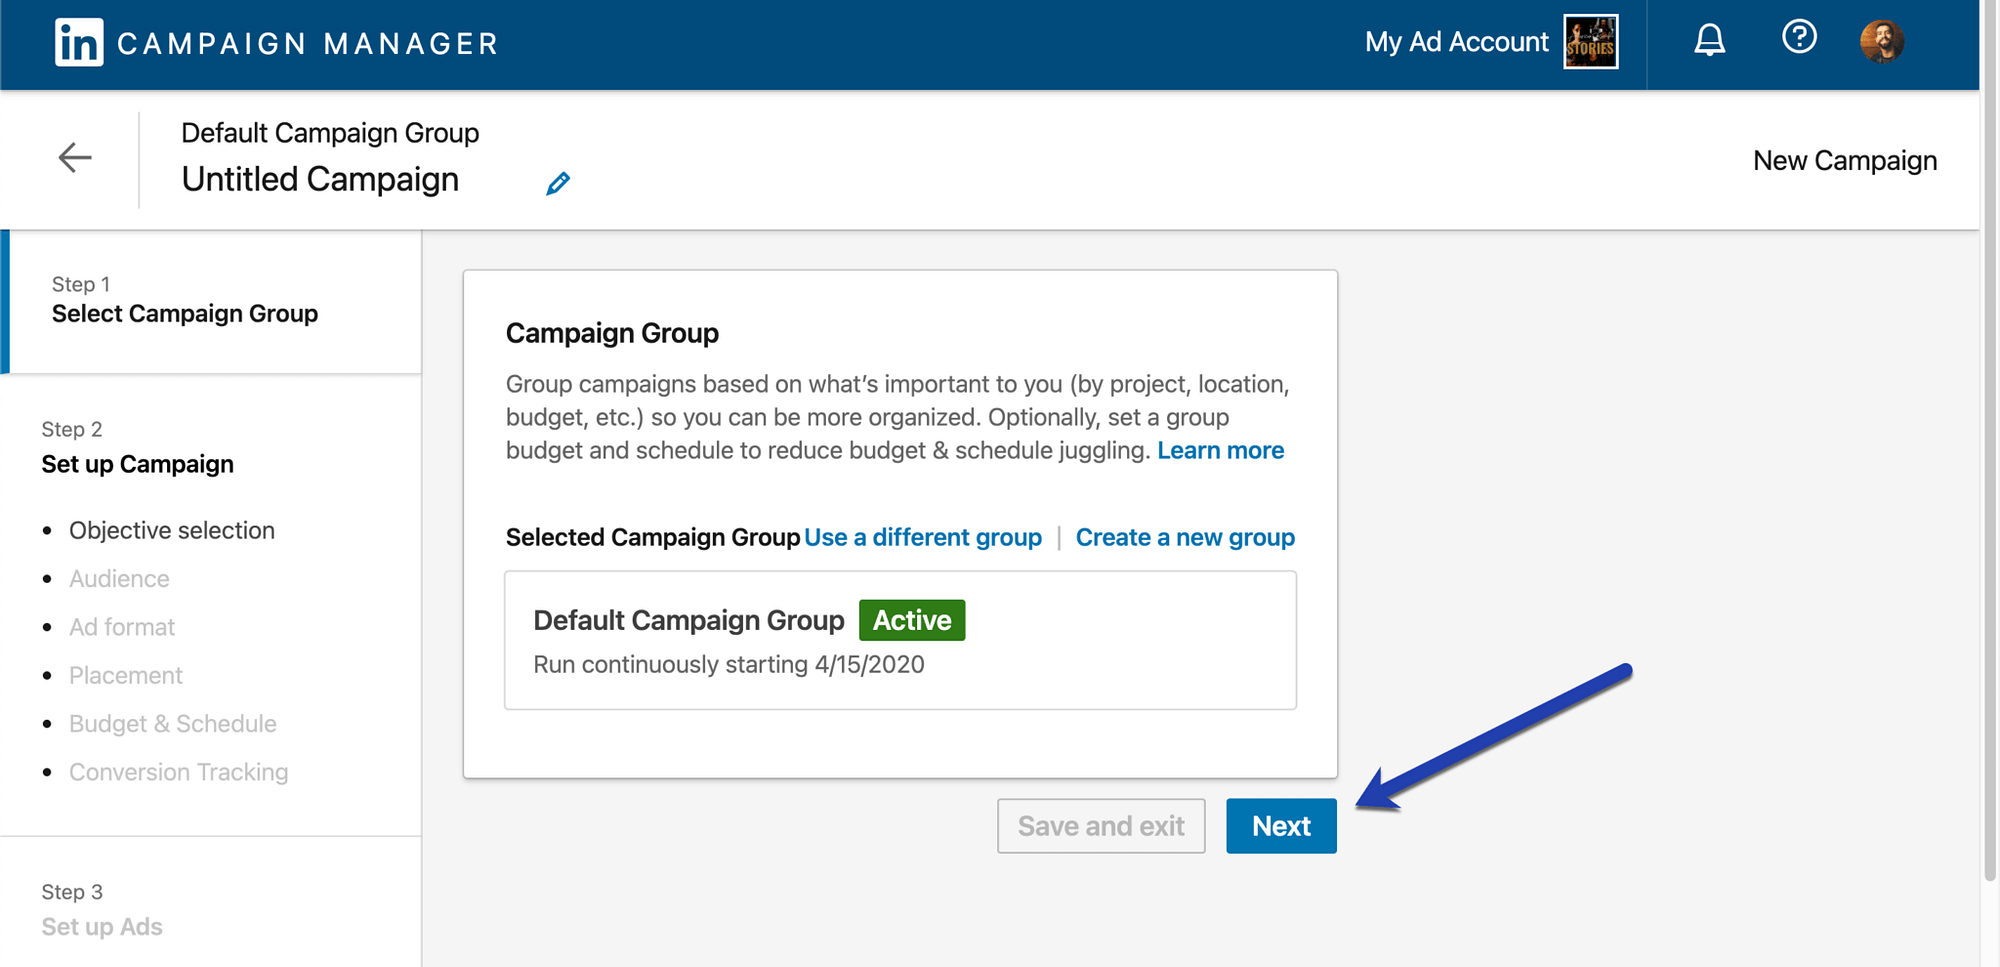
Select the Create Campaign button.

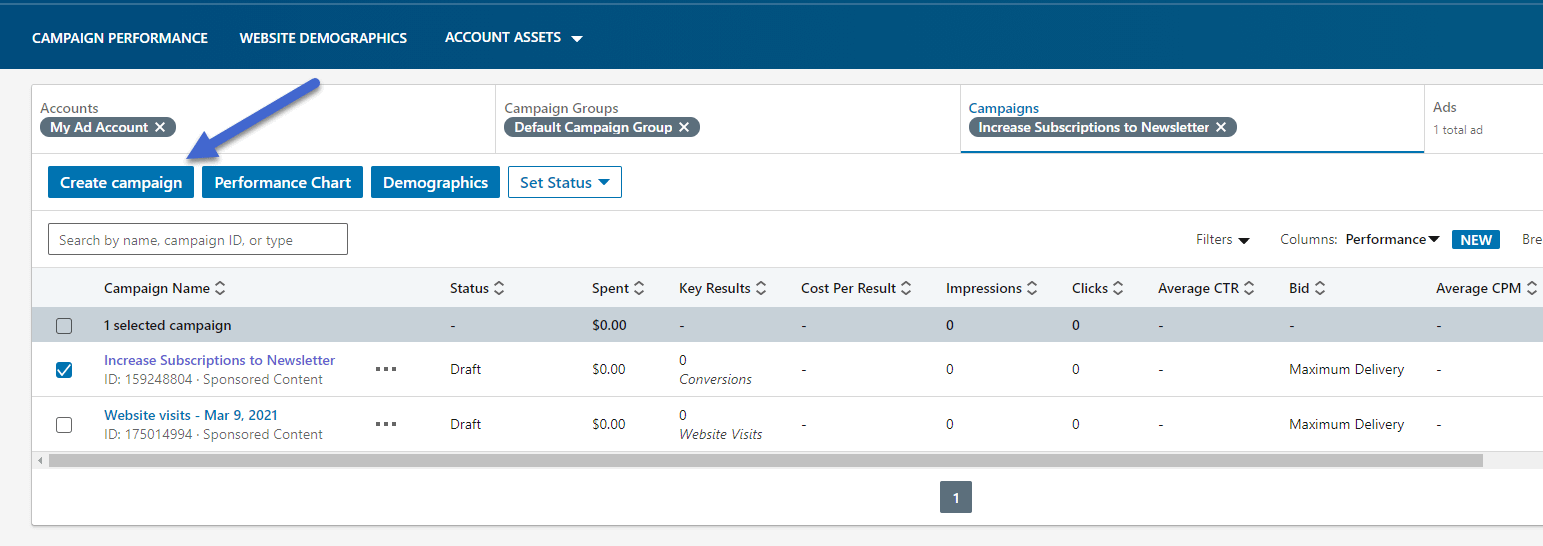
This final Campaign page confirms your campaign group and tells you if it’s active.
Click the Next button to generate your ad specifics and get to the lead generation form.

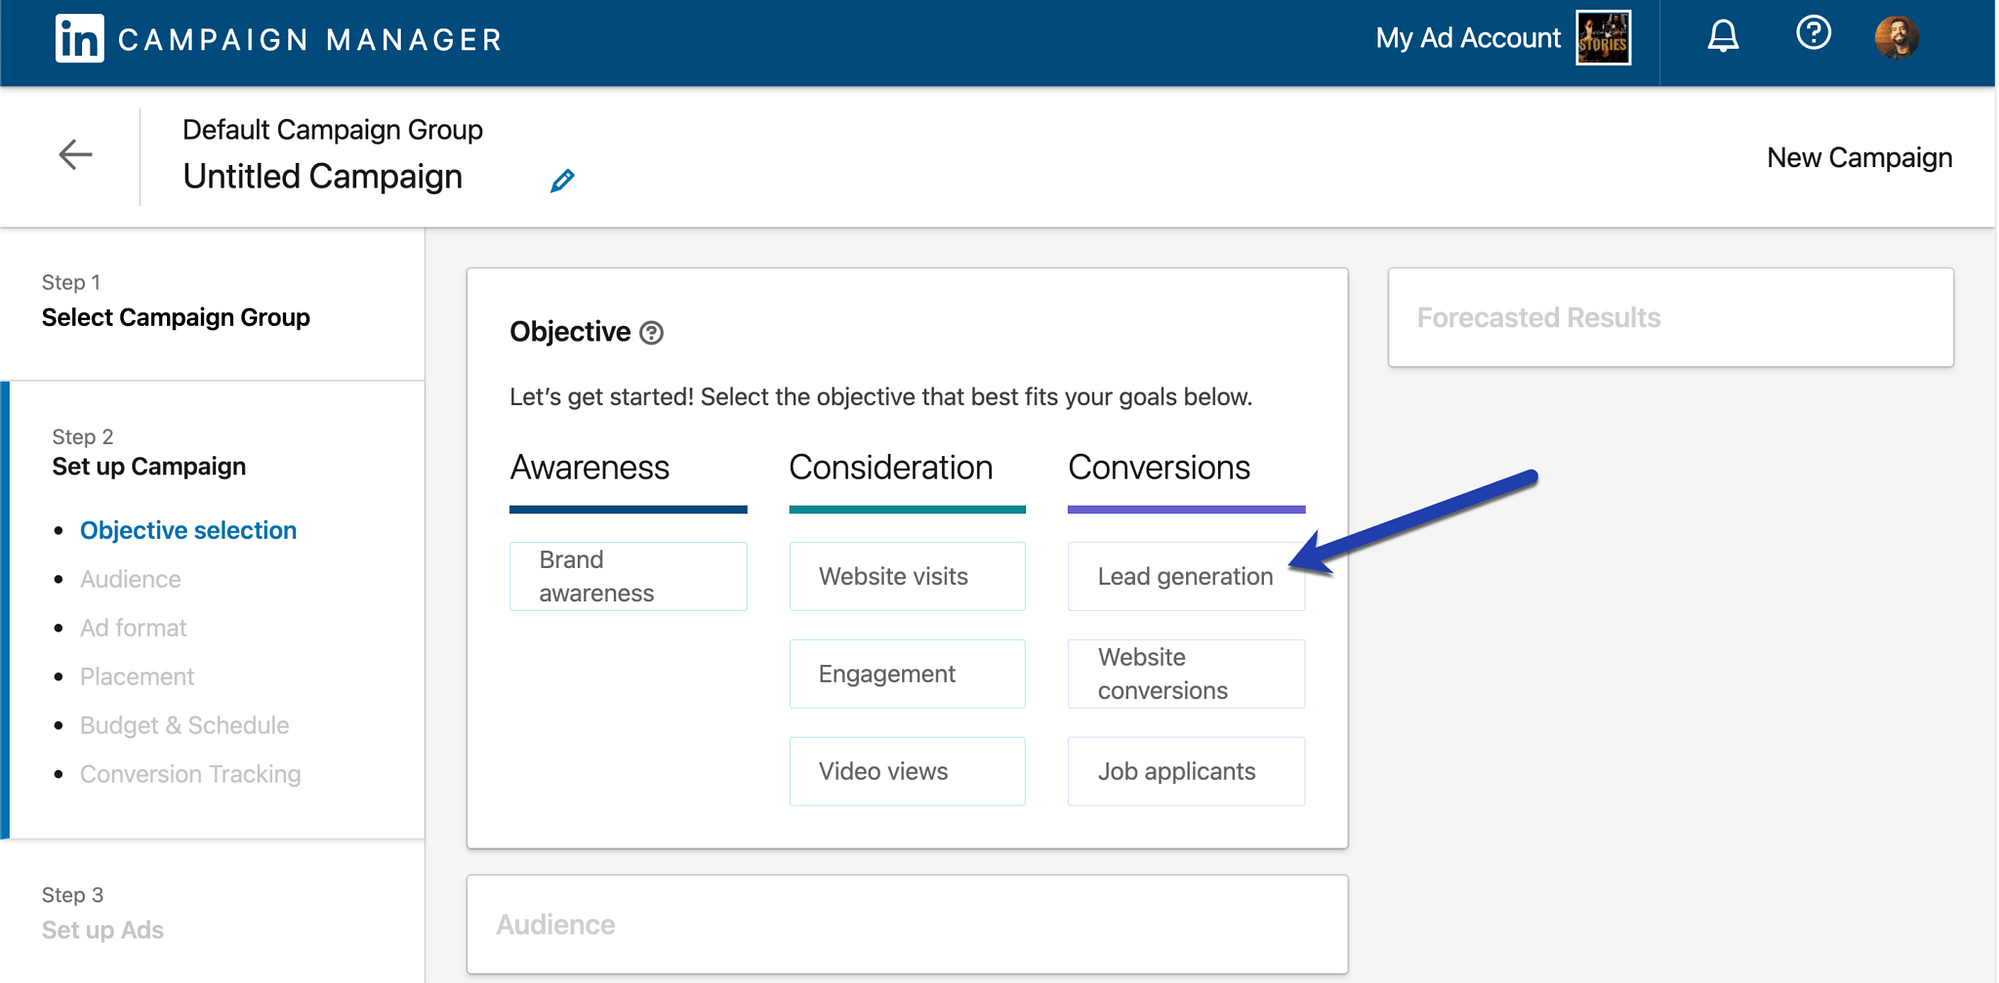
Step 2: Set the objective as “lead generation”
Under the Objective section, find the Conversions header to choose Lead Generation.
This way, you’re attaching a LinkedIn lead generation form to the new ad.

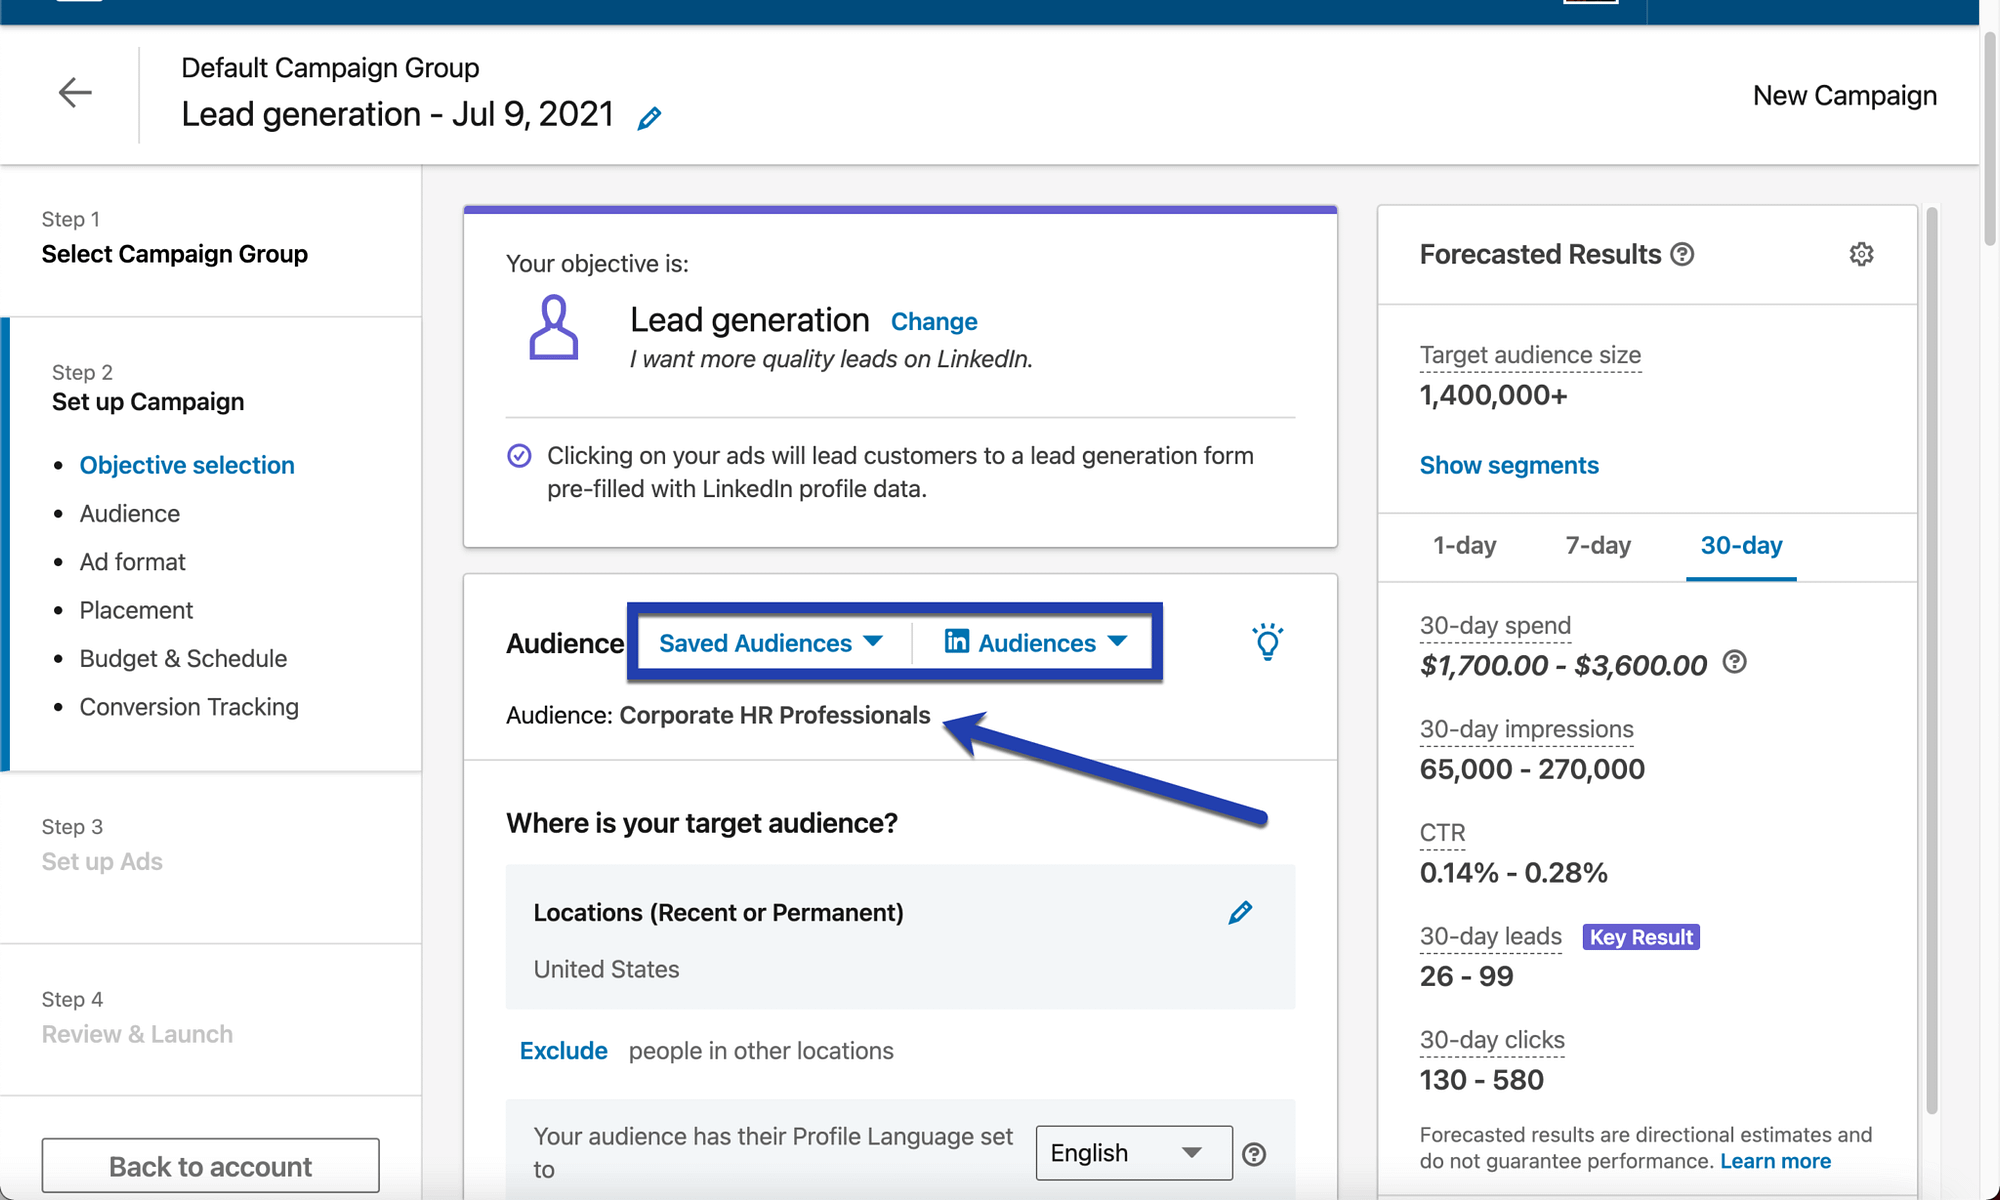
Step 3: Target an audience for the lead generation advertisement
Now it’s time to set up the ad campaign with a target audience. You can click on the Saved Audiences dropdown to view any Audiences you’ve stored in the past.
You can also select the LinkedIn Audiences dropdown or configure an audience from scratch.

For this tutorial, we’re setting up an ad for a new human resources software for small to mid-sized businesses. We’d like to obtain lead information in order to call prospective customers for a demo and give out a free month of the software.
Therefore, we’ll start by targeting professionals in the US. Then, we can go into elements like language, company size, job functions, and more.

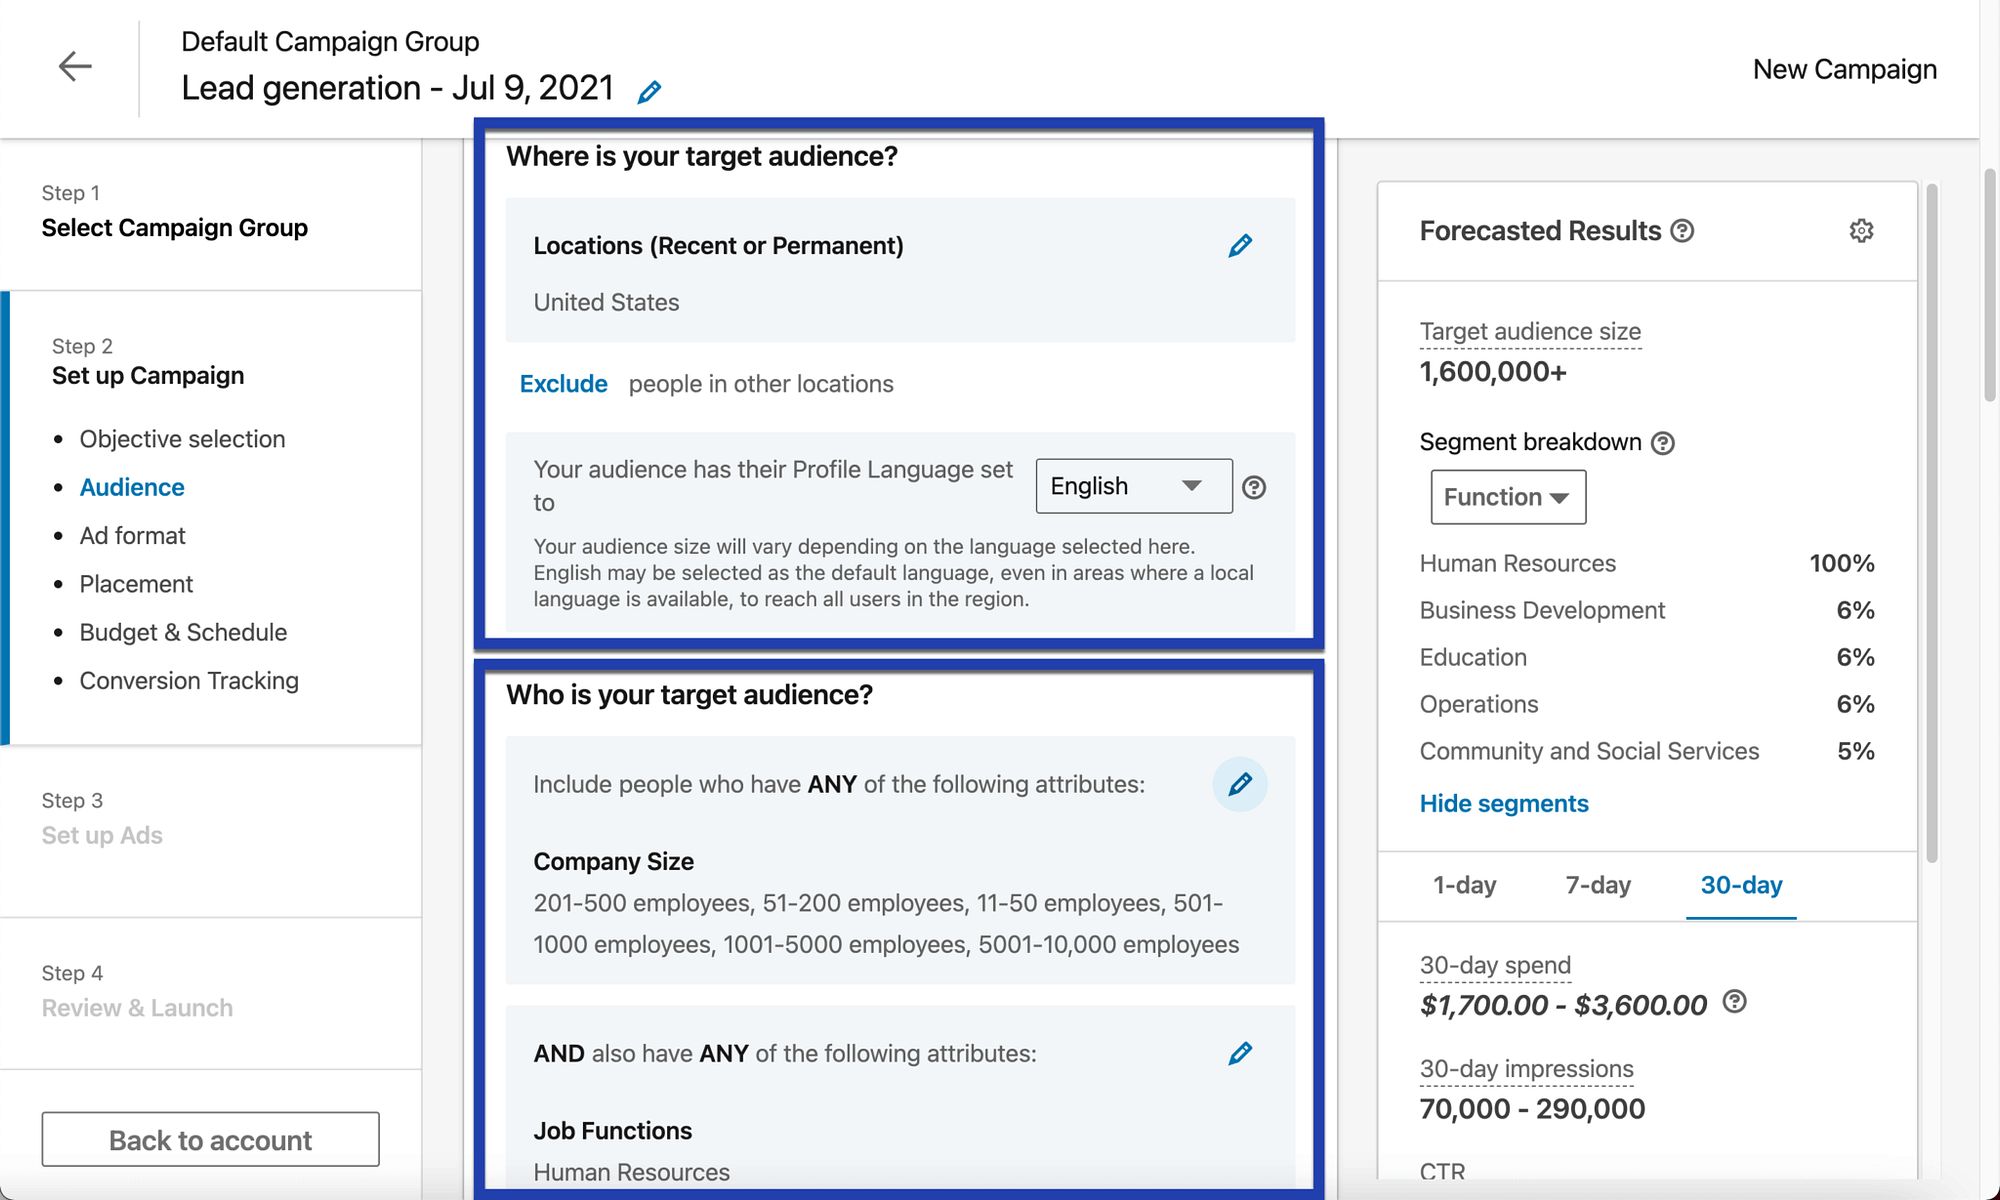
For instance, we’ll remove larger companies since the example software is mainly for small to mid-sized businesses.

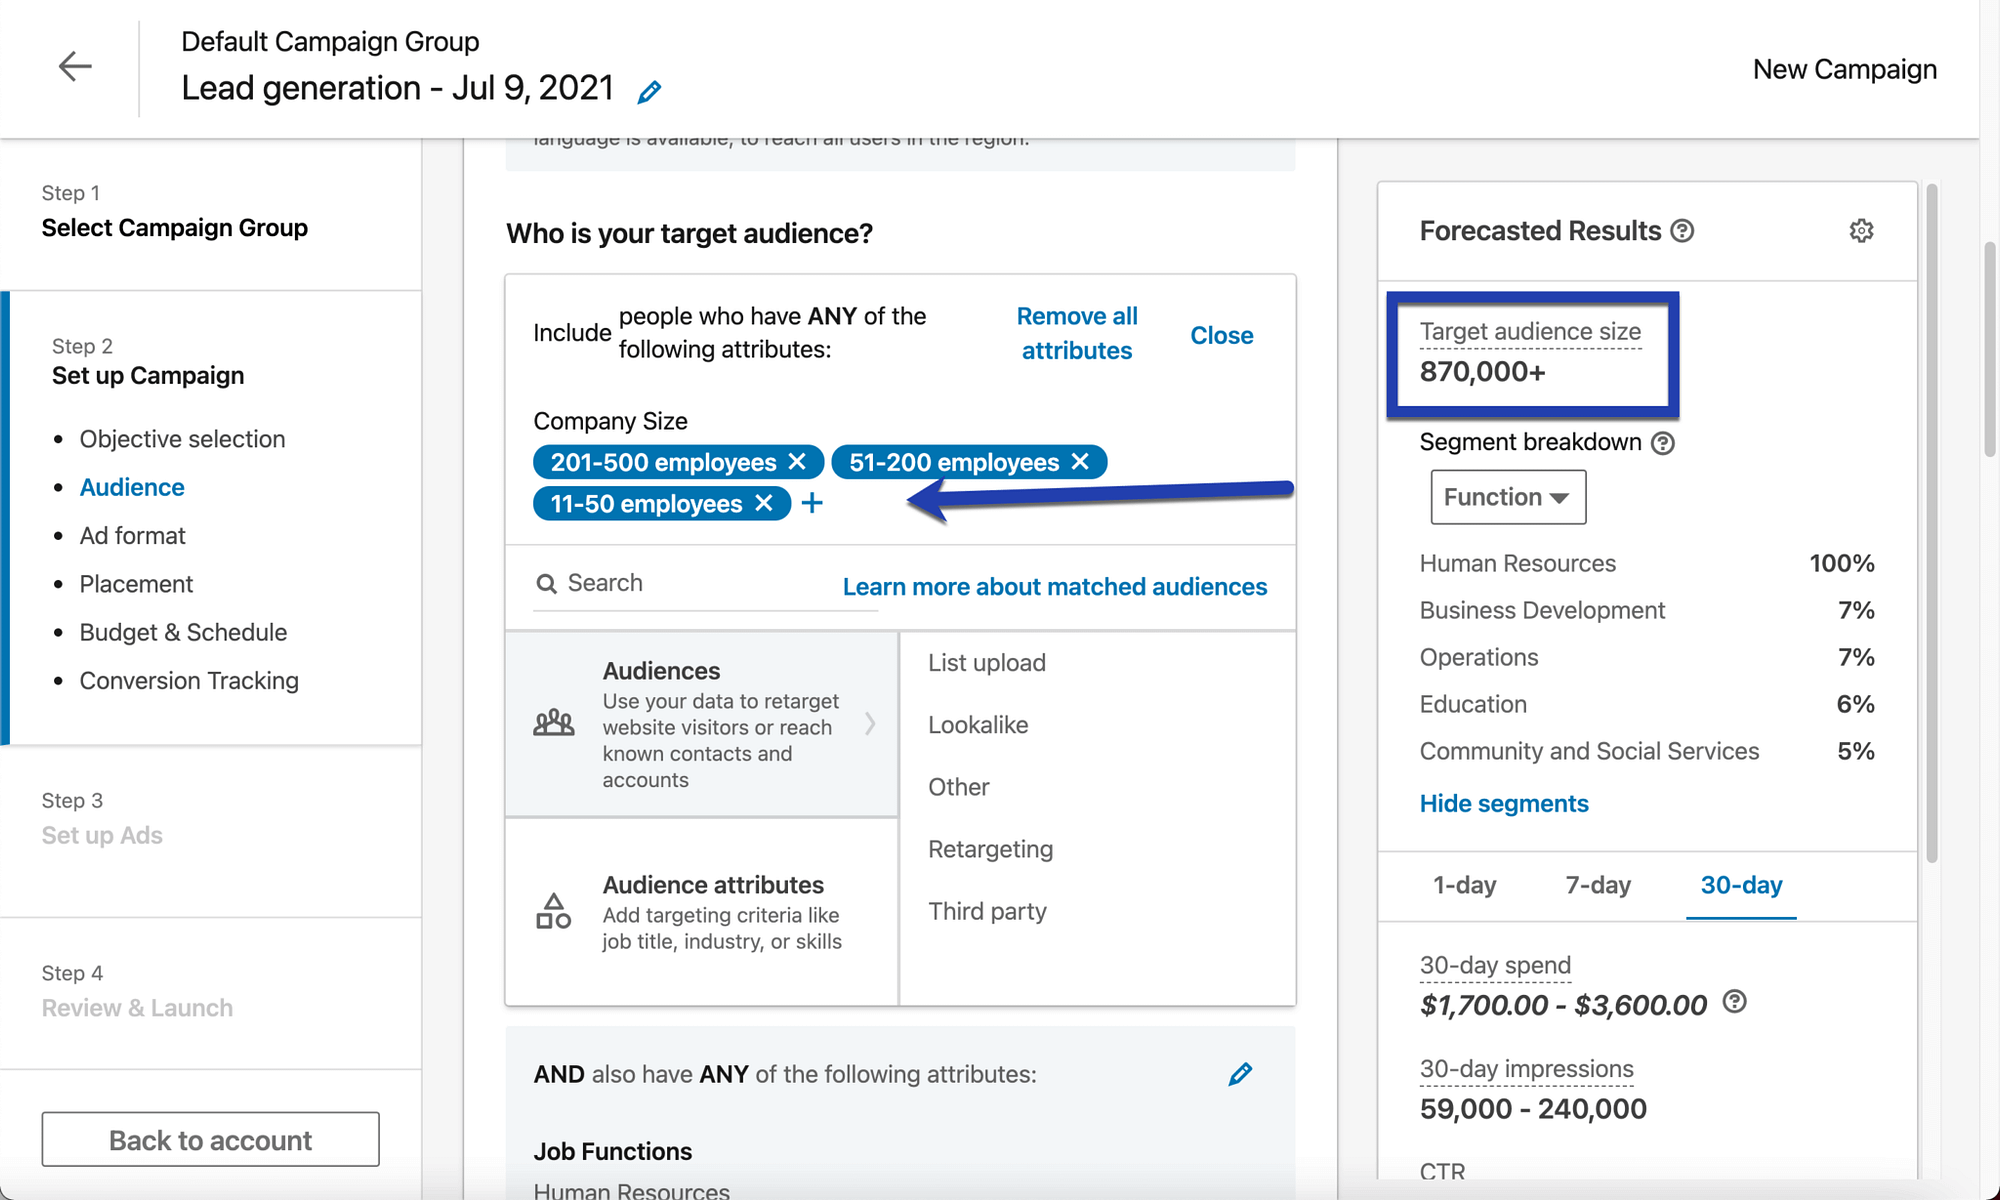
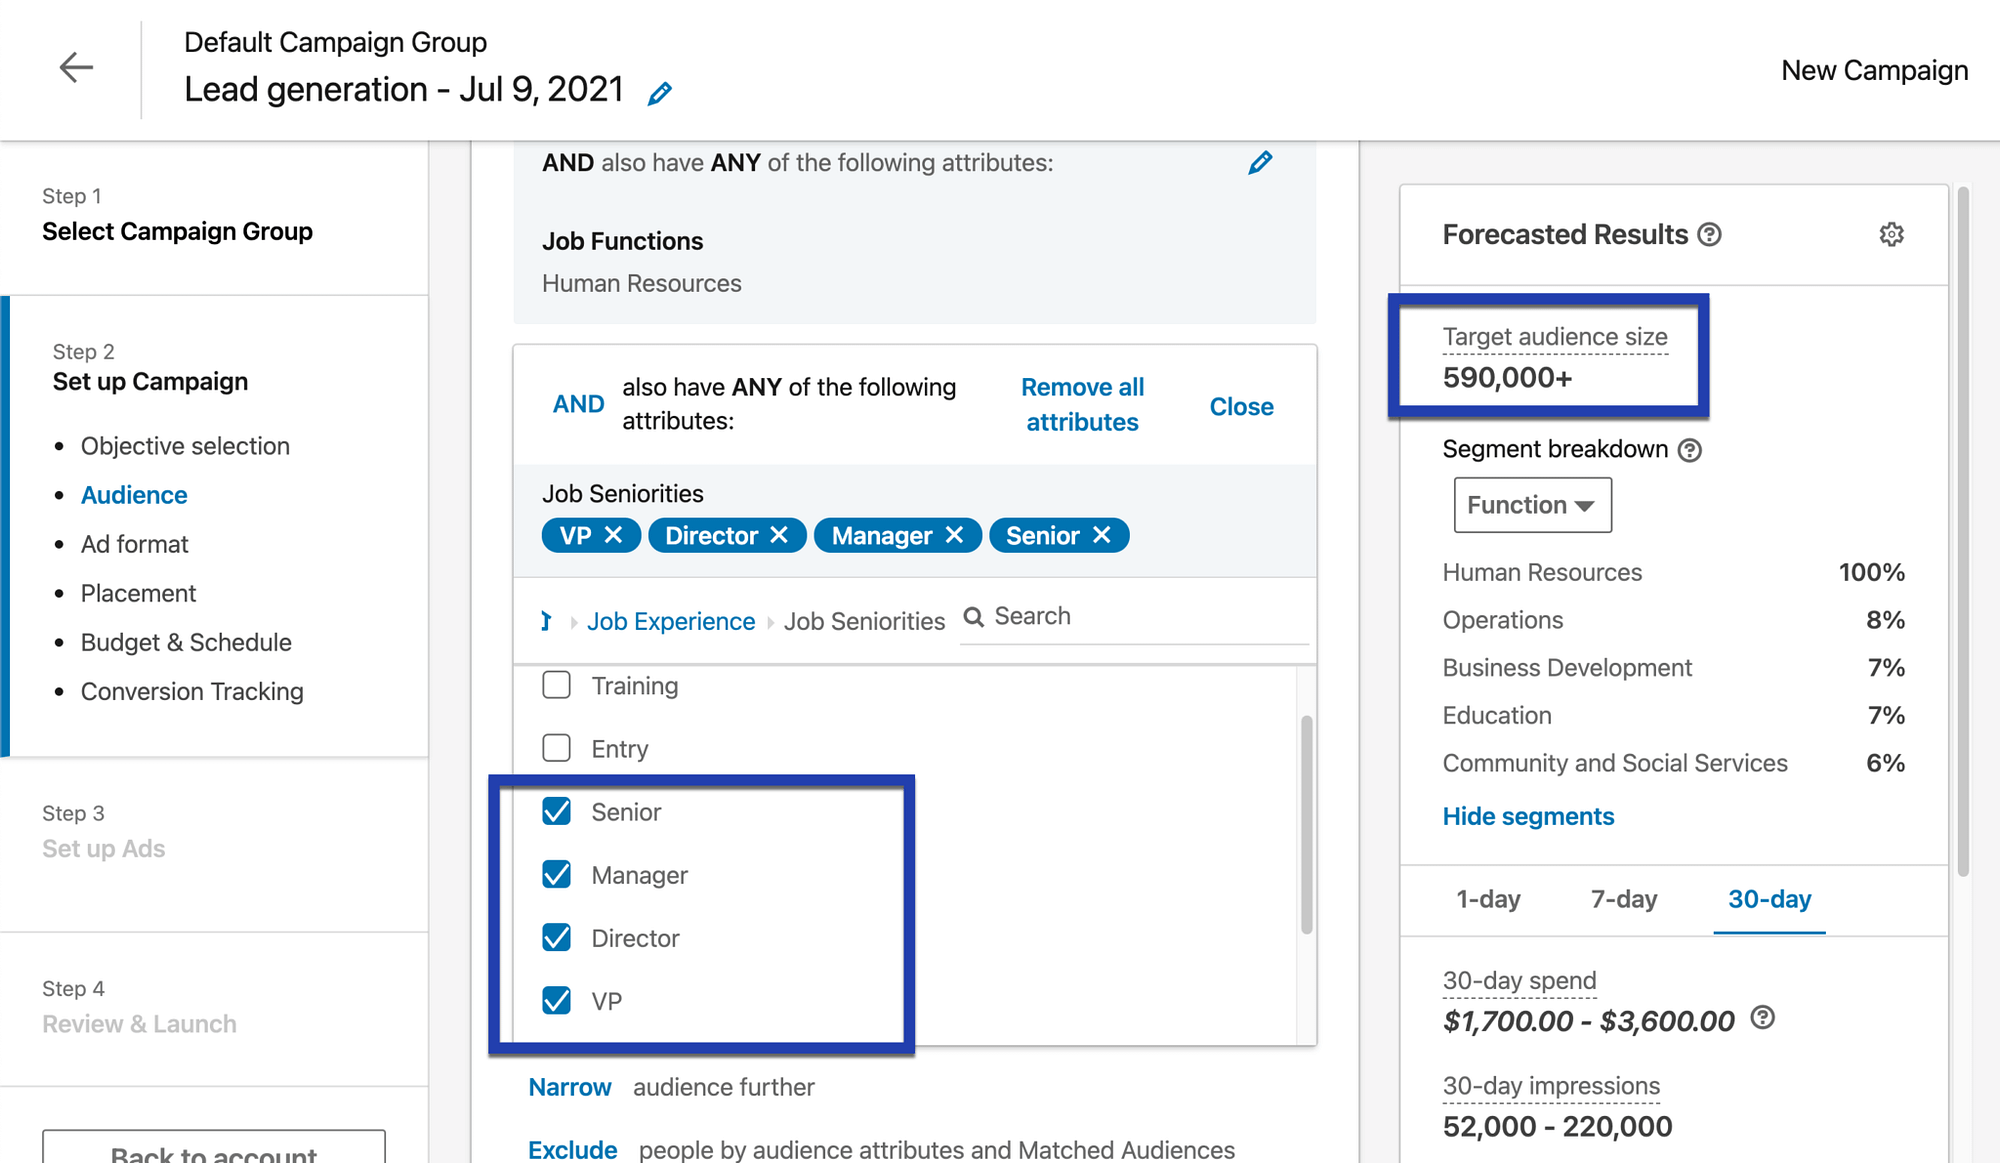
We can also get more specific by honing in on senior-type management users since we want to get the attention of people in charge.
We also specified the Job Function as Human Resources.
As you can see, the Target Audience Size gets smaller as we narrow the search. That’s what we’re looking for to target the right people.

Step 4: Set the LinkedIn Ad type and budget
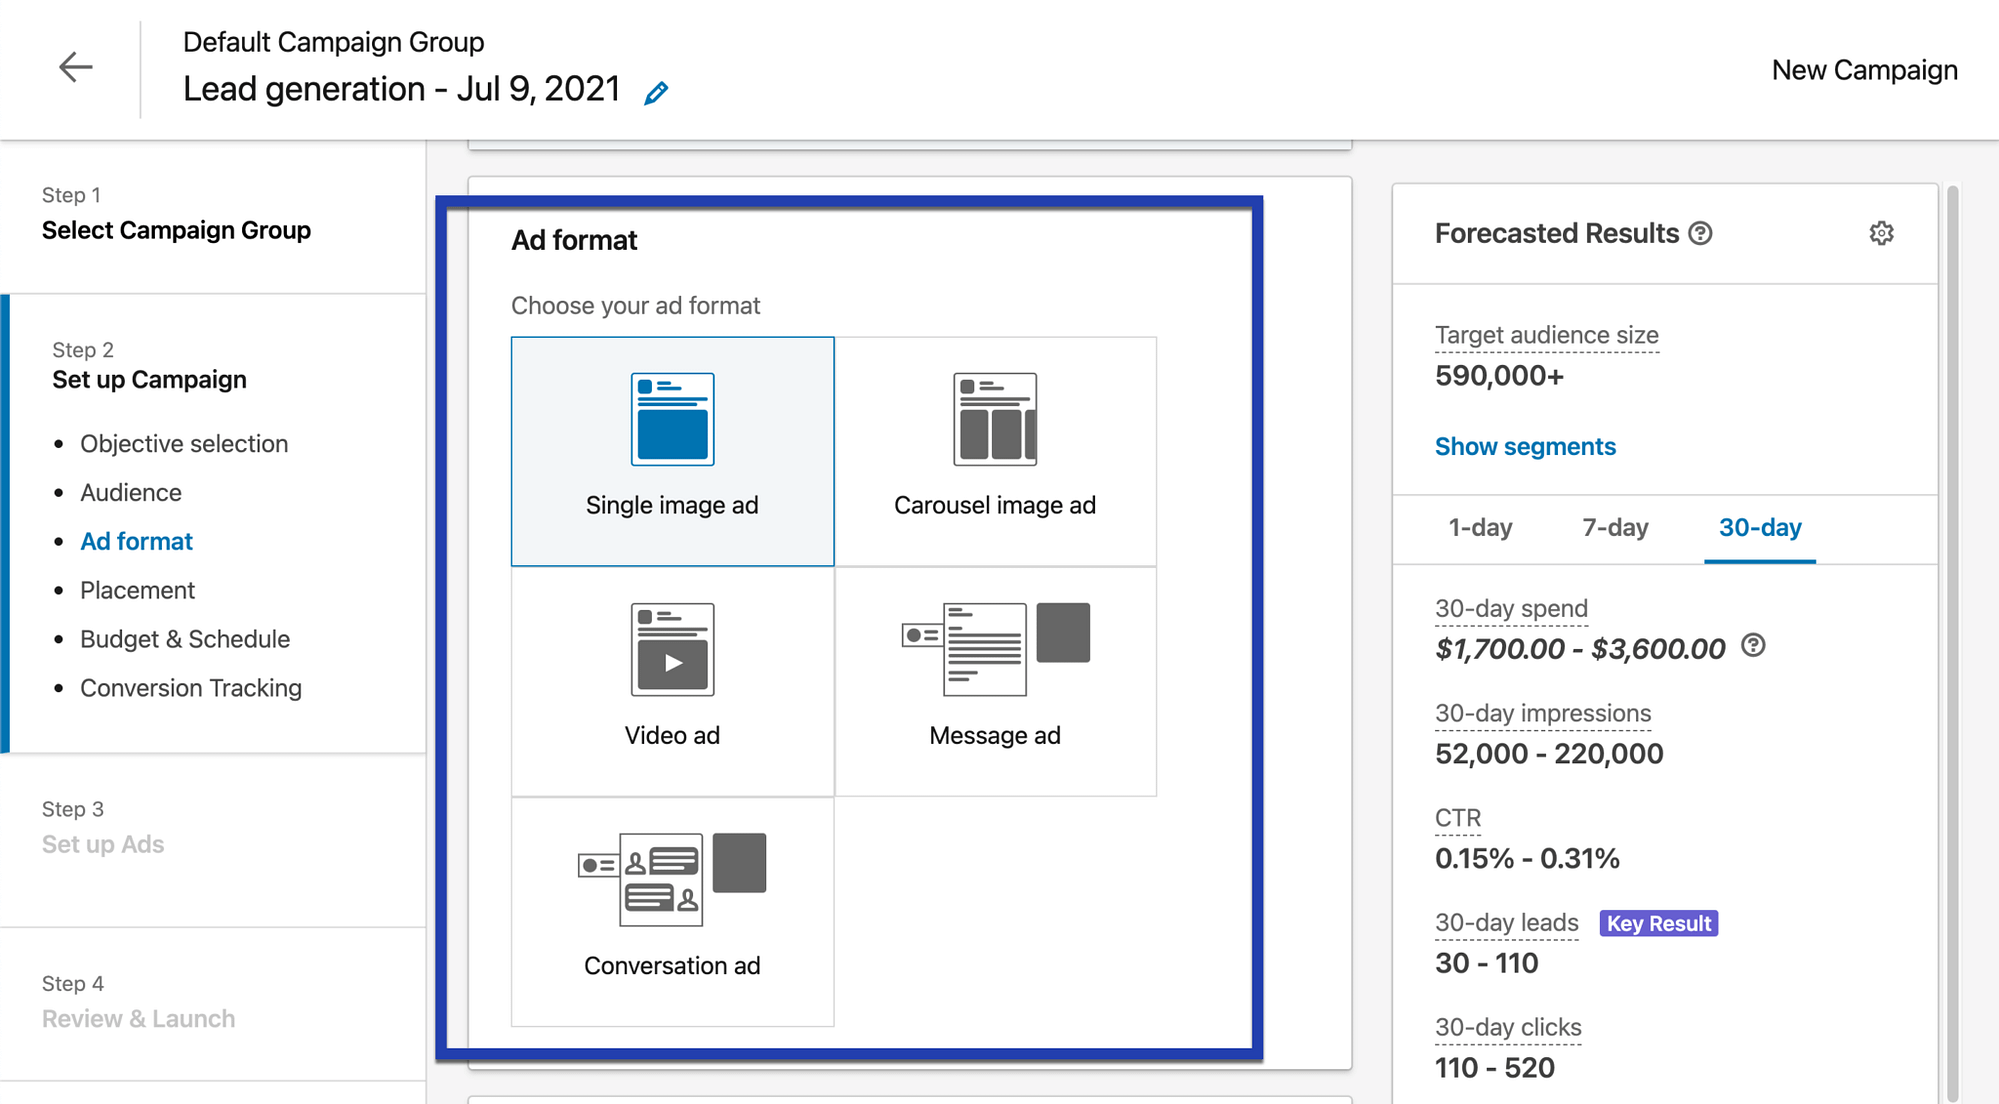
Under the Ad Format section, choose the type of advertisement you want to present. We’ll go with a simple Single Image Ad, but you can choose a different option, like a Message Ad or a Video Ad.

Type in the desired budget for this ad and choose how often you’re willing to refill the budget. For example, you may type in a $100 daily budget and run it continually or with an end date. The right side of the page shows spending estimates based on your daily budget, with calculations for 30-day spending, how many impressions you can expect, and click-through rates.

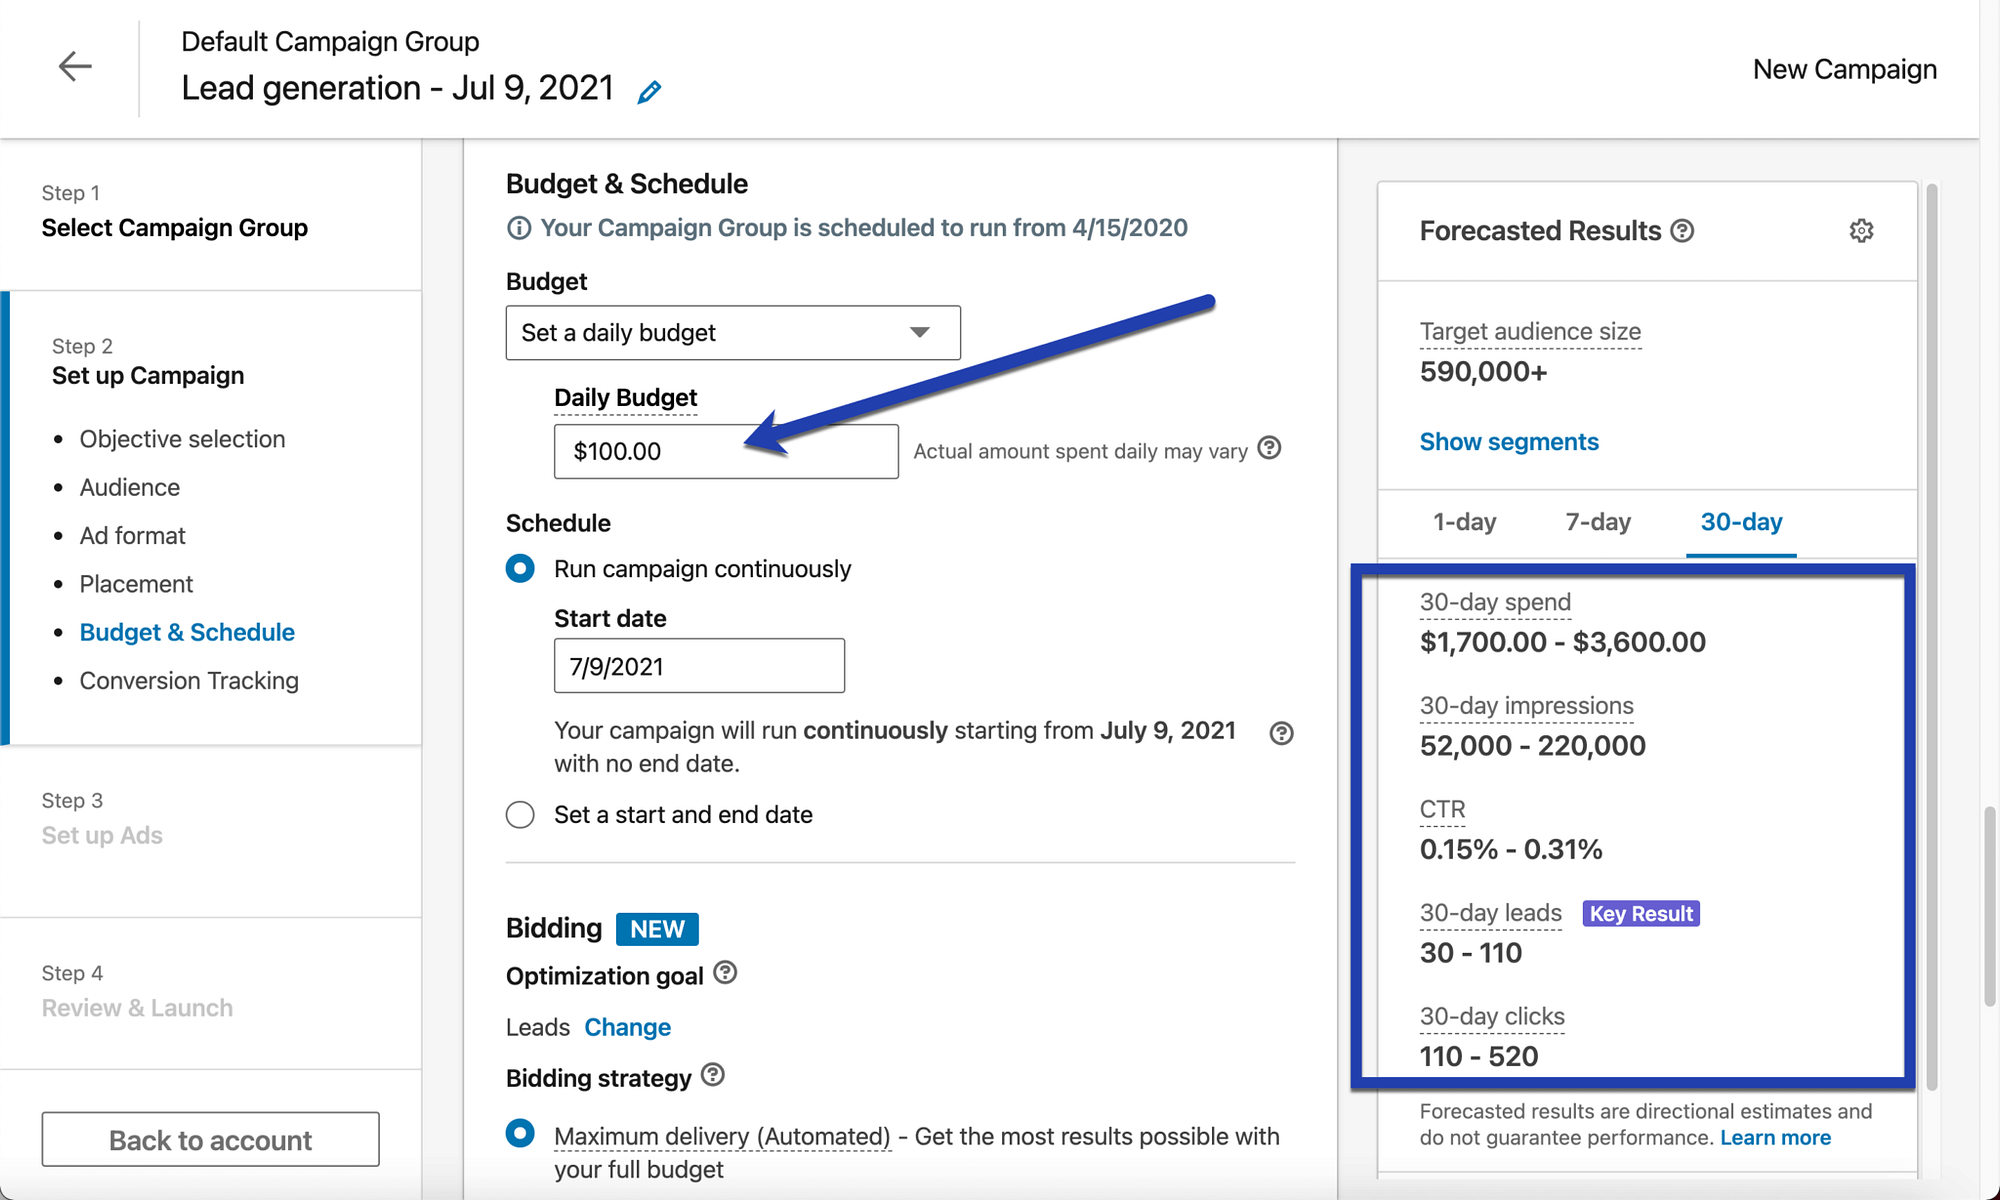
To give you an idea of how the calculator works, a simple modification of the budget decreases the 30-day spend and the potential impressions.

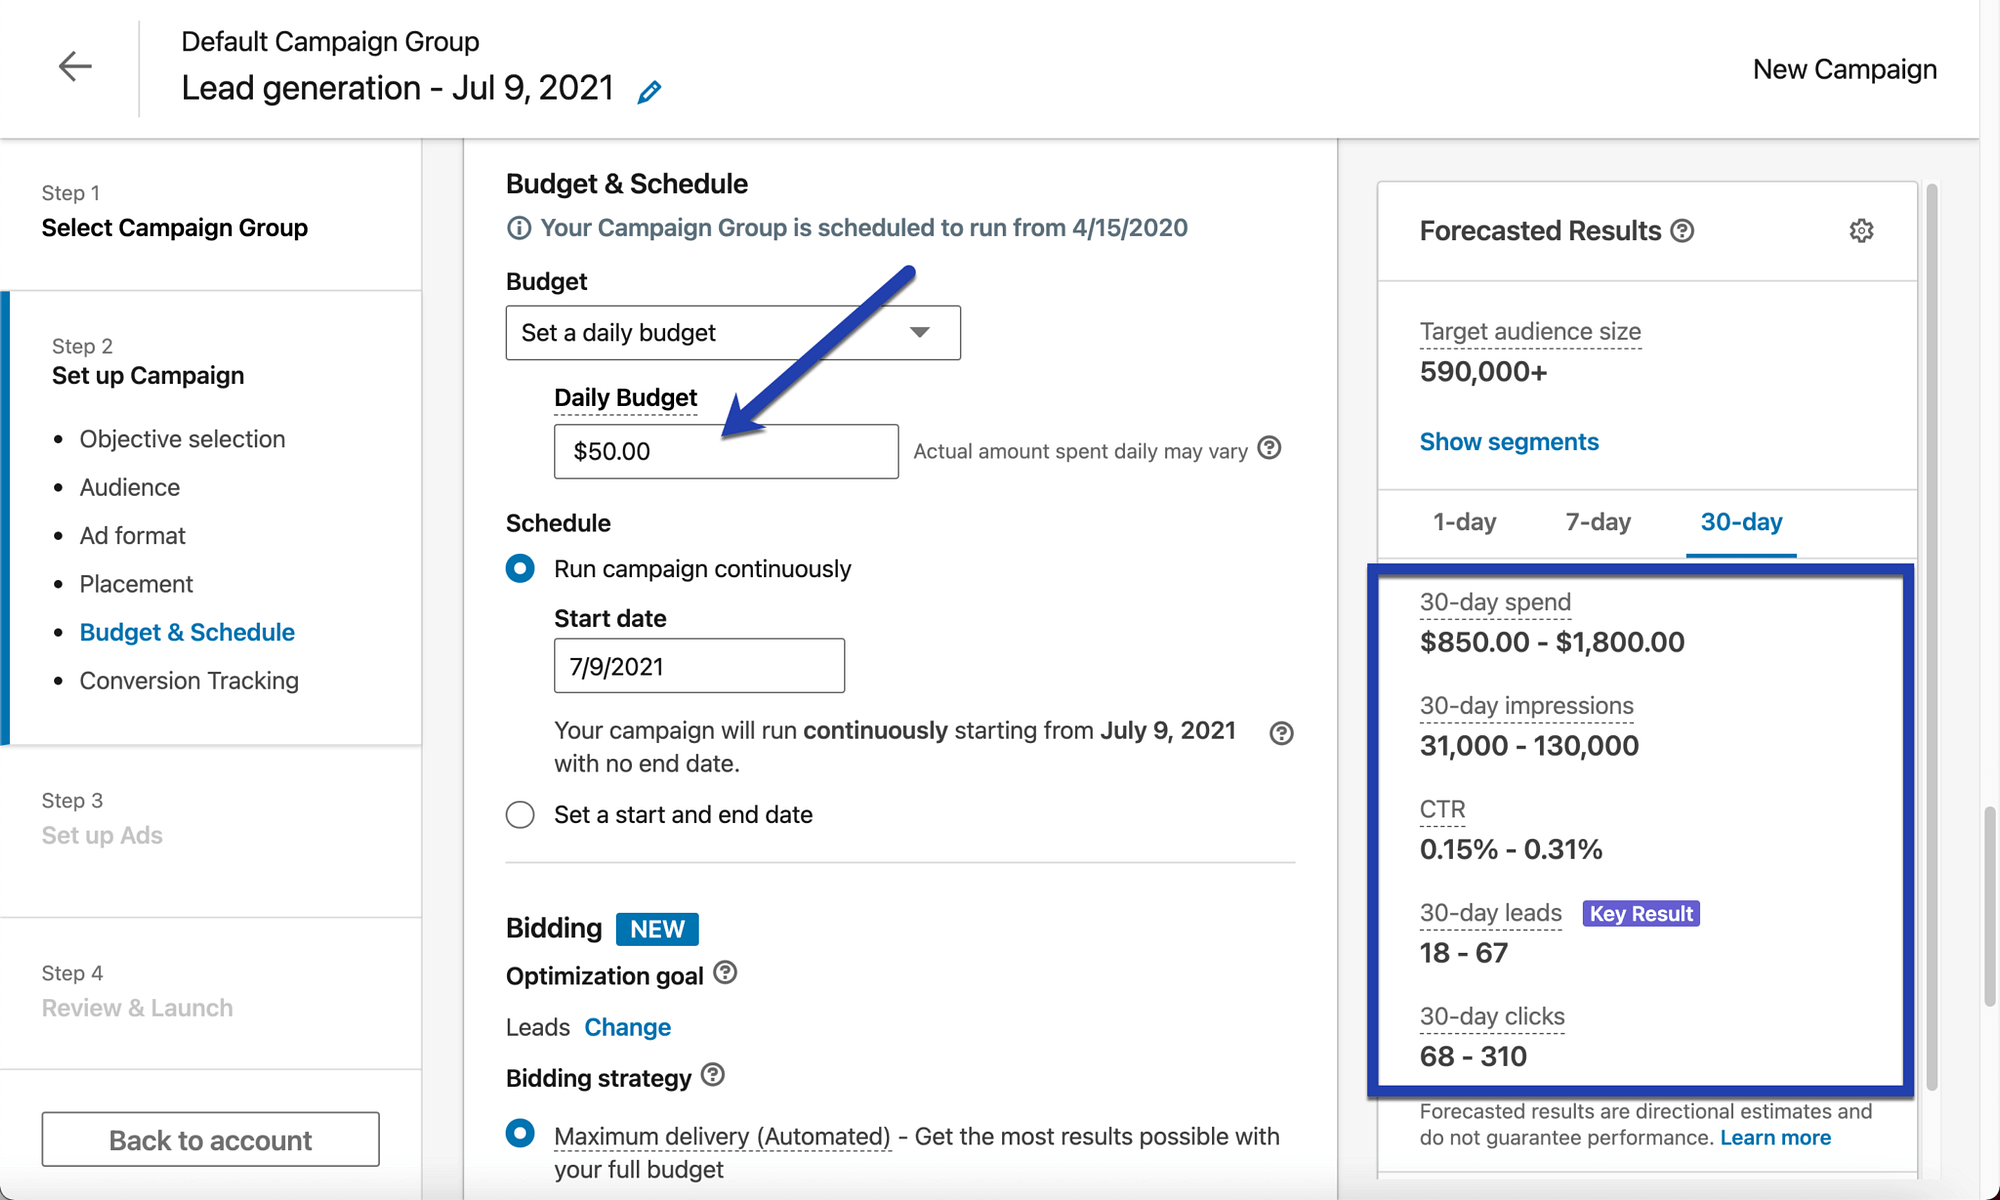
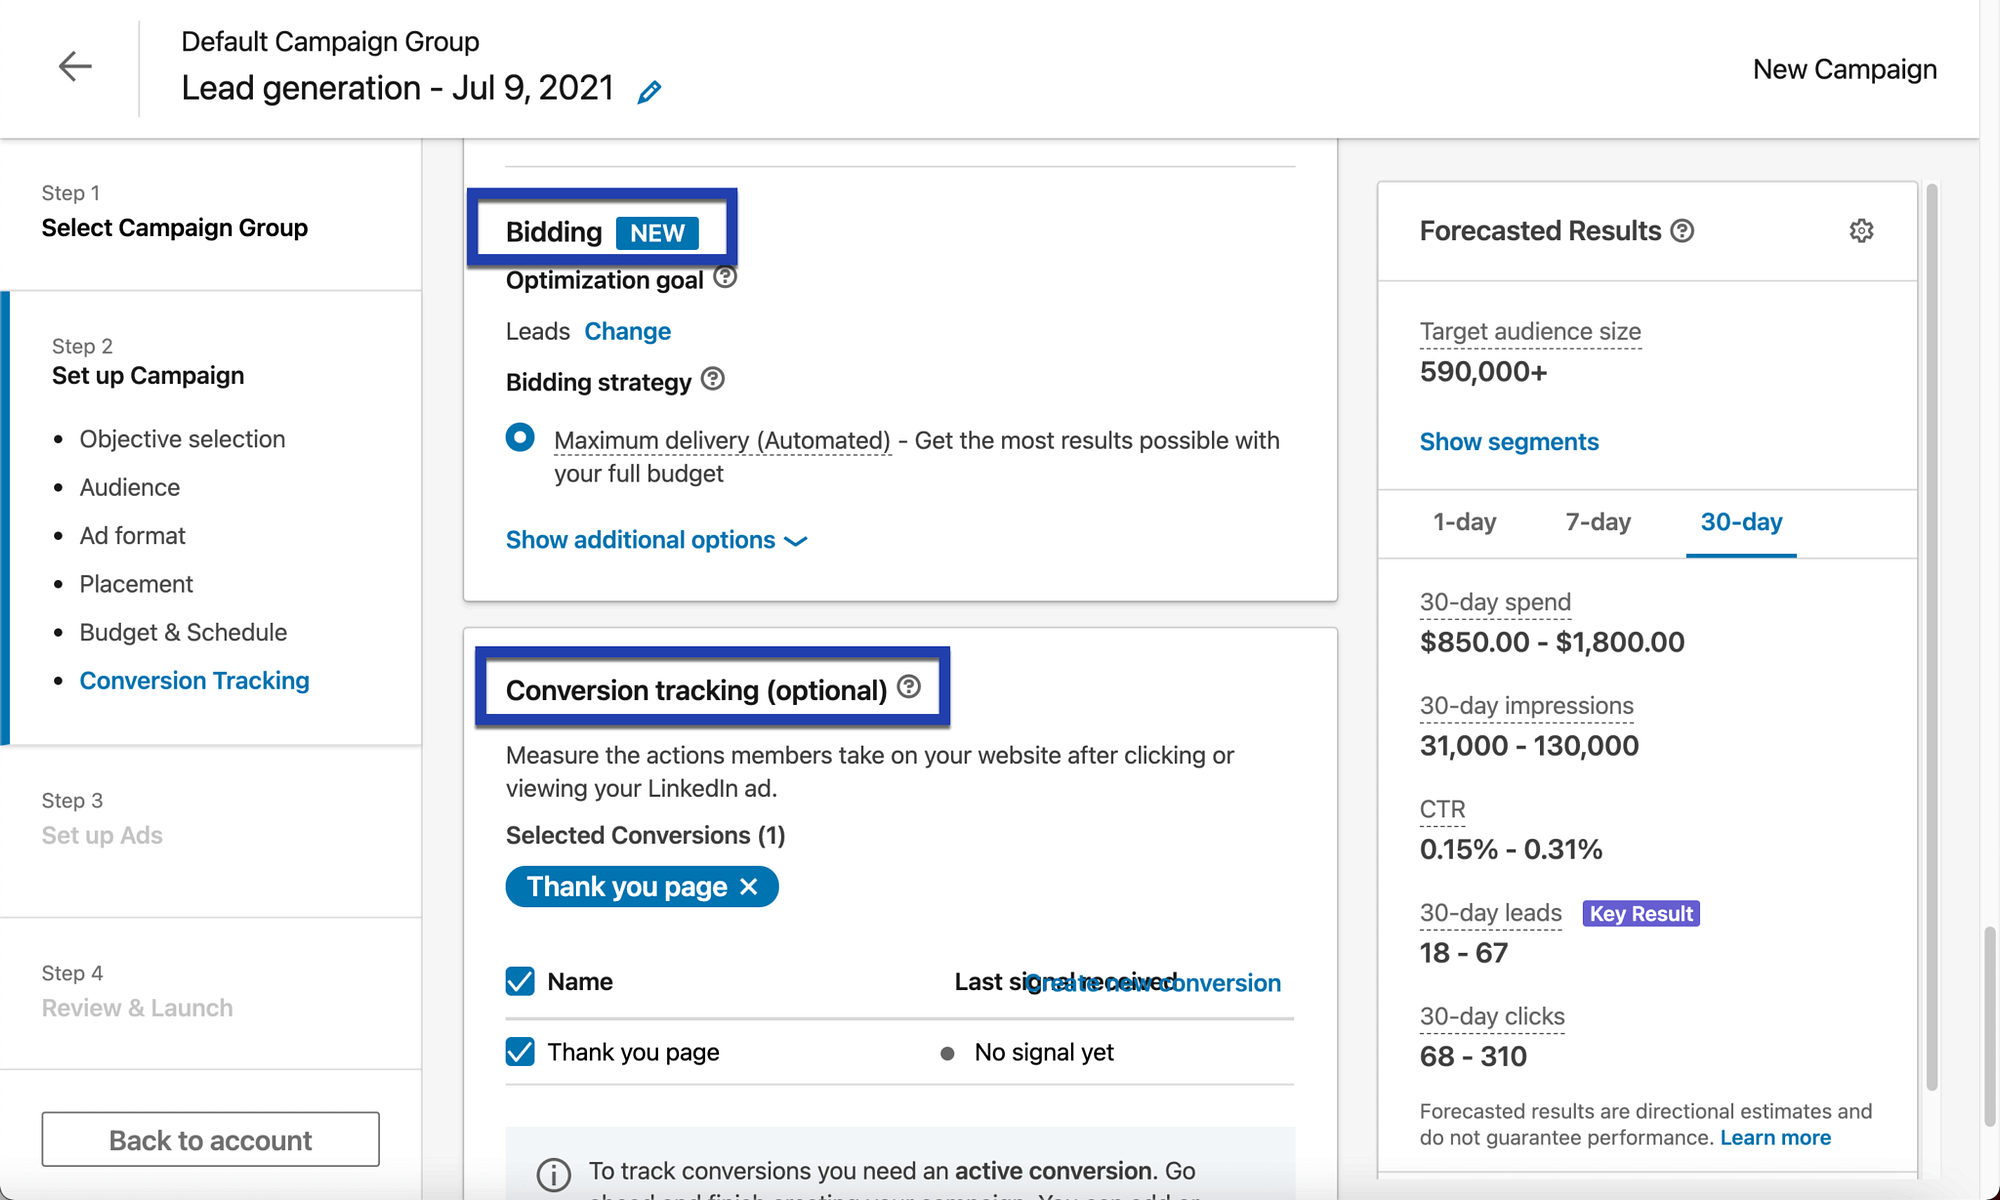
You can also configure the Bidding and Conversion Tracking fields.
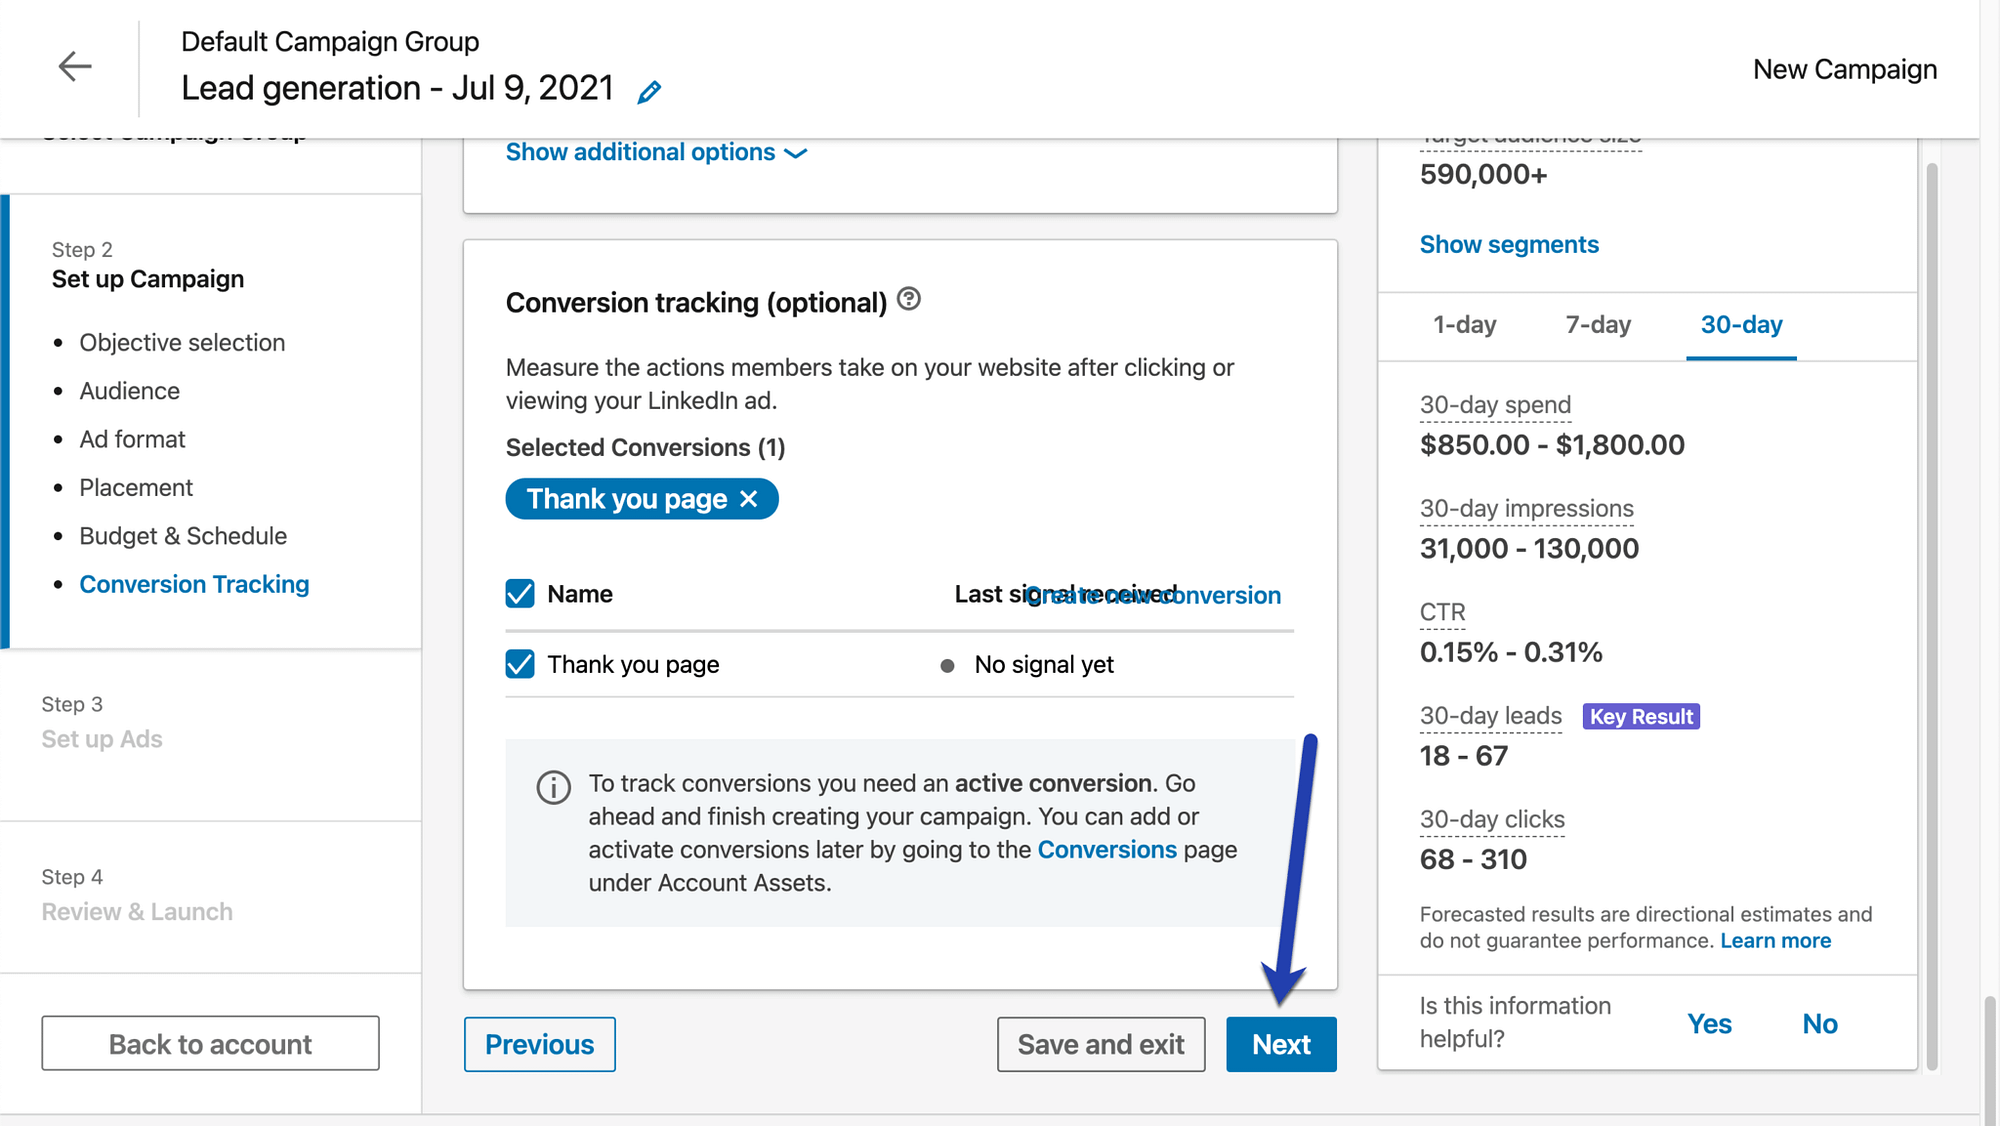
You’re often best off going with the default Maximum Delivery bidding strategy. The conversion tracking is optional but allows for measuring actions after clicking through your ad. This makes it easier to properly assess the success of your ad so you can create data-driven campaigns in the future.

Click on the Next button once you’re satisfied with the budget.

Step 5: Make the ad content
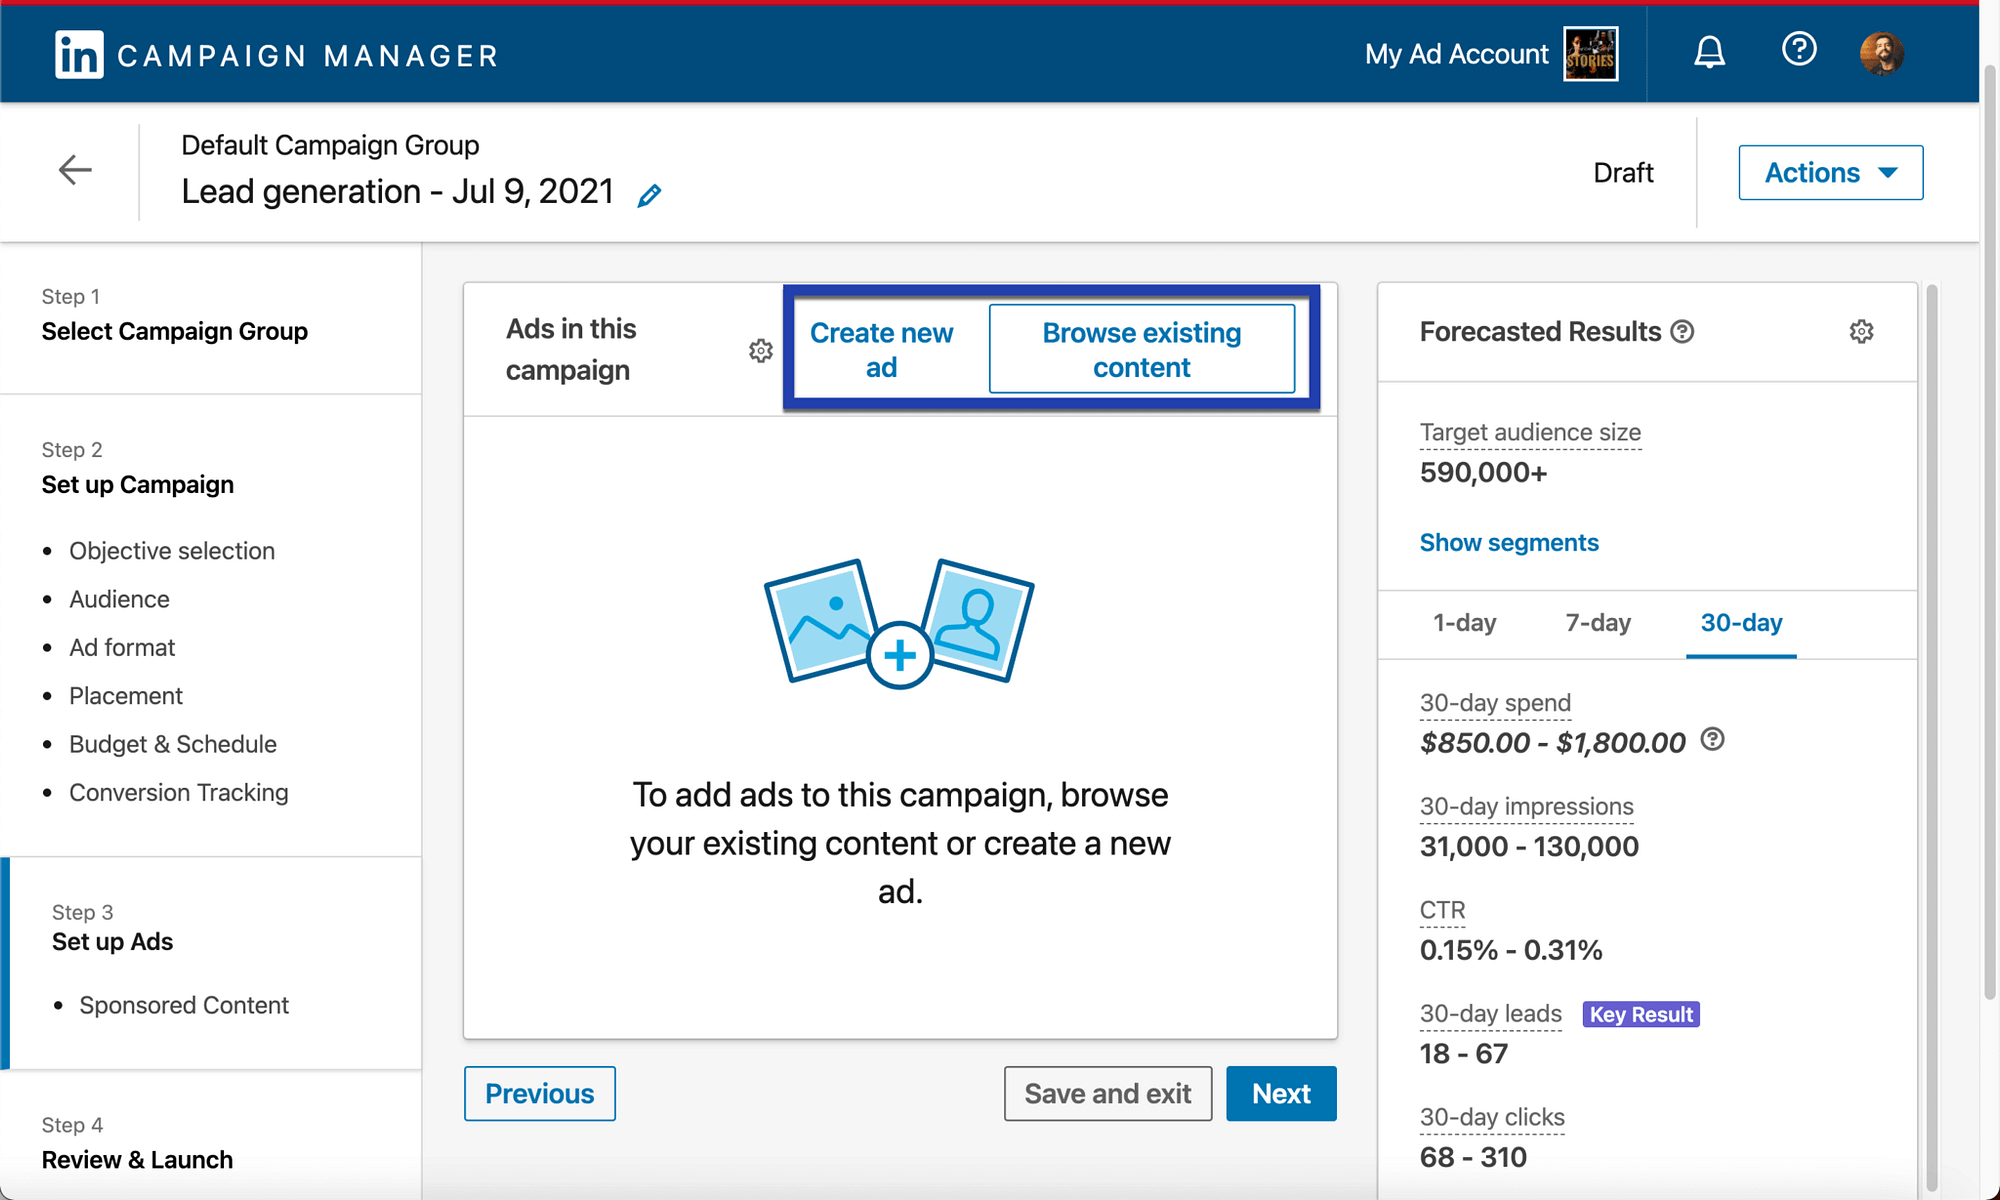
The next page offers two buttons: Create New Ad and Browse Existing Content.
The Browse Existing Content button shows ads you’ve launched or saved in the past. This allows you to save time by reusing content from popular ads.
If you’re not using something from the past, click on the Create New Ad button.

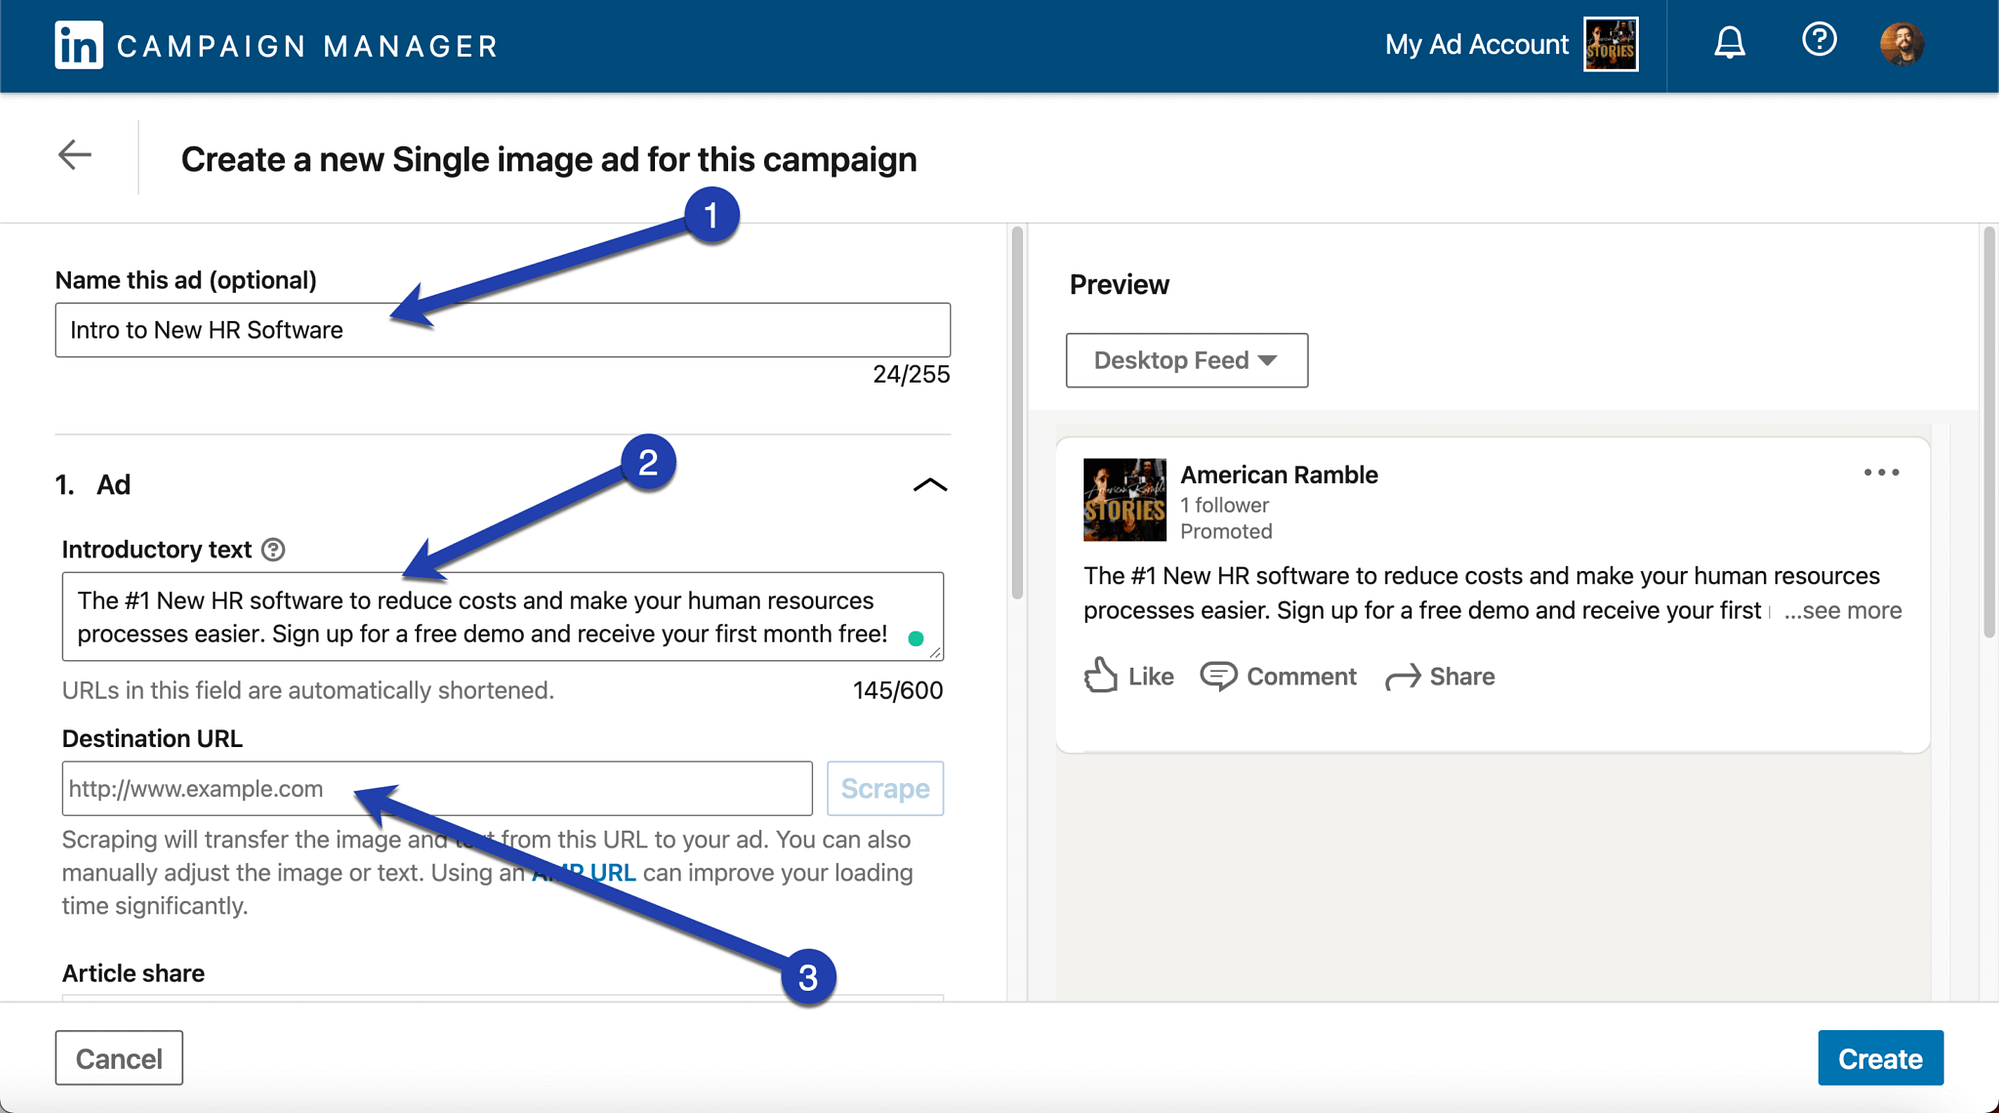
Fill in the following fields to compile your ad’s content:
- Ad Name
- Introductory Text
- Destination URL
A preview of the LinkedIn advertisement is shown on the right side with a dropdown to also view the mobile version.

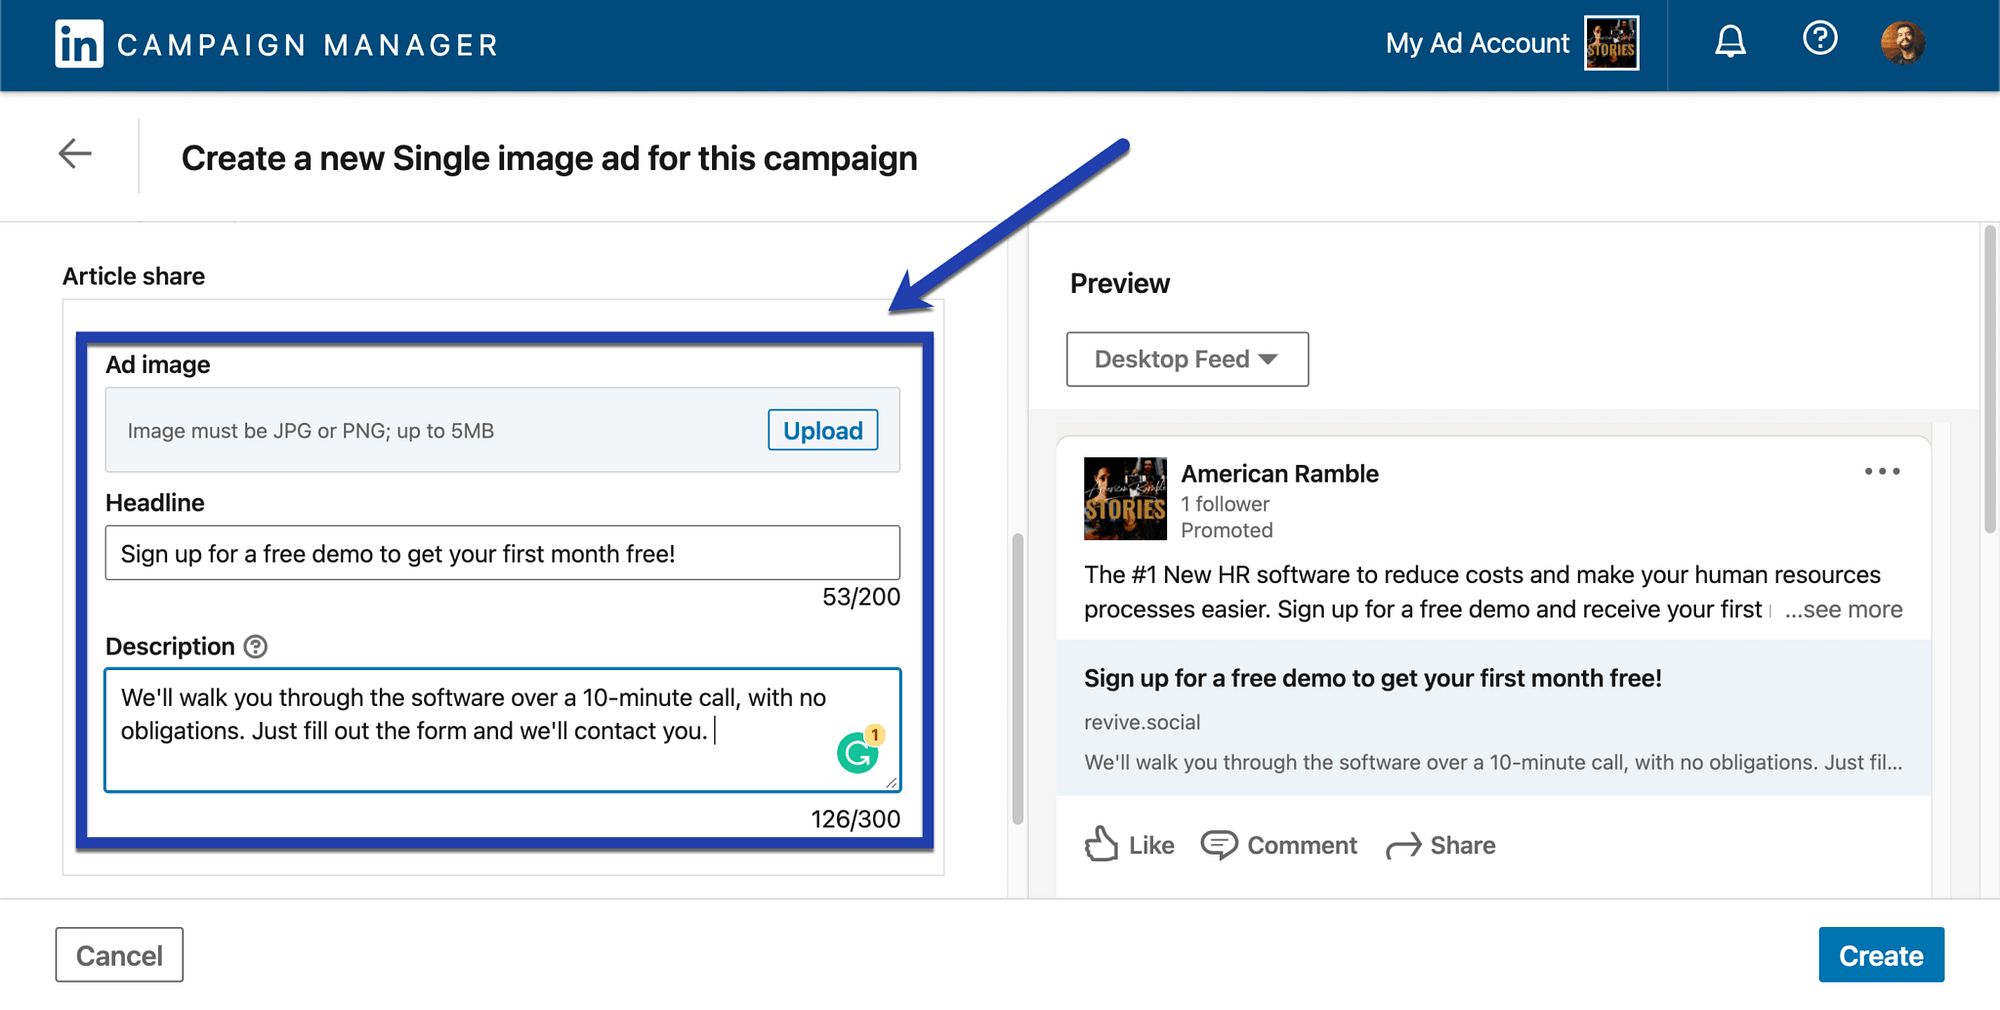
Continue by uploading an image for the ad, writing a headline, and typing in a description for the link.

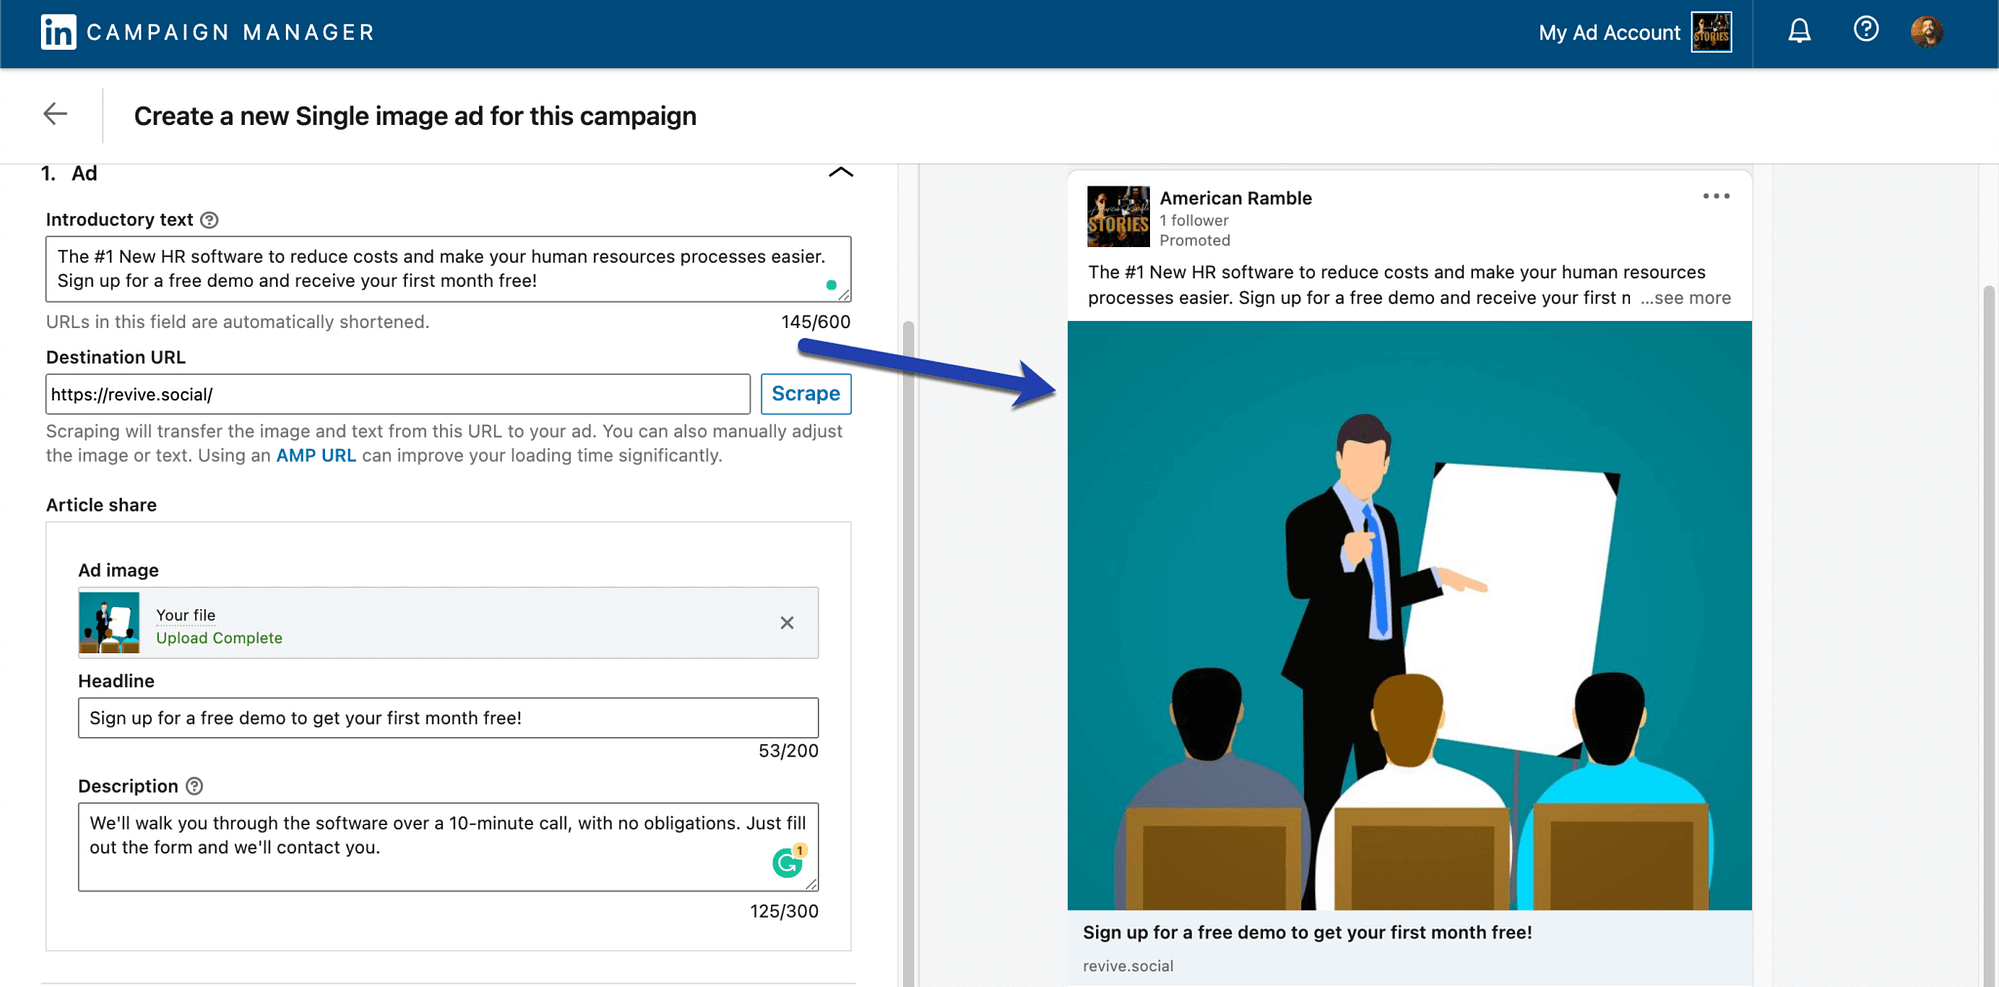
Again, you can see the image, along with all of the ad’s elements, in the preview on the right side of the screen.

Step 6: Set up the LinkedIn lead generation form
Click the tab called Form Details. This will reveal two dropdown fields for a Call-to-action and a Form. Open the Call-to-action dropdown.

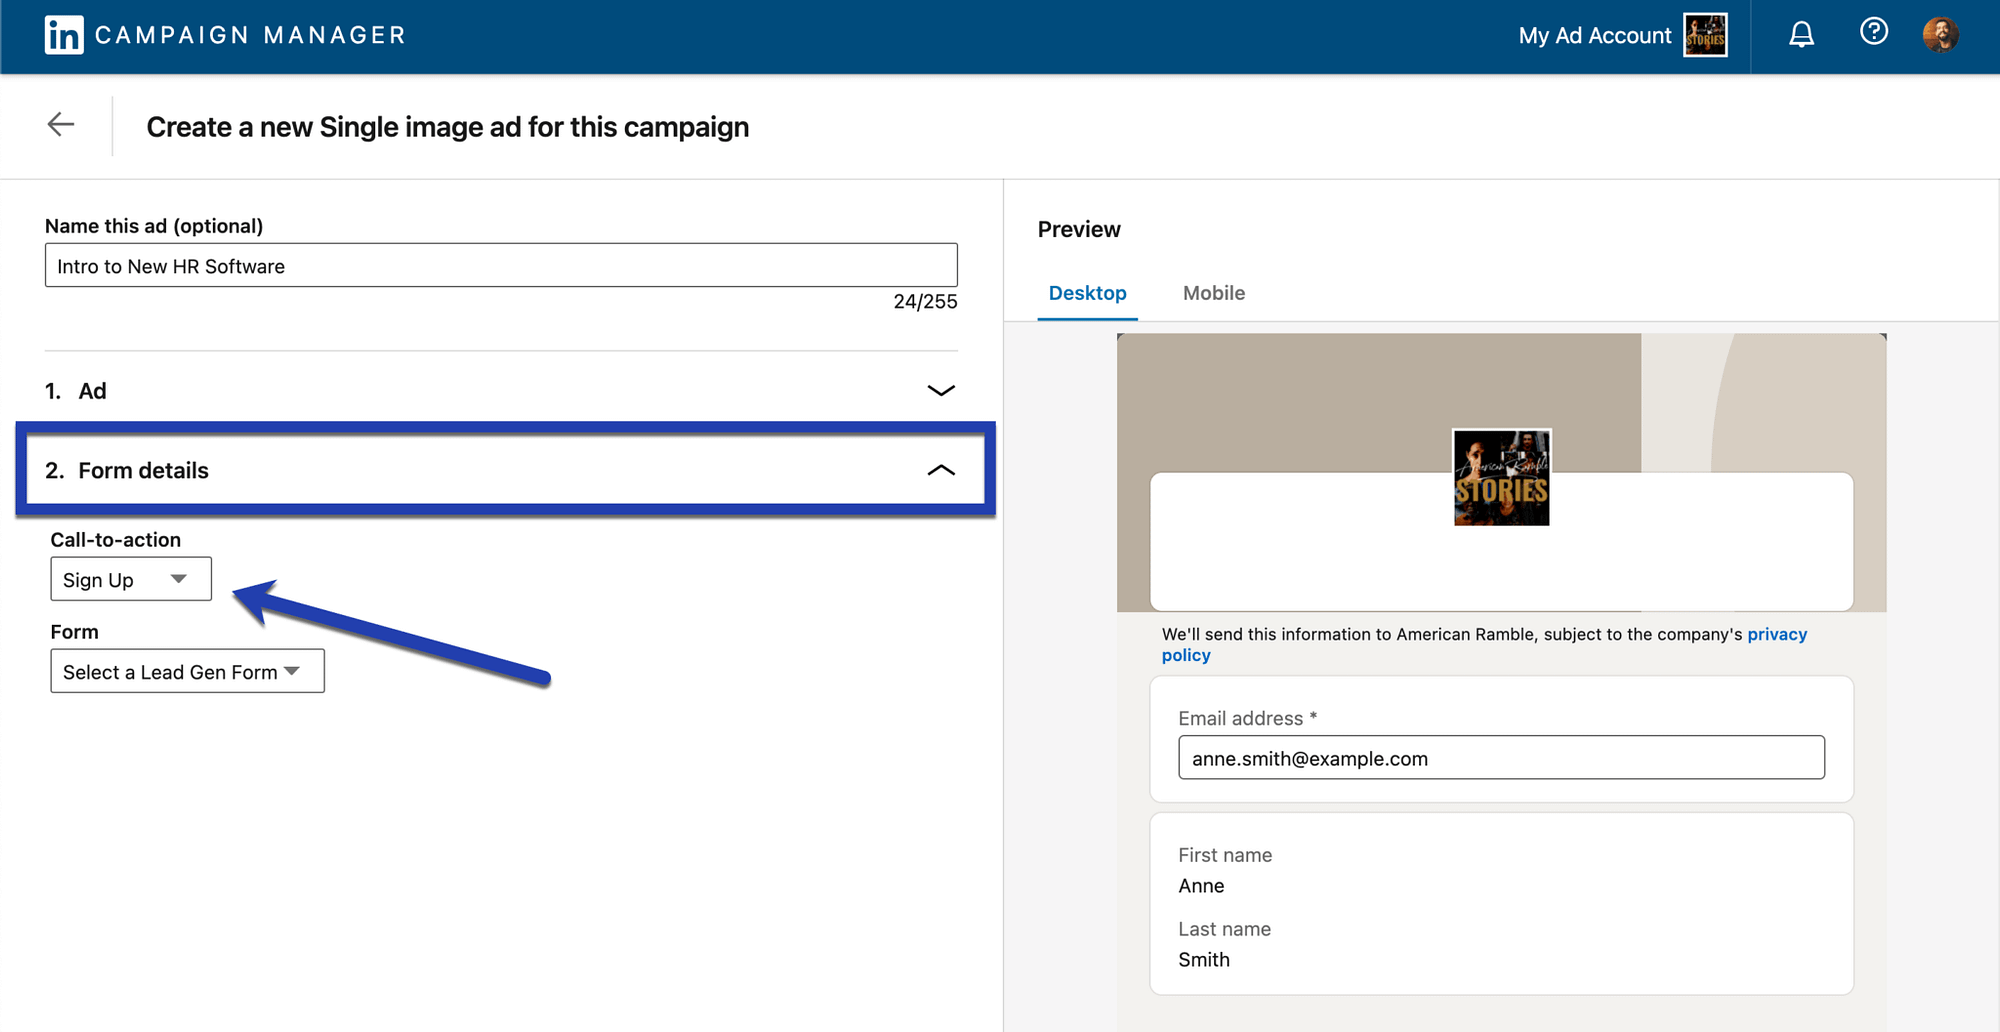
The choices include simple call-to-action text that relates to what you’re trying to sell or give away.
For instance, collecting information through a form in return for a download would make sense with a Download button. You can also opt for call-to-action text like:
- Apply Now
- Sign Up
- Get Quote
- Learn More
- Subscribe
- Register
Remember that more specific calls to action tend to be more effective since they tell users exactly what to do.

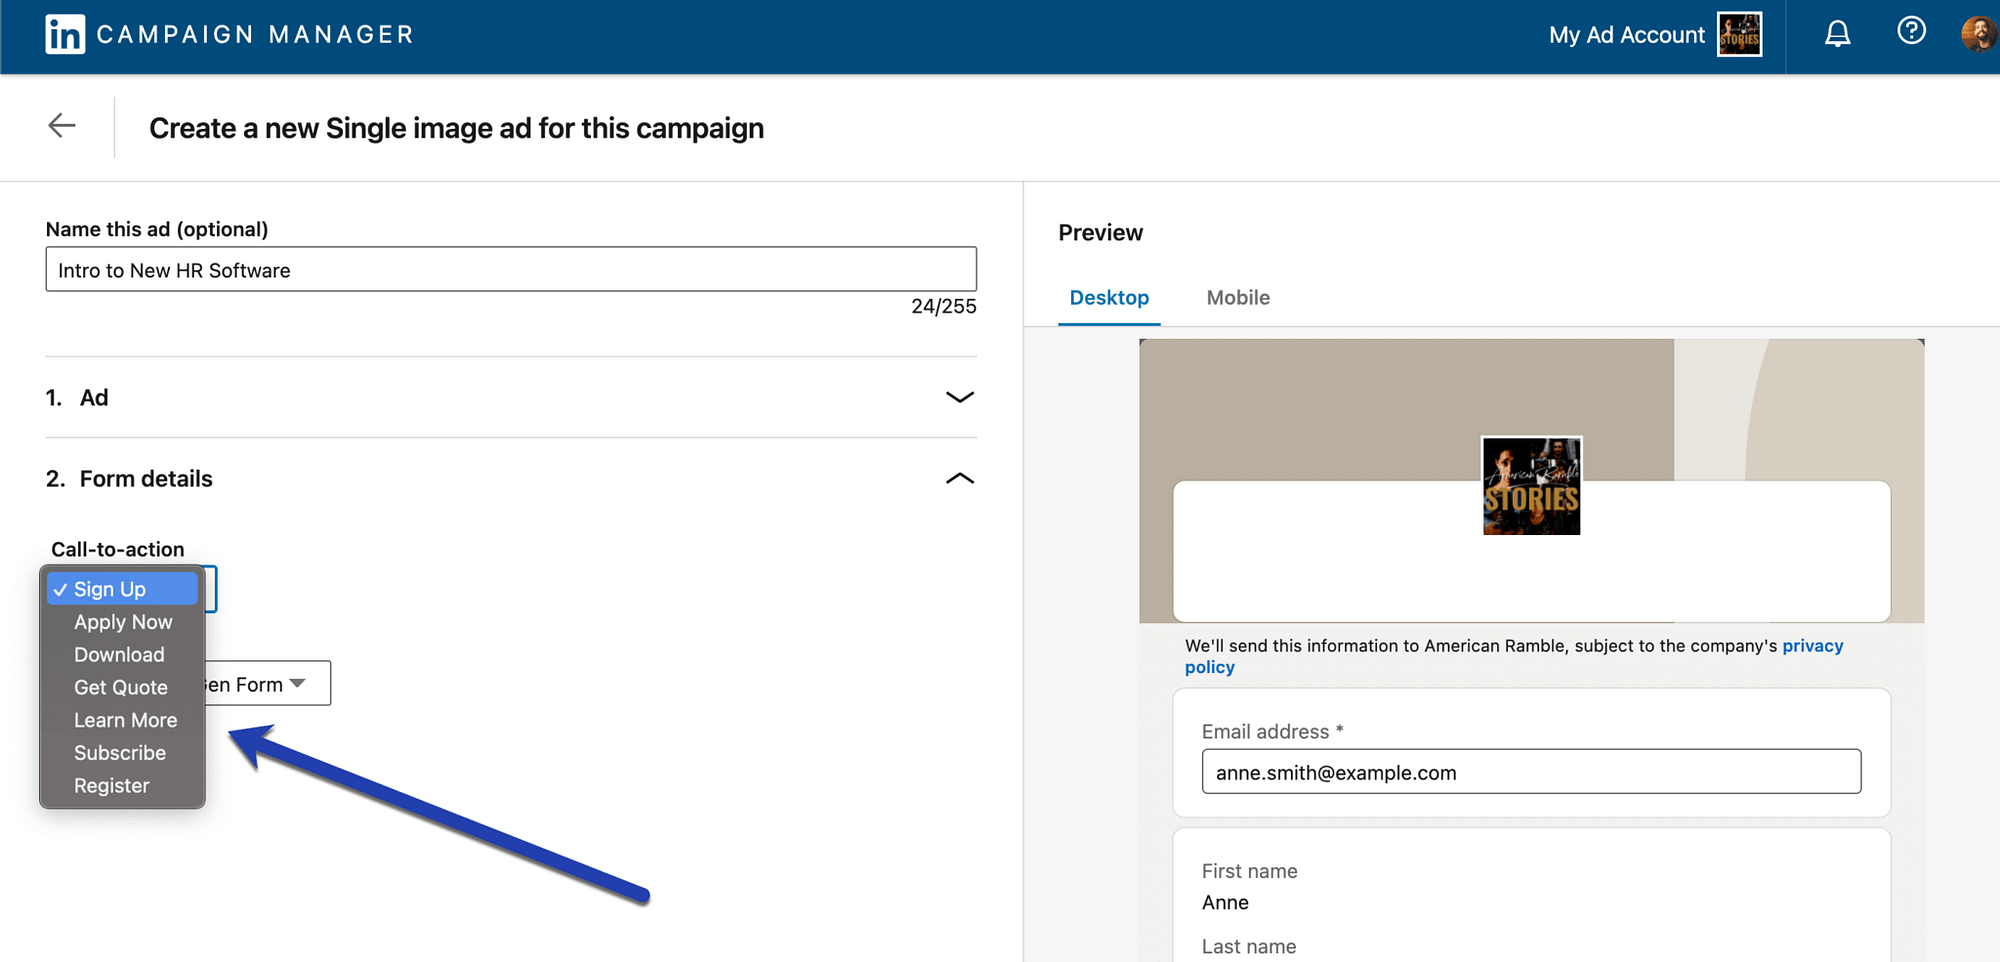
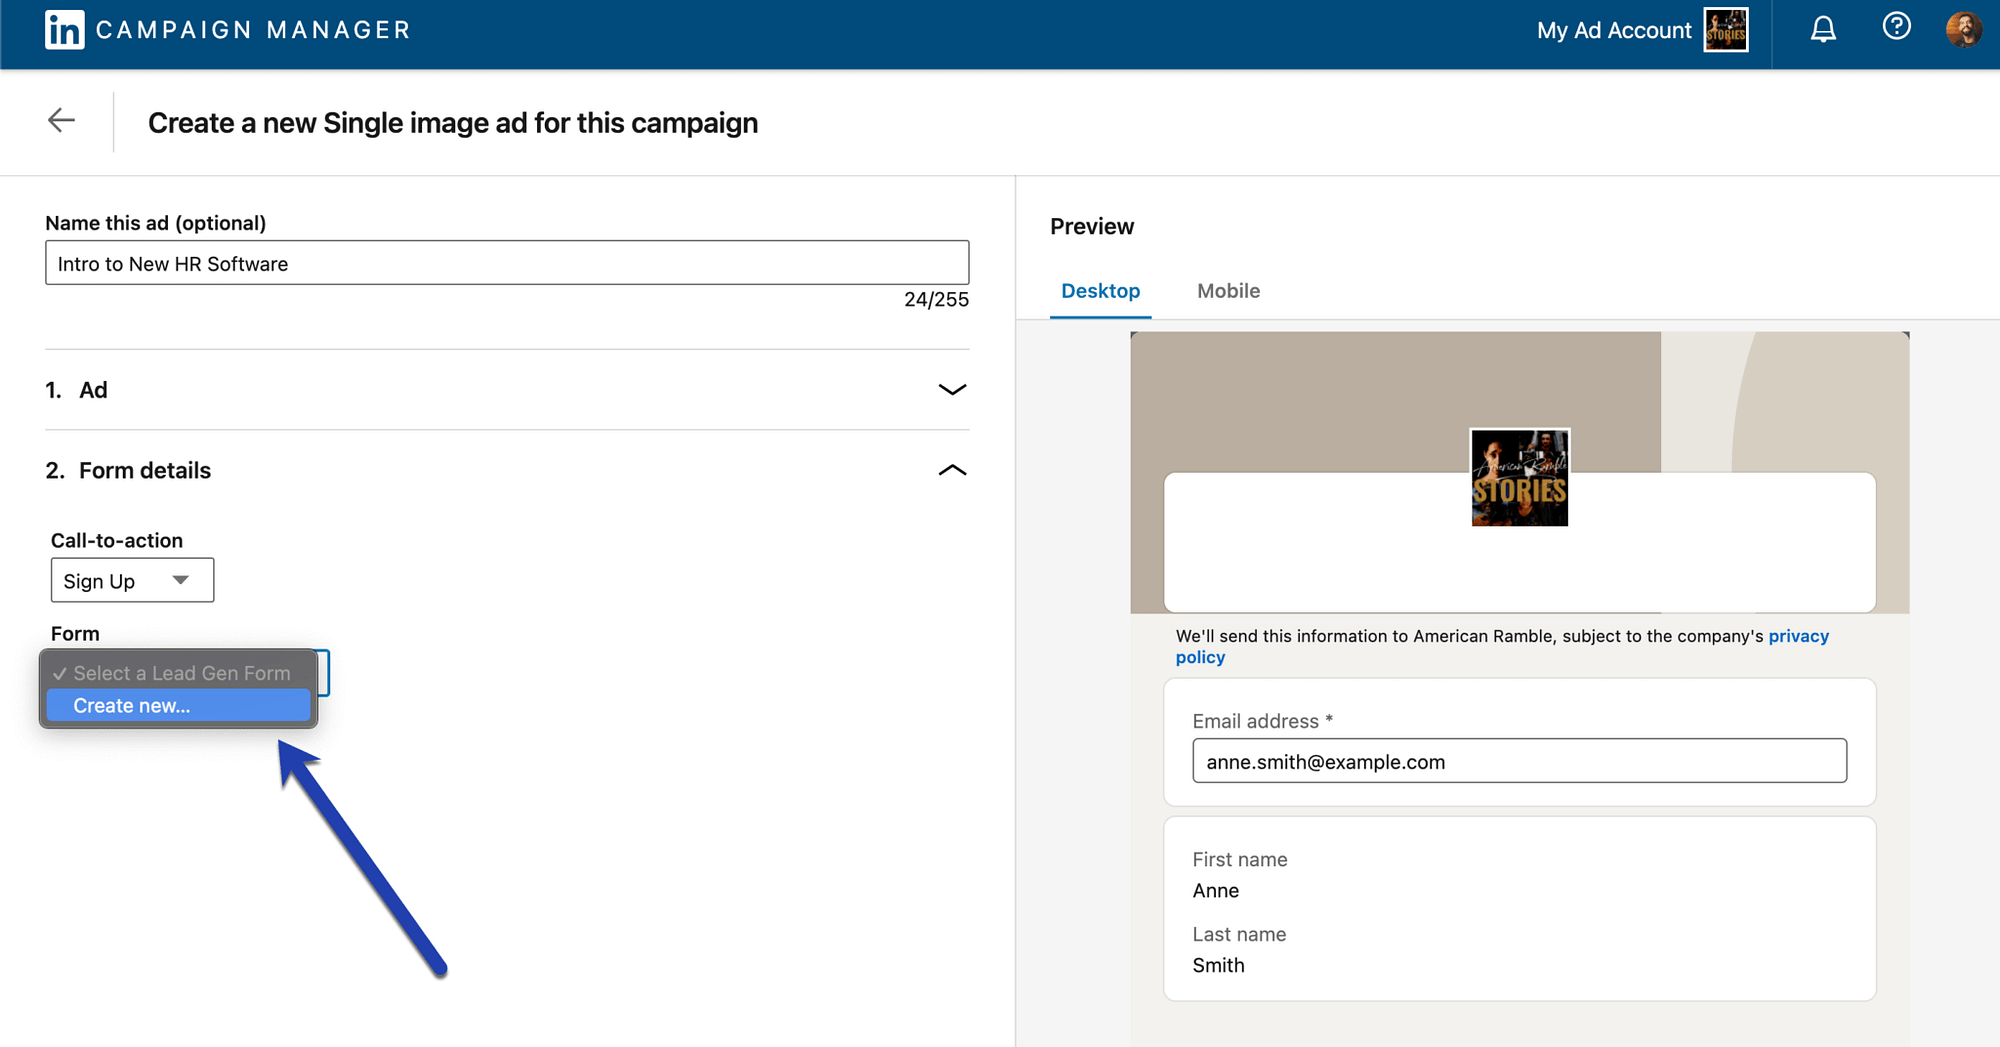
Click on the Form field and choose the Create New option to build a LinkedIn lead generation form from scratch. You can also grab a form you’ve created and saved from the past.

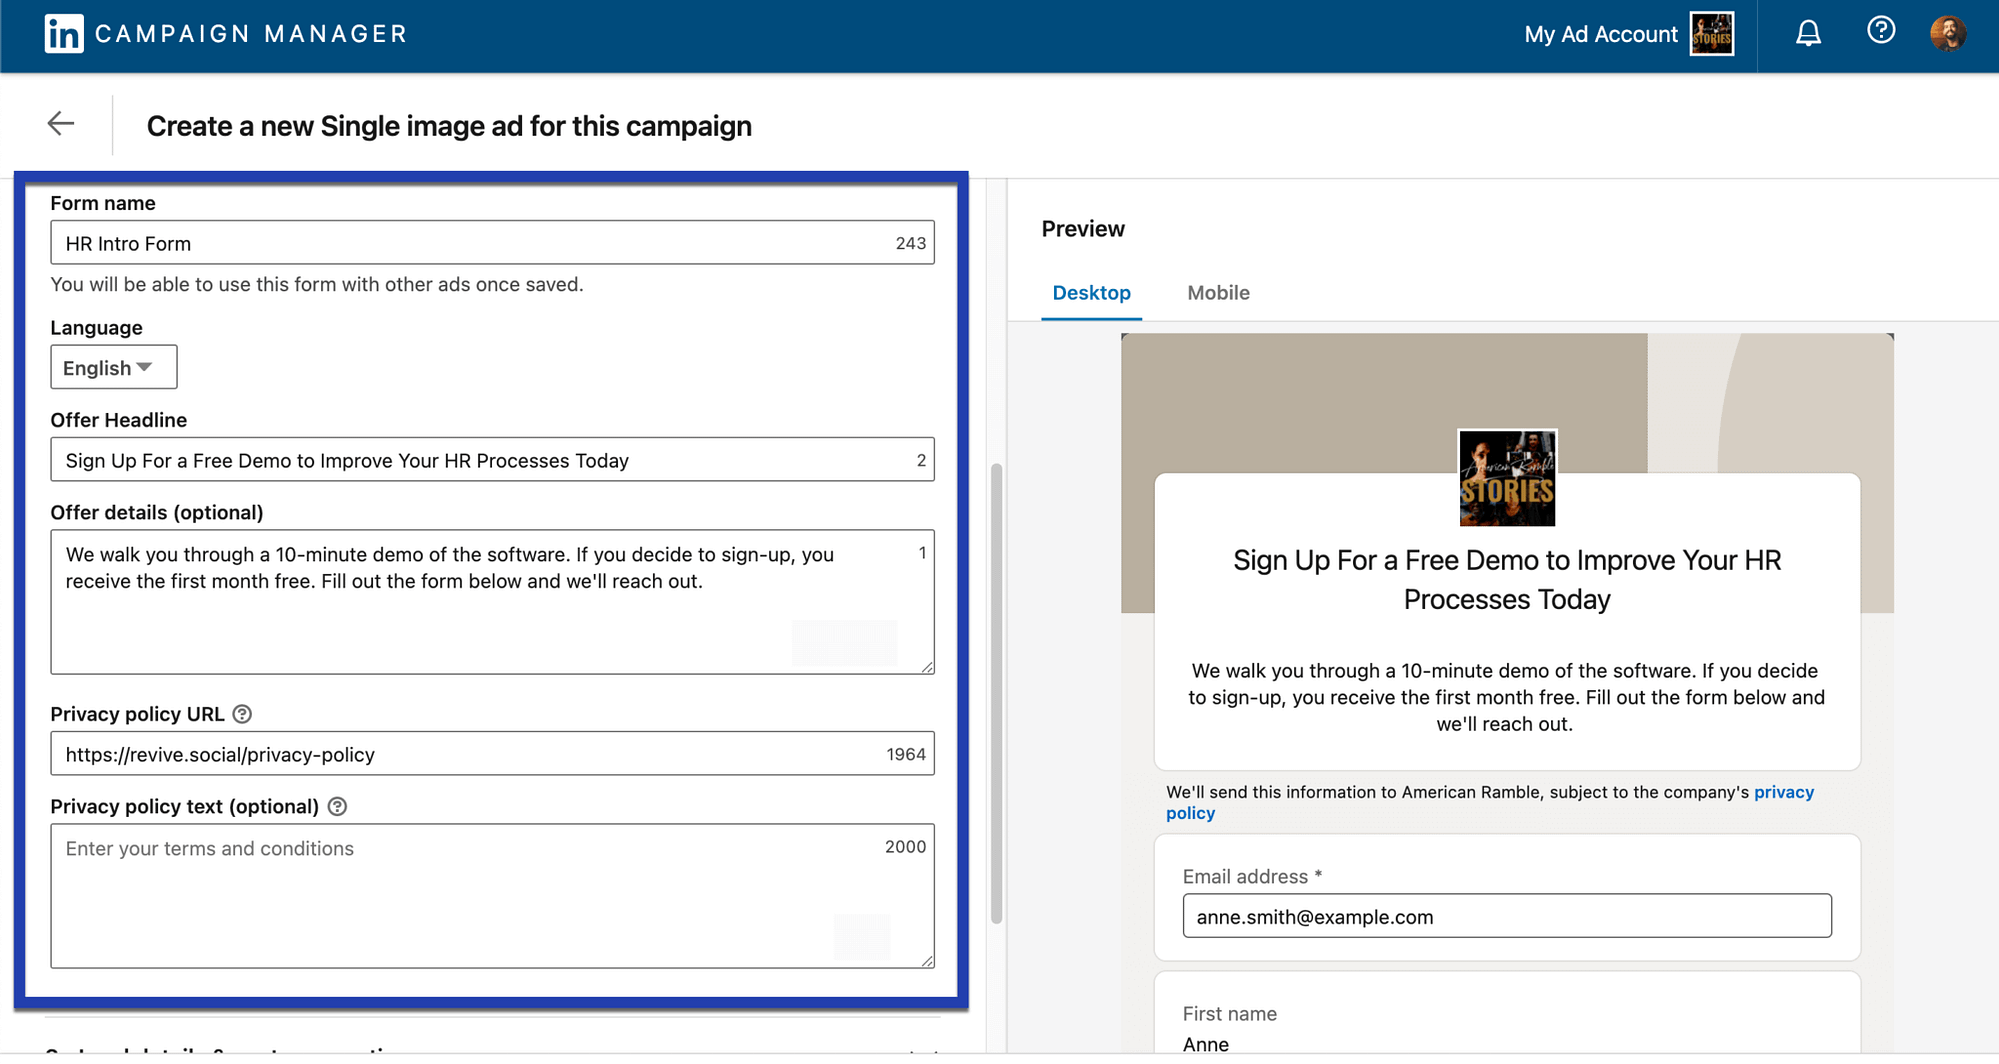
Fill out the following form fields based on what you’re trying to achieve and what’s relevant to your organization:
- Form Name: For your own reference.
- Language: Think about the language used by your target demographic, not just your own language.
- Offer Headline: An attention-grabbing headline with your main value proposition, or the reason people should give you their information.
- Offer Details: Type in information about what the user gets from you and how to work the form in general.
- Privacy Policy URL: Be sure to make one of these on your website as it’s required on LinkedIn when collecting data.
- Privacy Policy Text: This is an optional field where you can state a summary of your privacy policy or the entire thing.

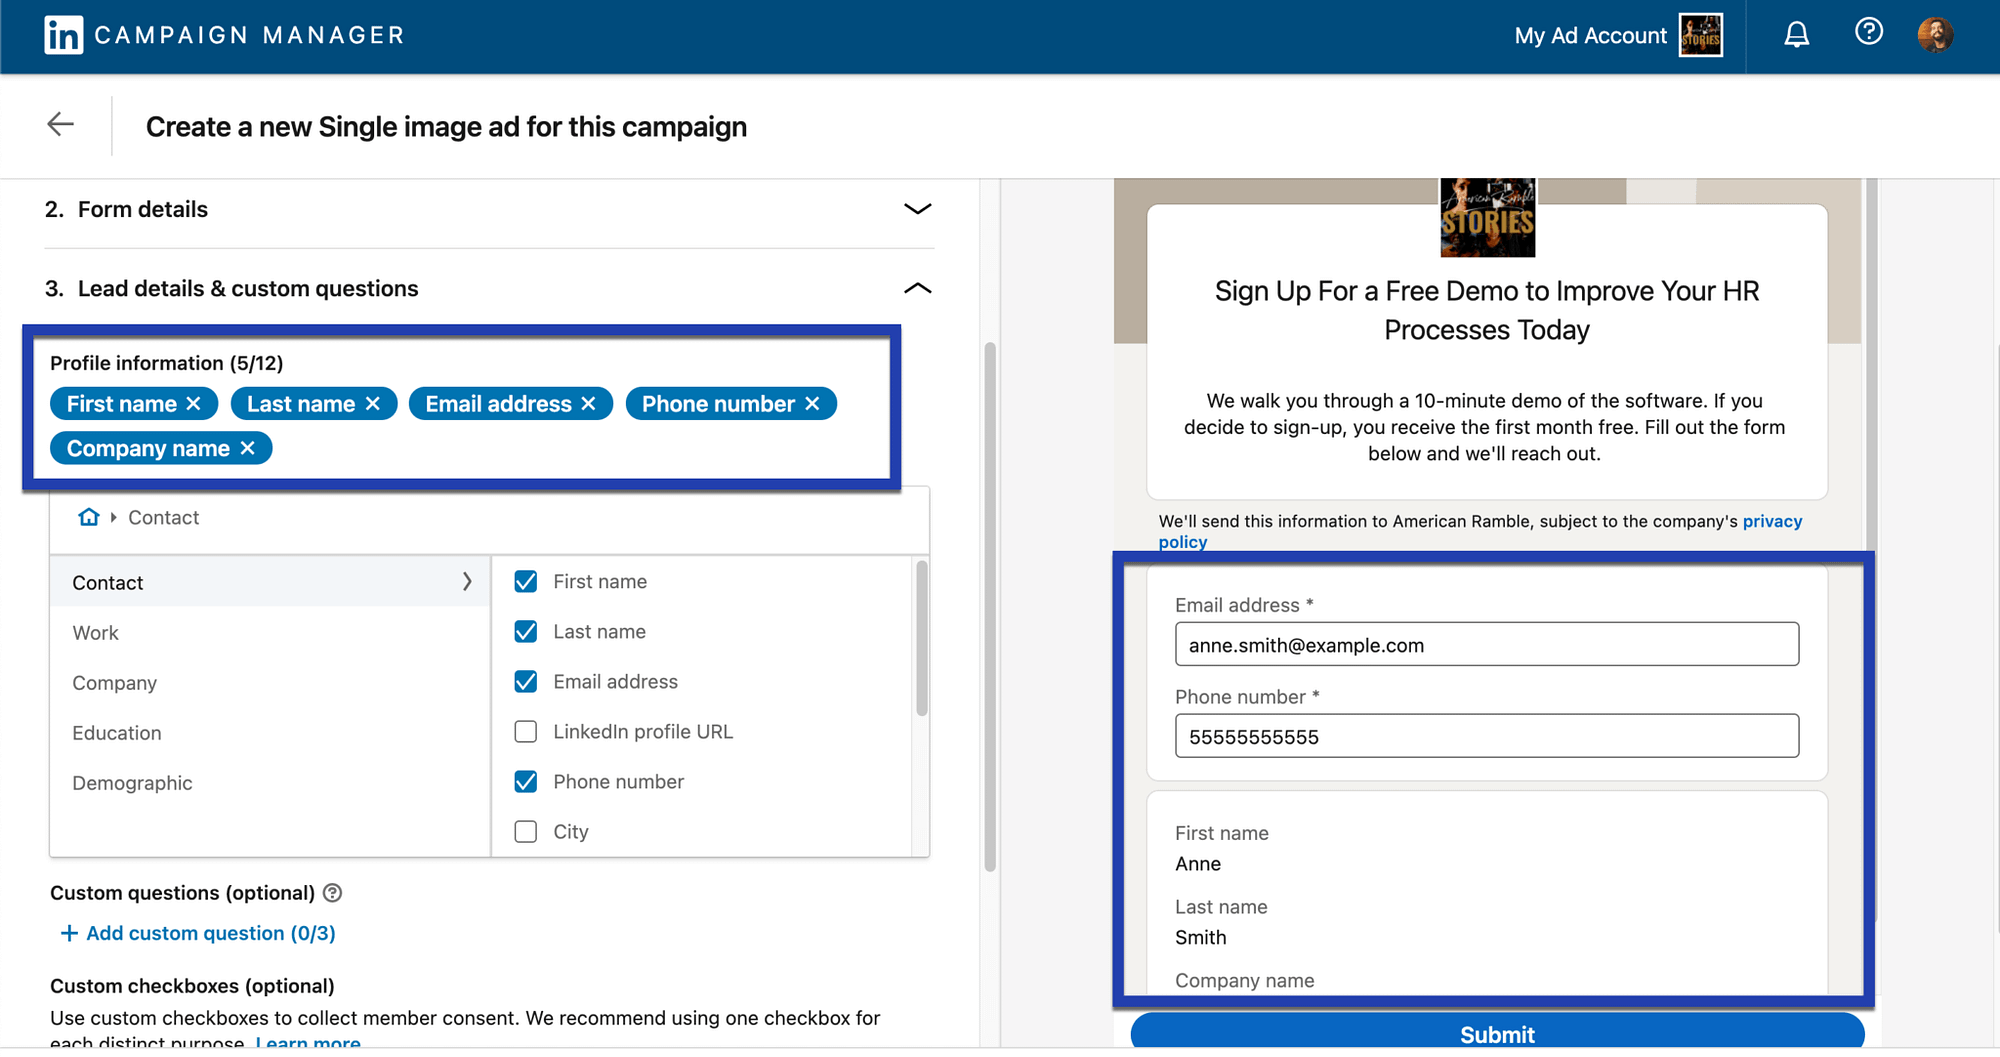
With the form details ready, open the Lead Details and Custom Questions tab.
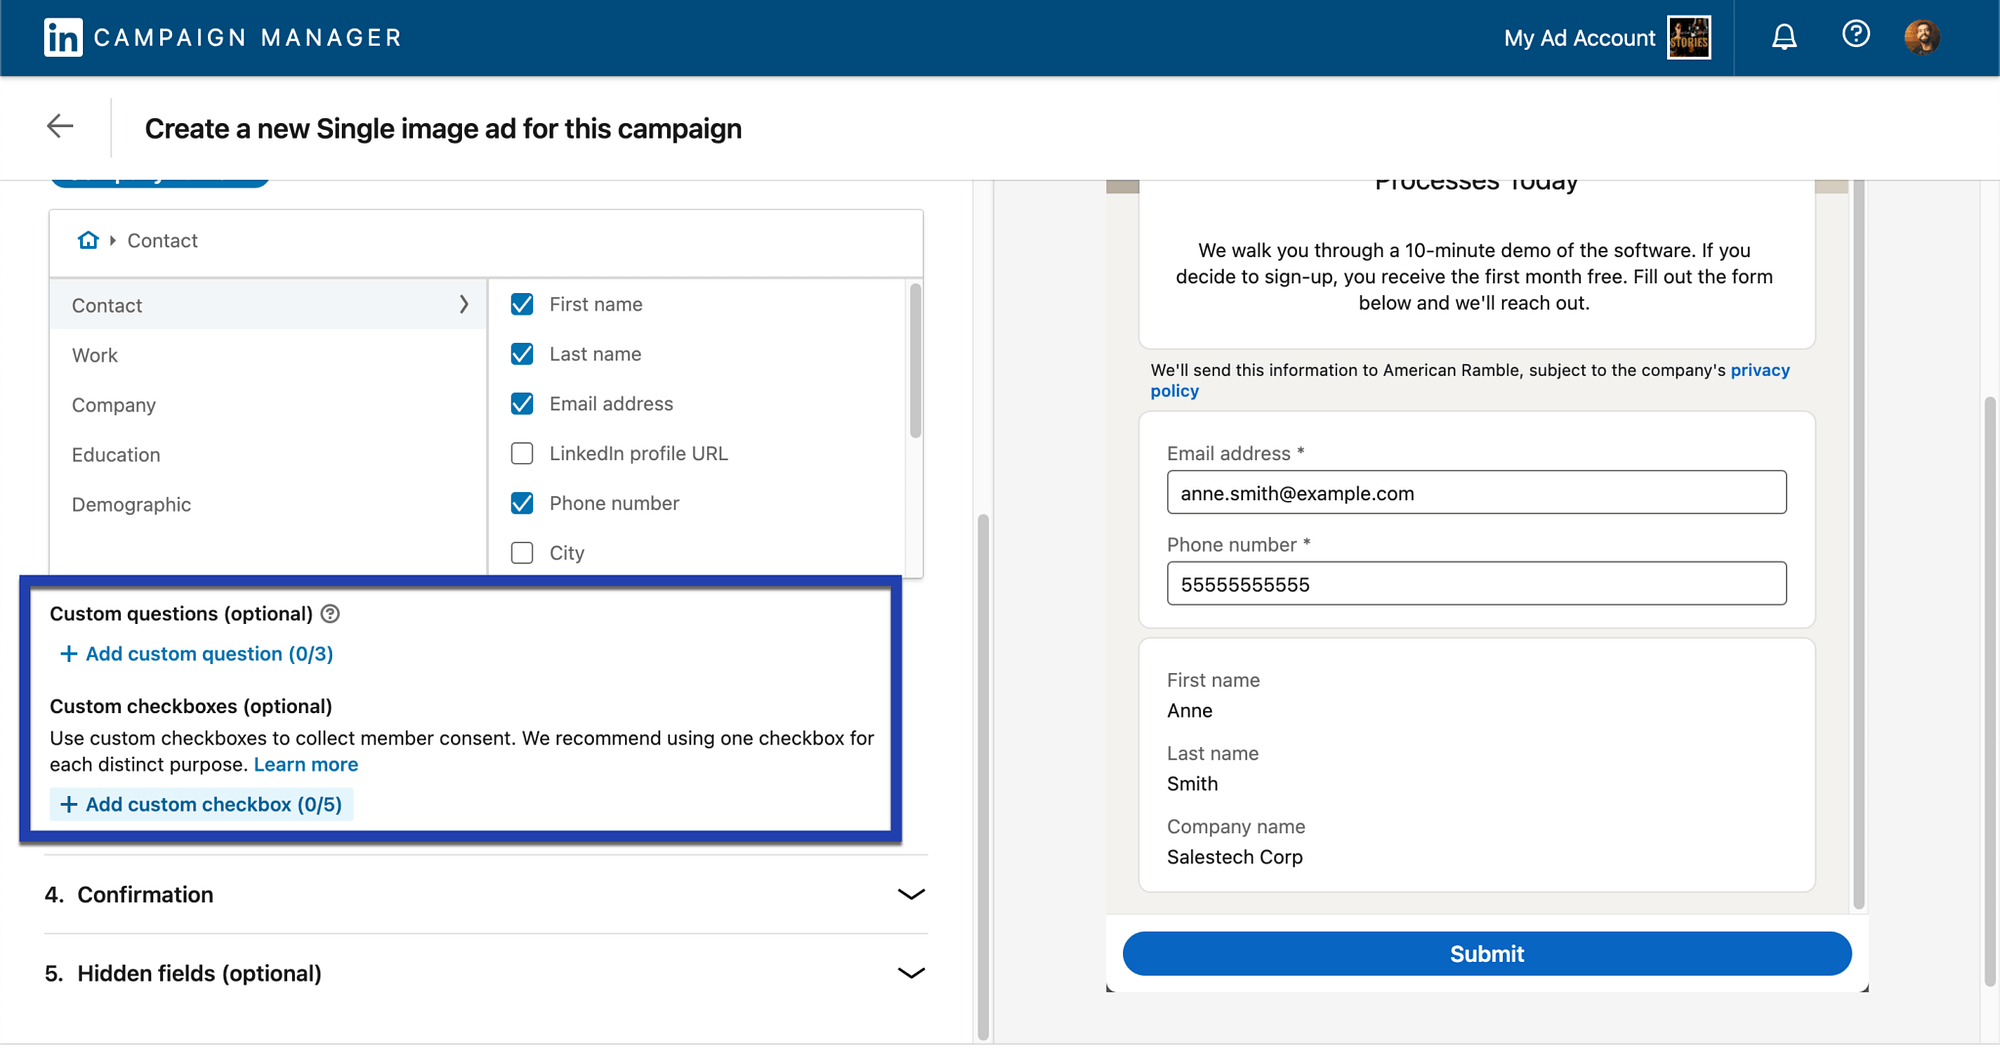
Here, you can activate fields depending on which information you want to collect. For instance, we can make a form where we ask for a First Name, Last Name, Email Address, and Company Name.
Other options include:
- Contact information like phone numbers, addresses, and LinkedIn profile URLs
- Work details like job title and function
- Company size and industry
- Educational background such as school, degree, and field of study
- Gender (this is the only field that LinkedIn doesn’t automatically fill)
As you add more fields, they appear in the preview for you to see how it looks.

You also have the option to make your own custom questions. LinkedIn lead generation forms allow you to add up to three custom questions per form. All you need to do is type in a question and include a multiple-choice list of answers or a single-line input answer.
Below that, a space for Custom Checkboxes is helpful if you’d like potential leads to agree to any terms and conditions or make some other type of confirmation. You can make five of these custom checkboxes.

Step 7: Thank potential leads with the Confirmation page
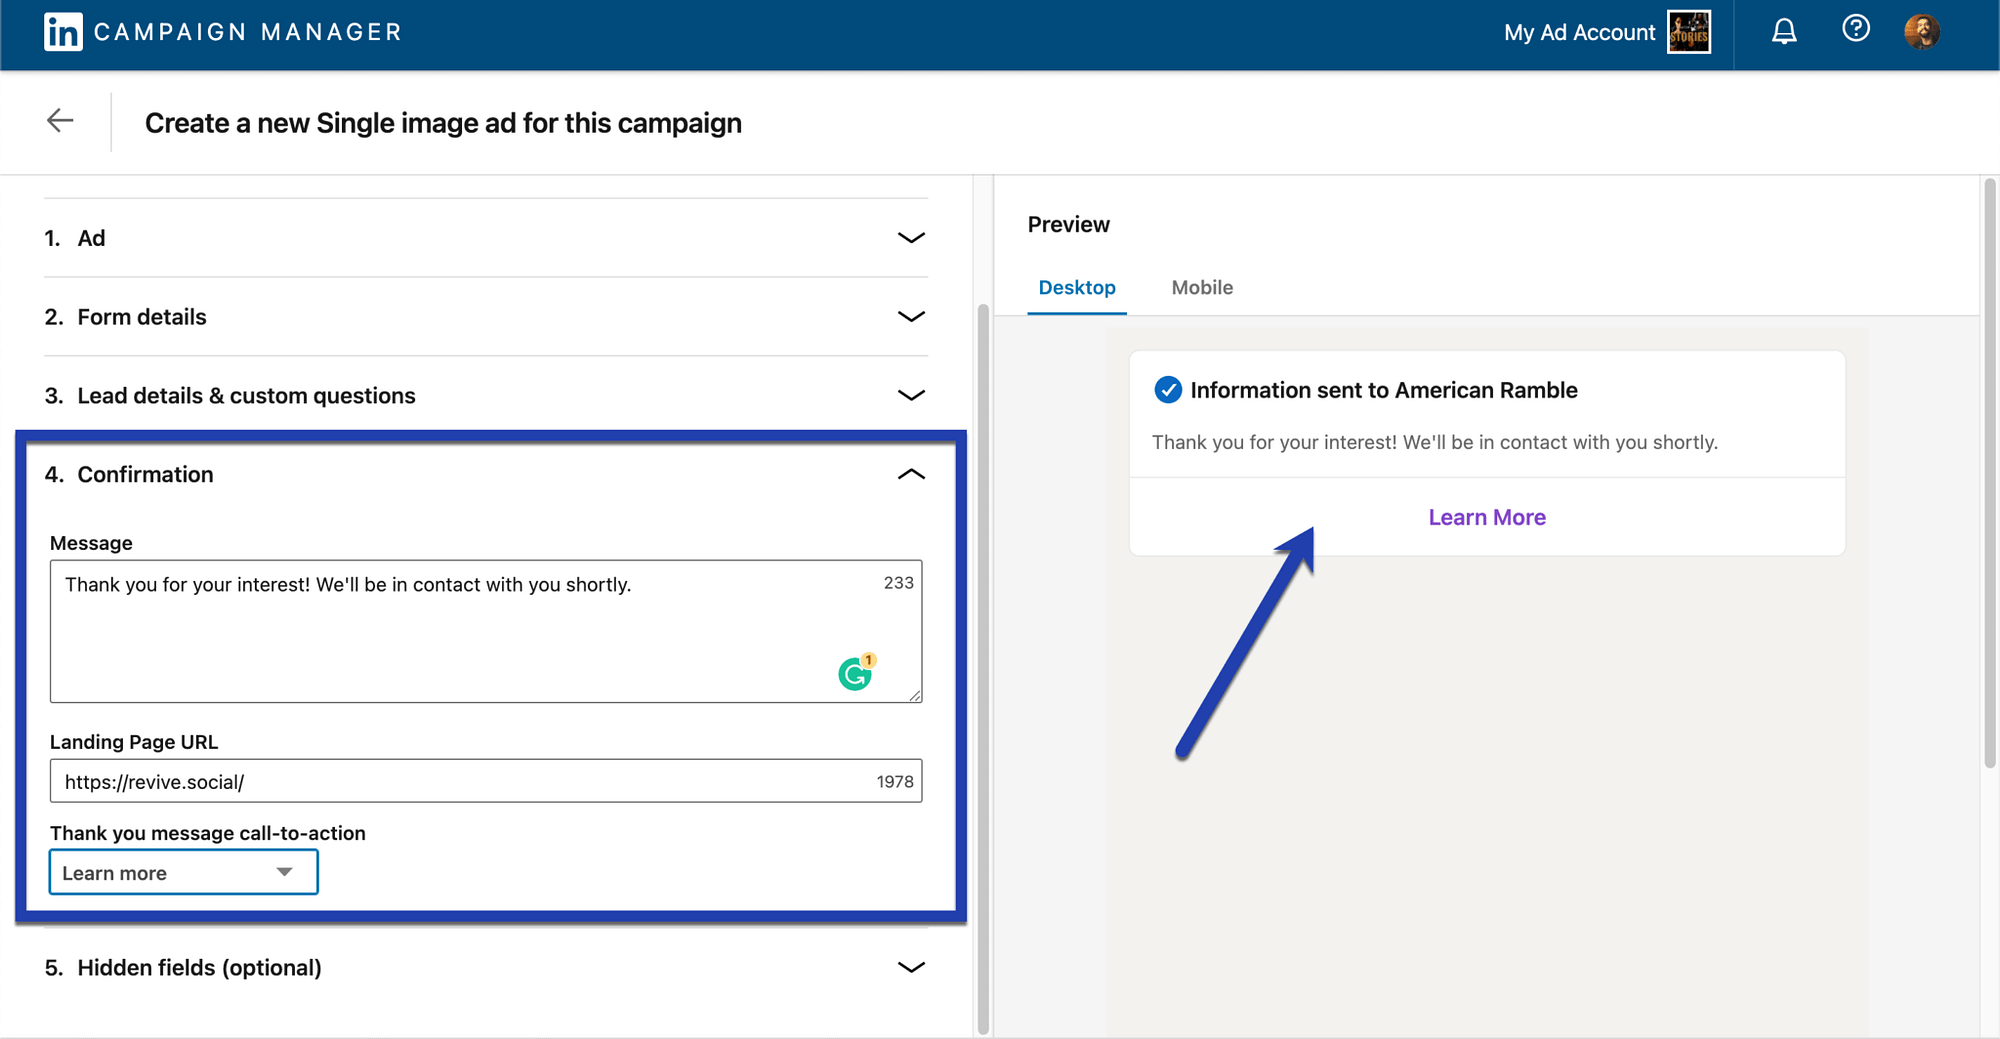
All LinkedIn lead generation forms contain a quick Thank You window with a message, link, and a call-to-action button. Again, the Preview panel displays what the Thank You page looks like.
Fill in the following fields:
- Message: Give them a thank you and information about what may happen next, like a follow-up email or call.
- Landing Page URL: Link to your website or a landing page in case anyone wants to learn more about your company or product.
- Thank You Message Call-to-action: Use this to modify the text for the button that links to your landing page.

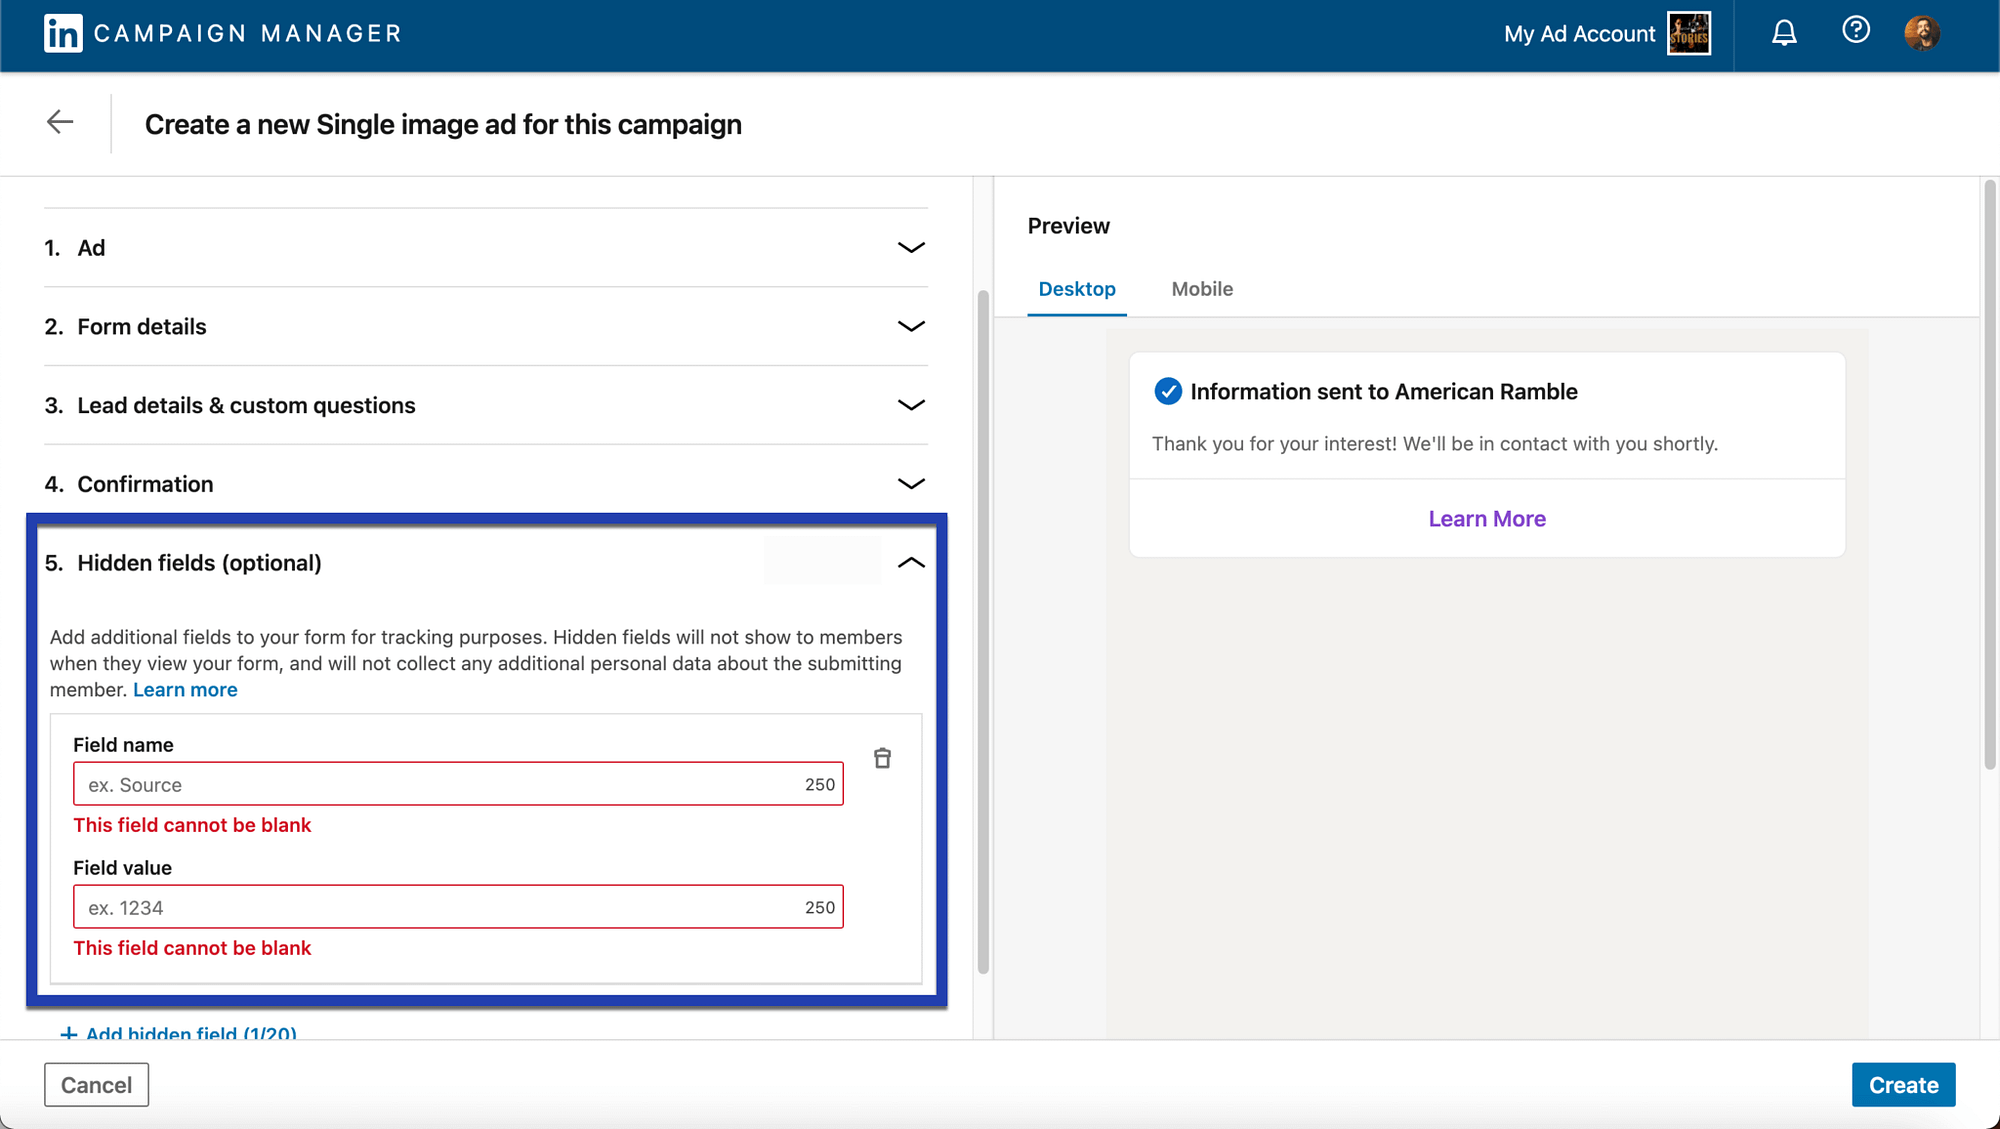
Although entirely optional, you have the ability to create Hidden Fields, which don’t show up for any of your potential leads but provide a way to track the performance of your fields and forms.
For example, you may want to link the form to a service or product like Zapier, Salesforce, or Hubspot.
Again, these are hidden from the public and only serve as little bits of code behind the scenes to send the results to your company reports in other software.

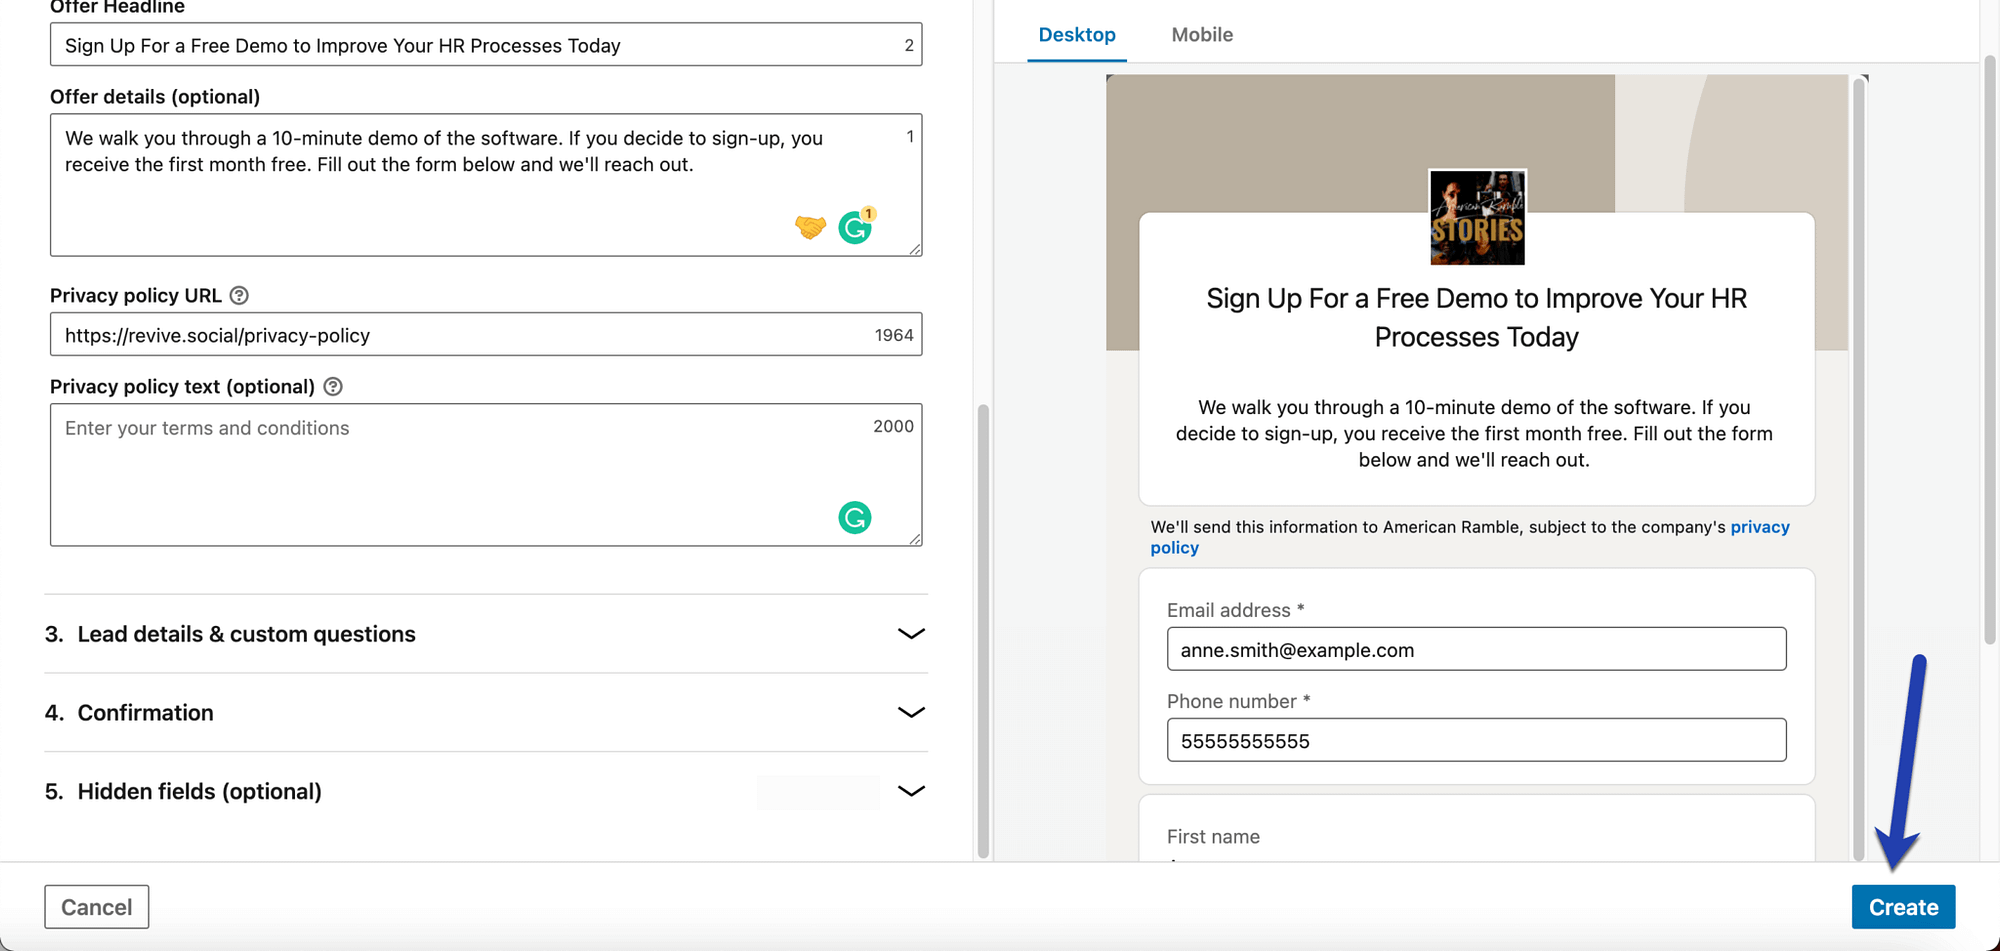
Congrats! You’ve successfully configured and designed a LinkedIn lead generation form.
Be sure to read over the text and fields a few more times for errors. Then, click on the Create button. This saves your lead generation form into LinkedIn for you to edit later and make an order for the ad you just created.

Step 8: Launch the ad campaign with your LinkedIn lead generation form
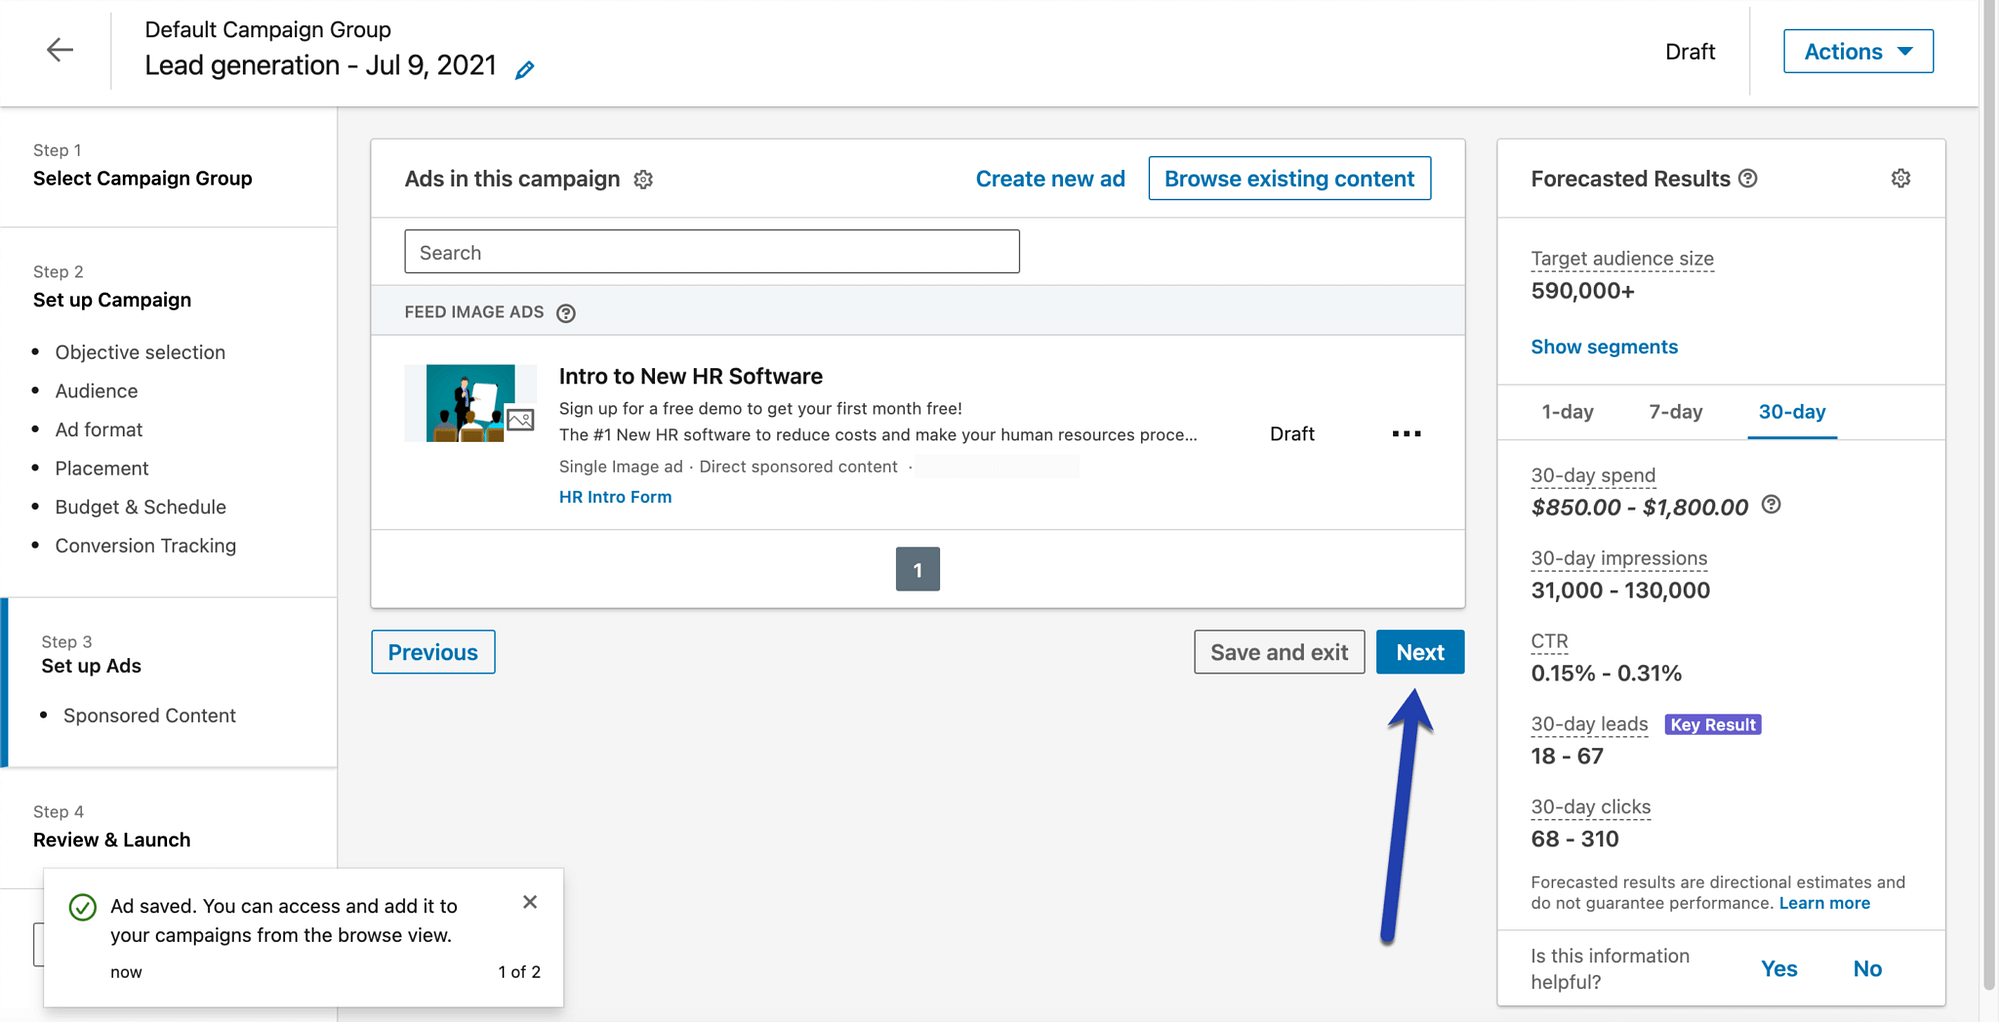
LinkedIn takes you to the list of ads you currently have in your campaign. Feel free to make multiple ads for the campaign if you’d like to test out different forms or see if alternative designs work better.
To launch the ad campaign and its form, click on the Next button.

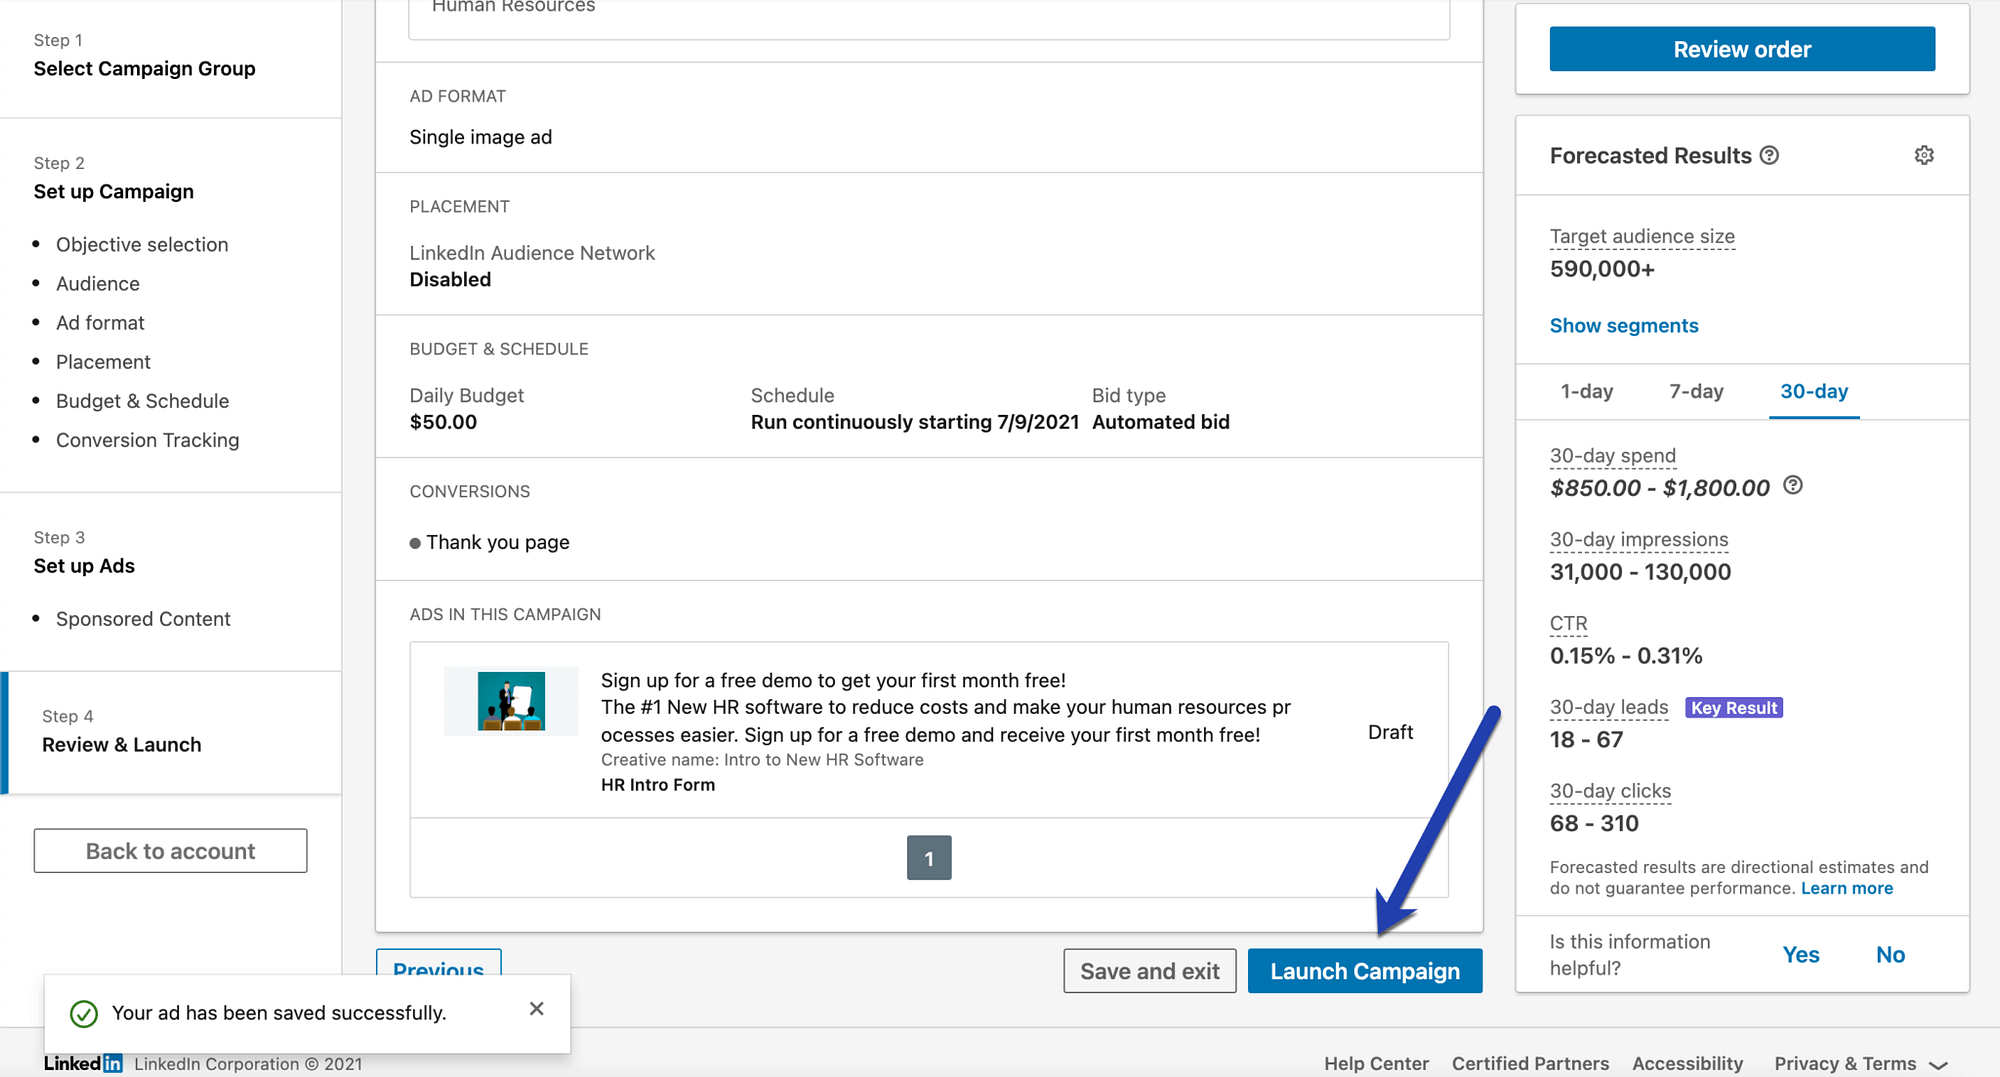
The final page outlines the details of the ad campaign along with information about the budget, the target audience size, and how much you can expect to pay over the course of the campaign.
To make the ad live, click on the Launch Campaign button. LinkedIn prompts you to fill in your payment information if you haven’t already done that.

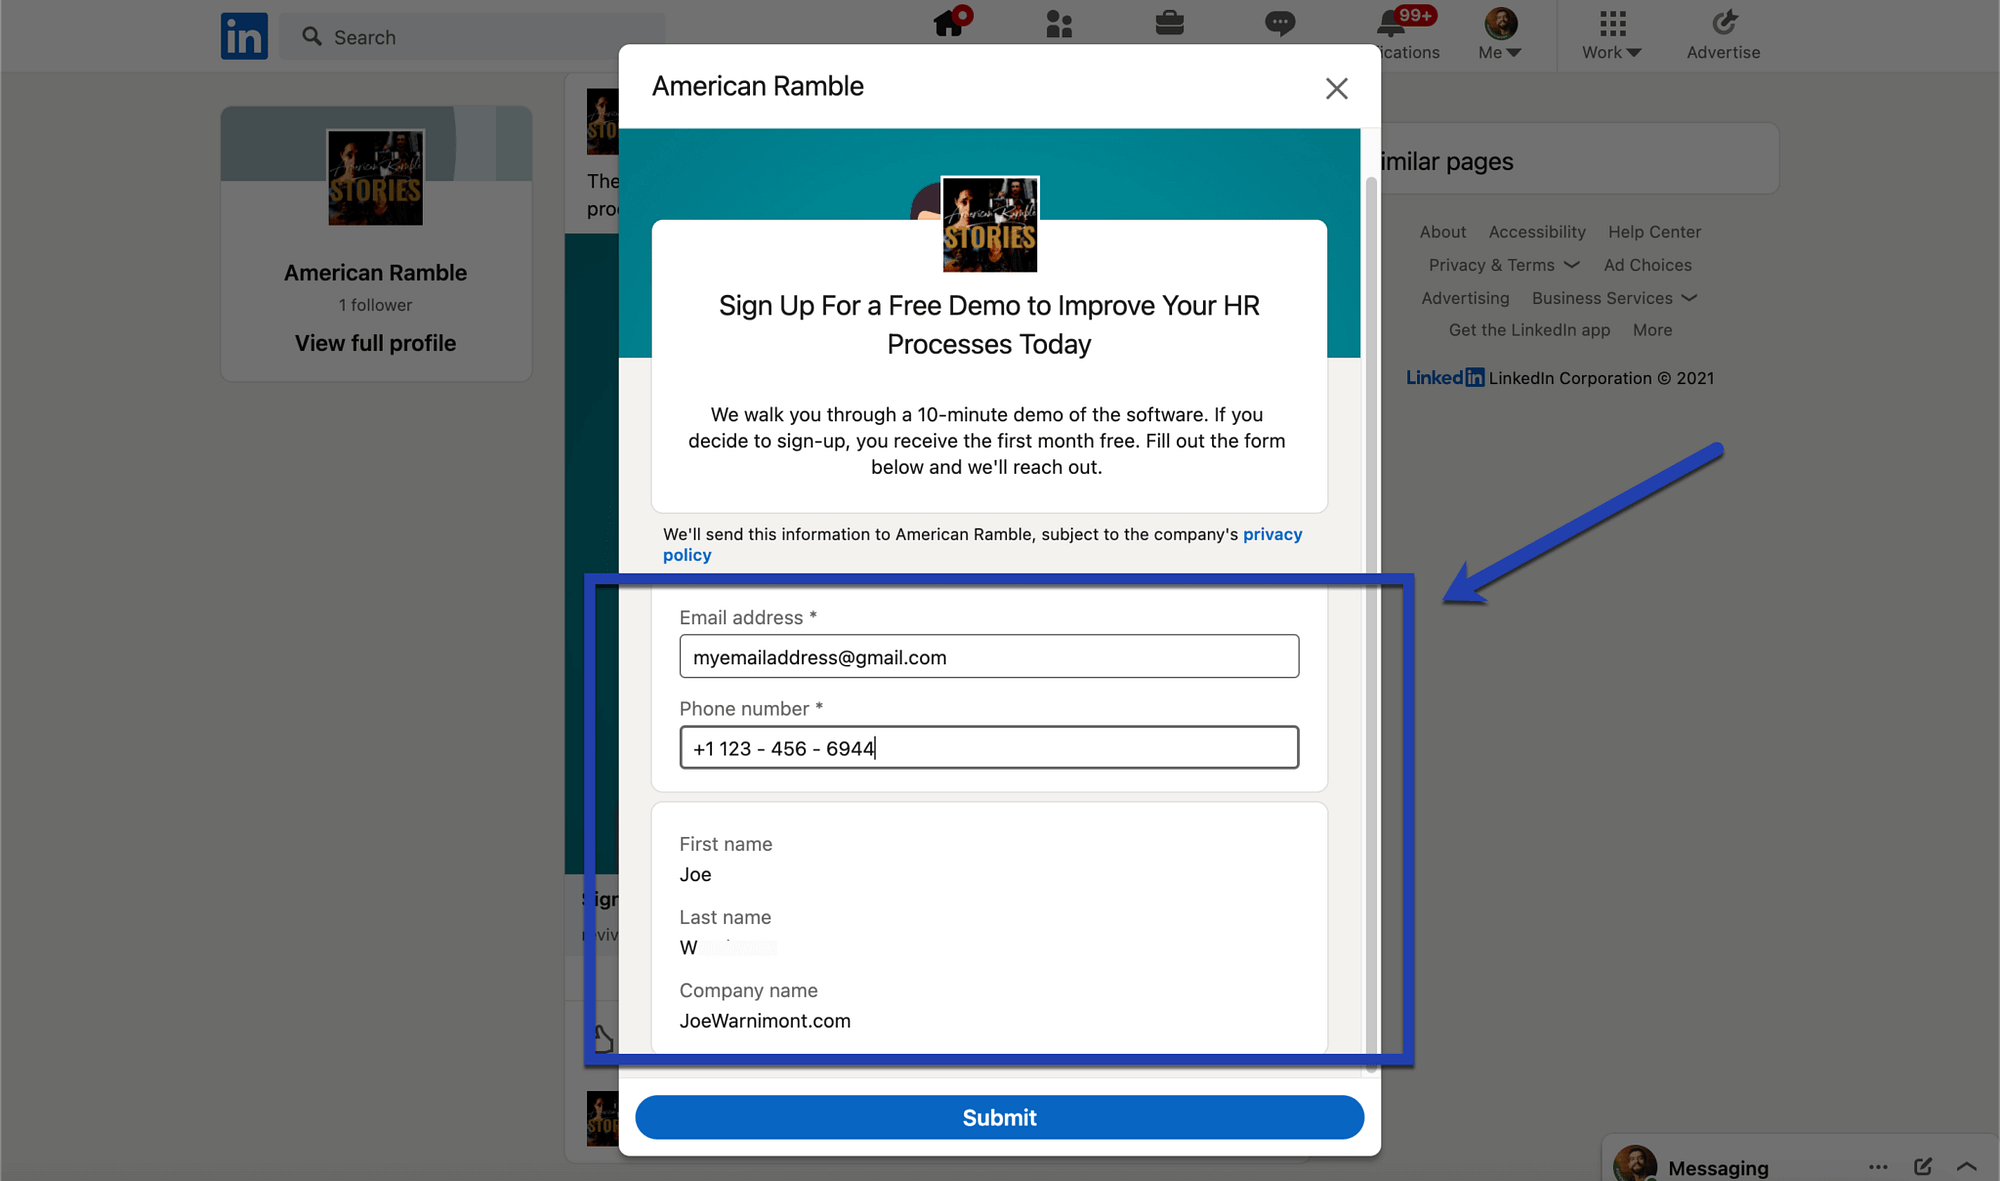
Now the targeted leads end up seeing your new ad in their timelines (or other places depending on the type of ad you decided to use).
They can click on the Sign Up button (or other call-to-action button) to reveal the LinkedIn lead generation form on the exact same page.


One of the greatest parts about LinkedIn lead generation forms is that they auto-populate with data from each user’s LinkedIn profile. Therefore, they won’t have to type anything into the form unless they feel like changing something.

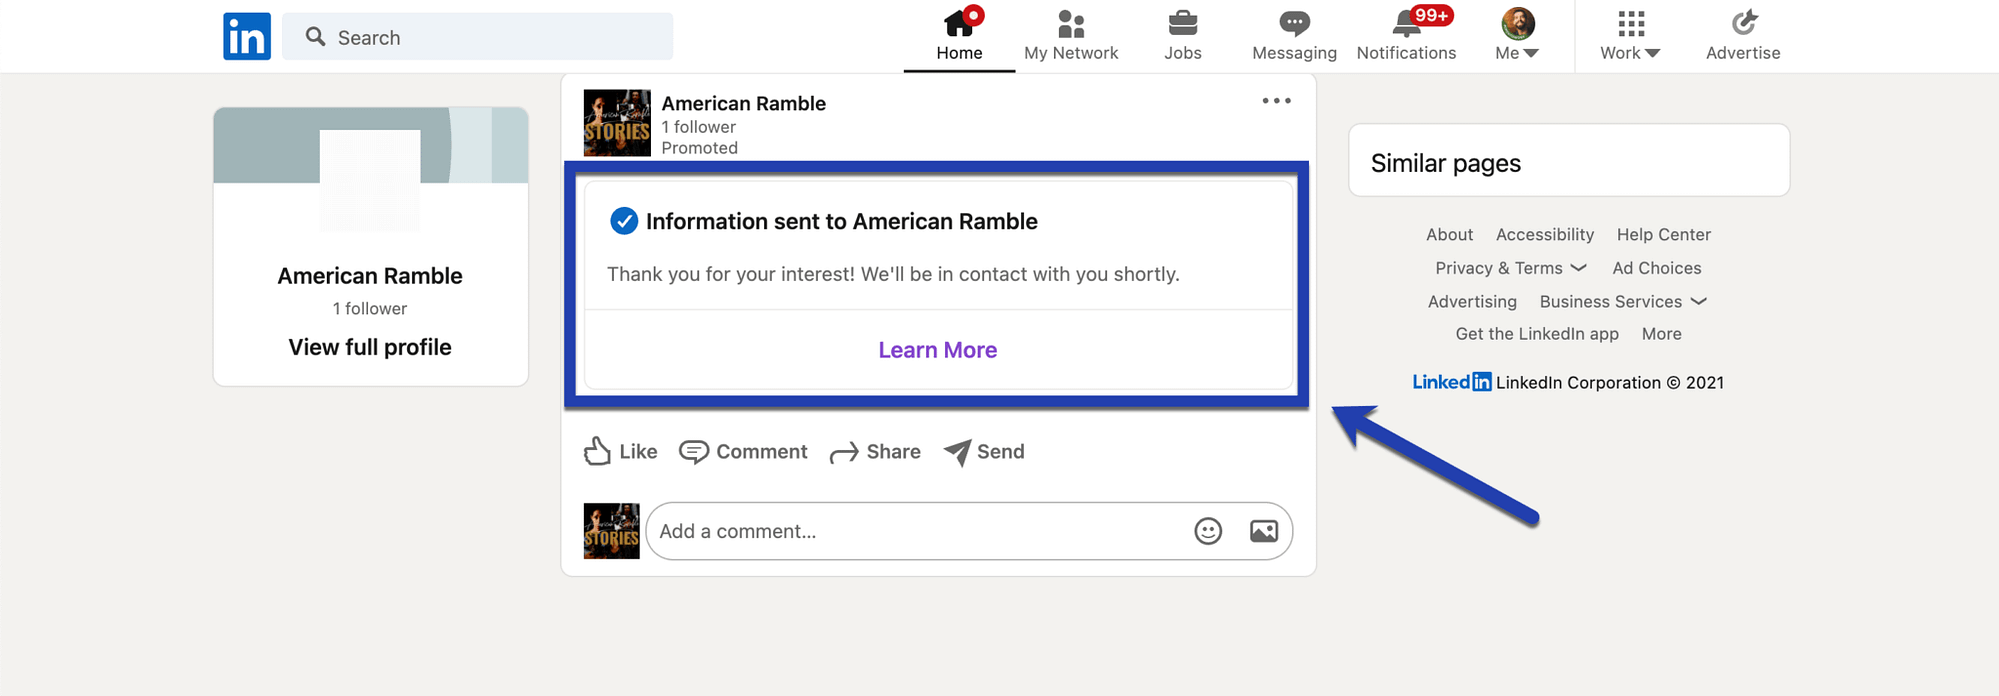
After they click the Submit button, the Thank You module reveals itself with your quick message and the call-to-action button that leads to your landing page.
It’s also nice to see that anyone can Like, Comment, Share, or Send the ad as if it were a regular LinkedIn feed post.

How to download contact information from leads
As time passes, leads will eventually start rolling in. But where do you go to download the data collected by the LinkedIn lead generation form?
That data is stored in the LinkedIn Campaign Manager. The main menu offers an Account Assets button at the top of the page. Click on that button to show the dropdown selections.
Choose the Lead Gen Forms option.

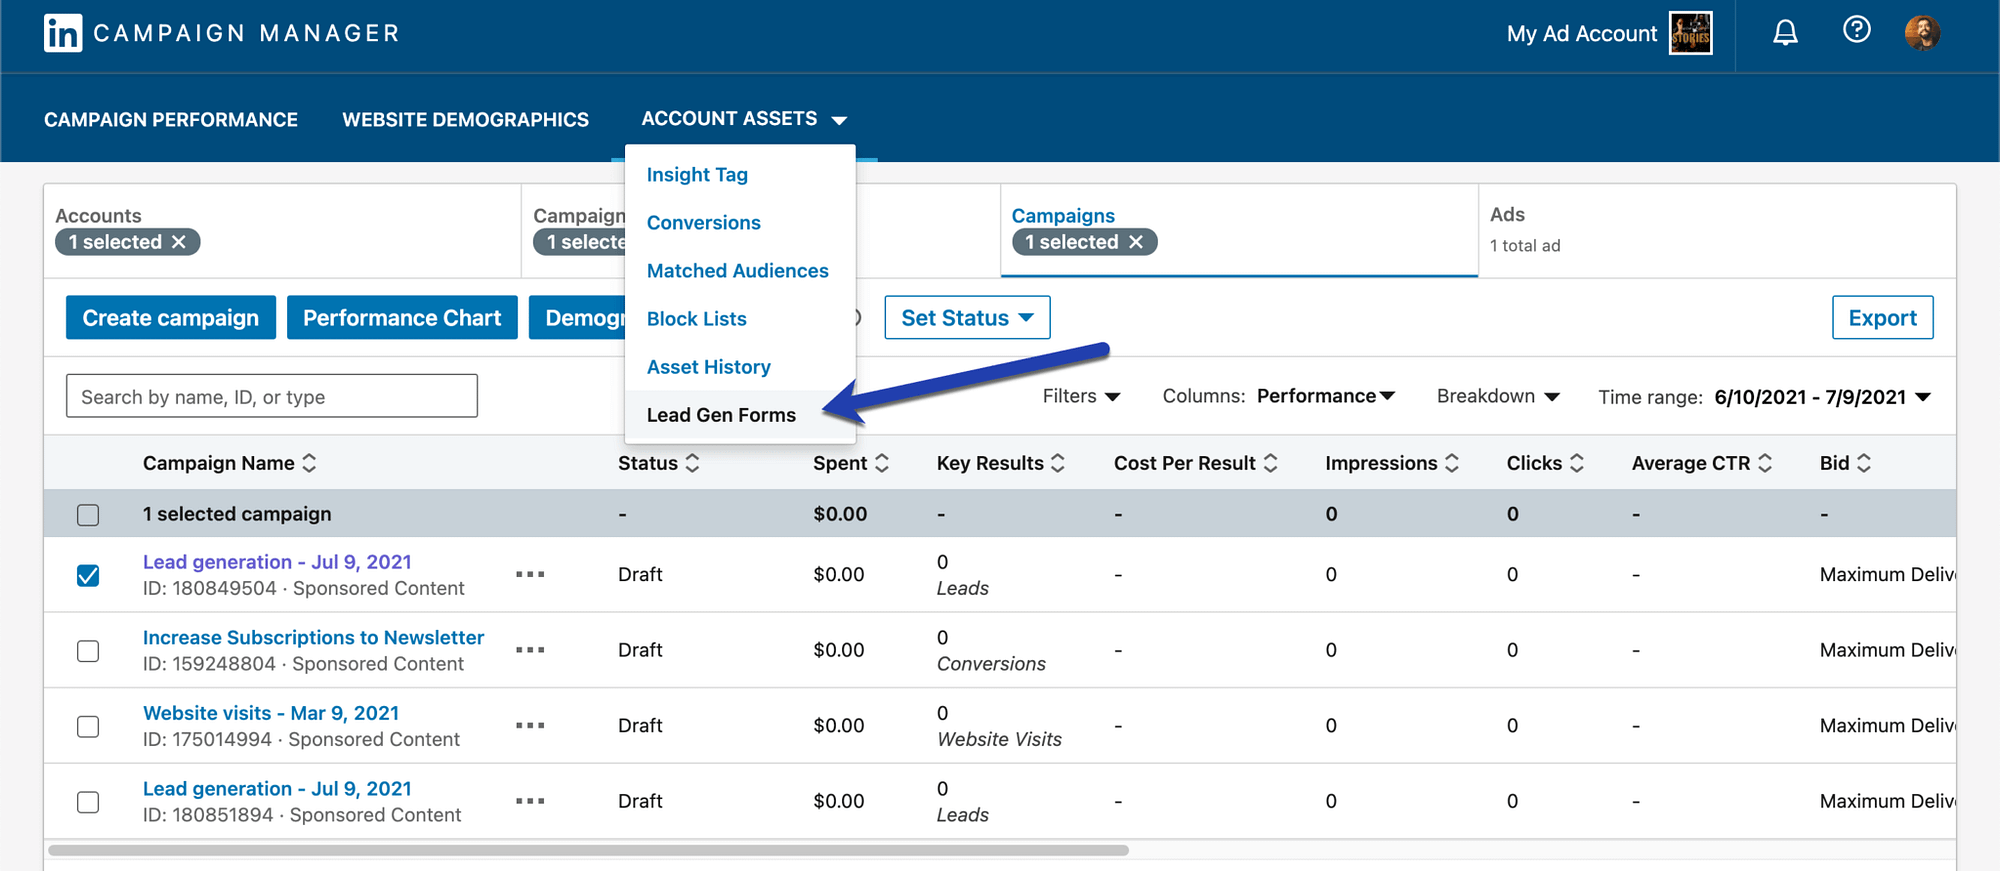
Every lead generation form should appear on the list.
Find the one that has data you’d like to download. Click on the “…” button next to that lead generation form. This will reveal a dropdown menu with a variety of options. Click on Download Leads.

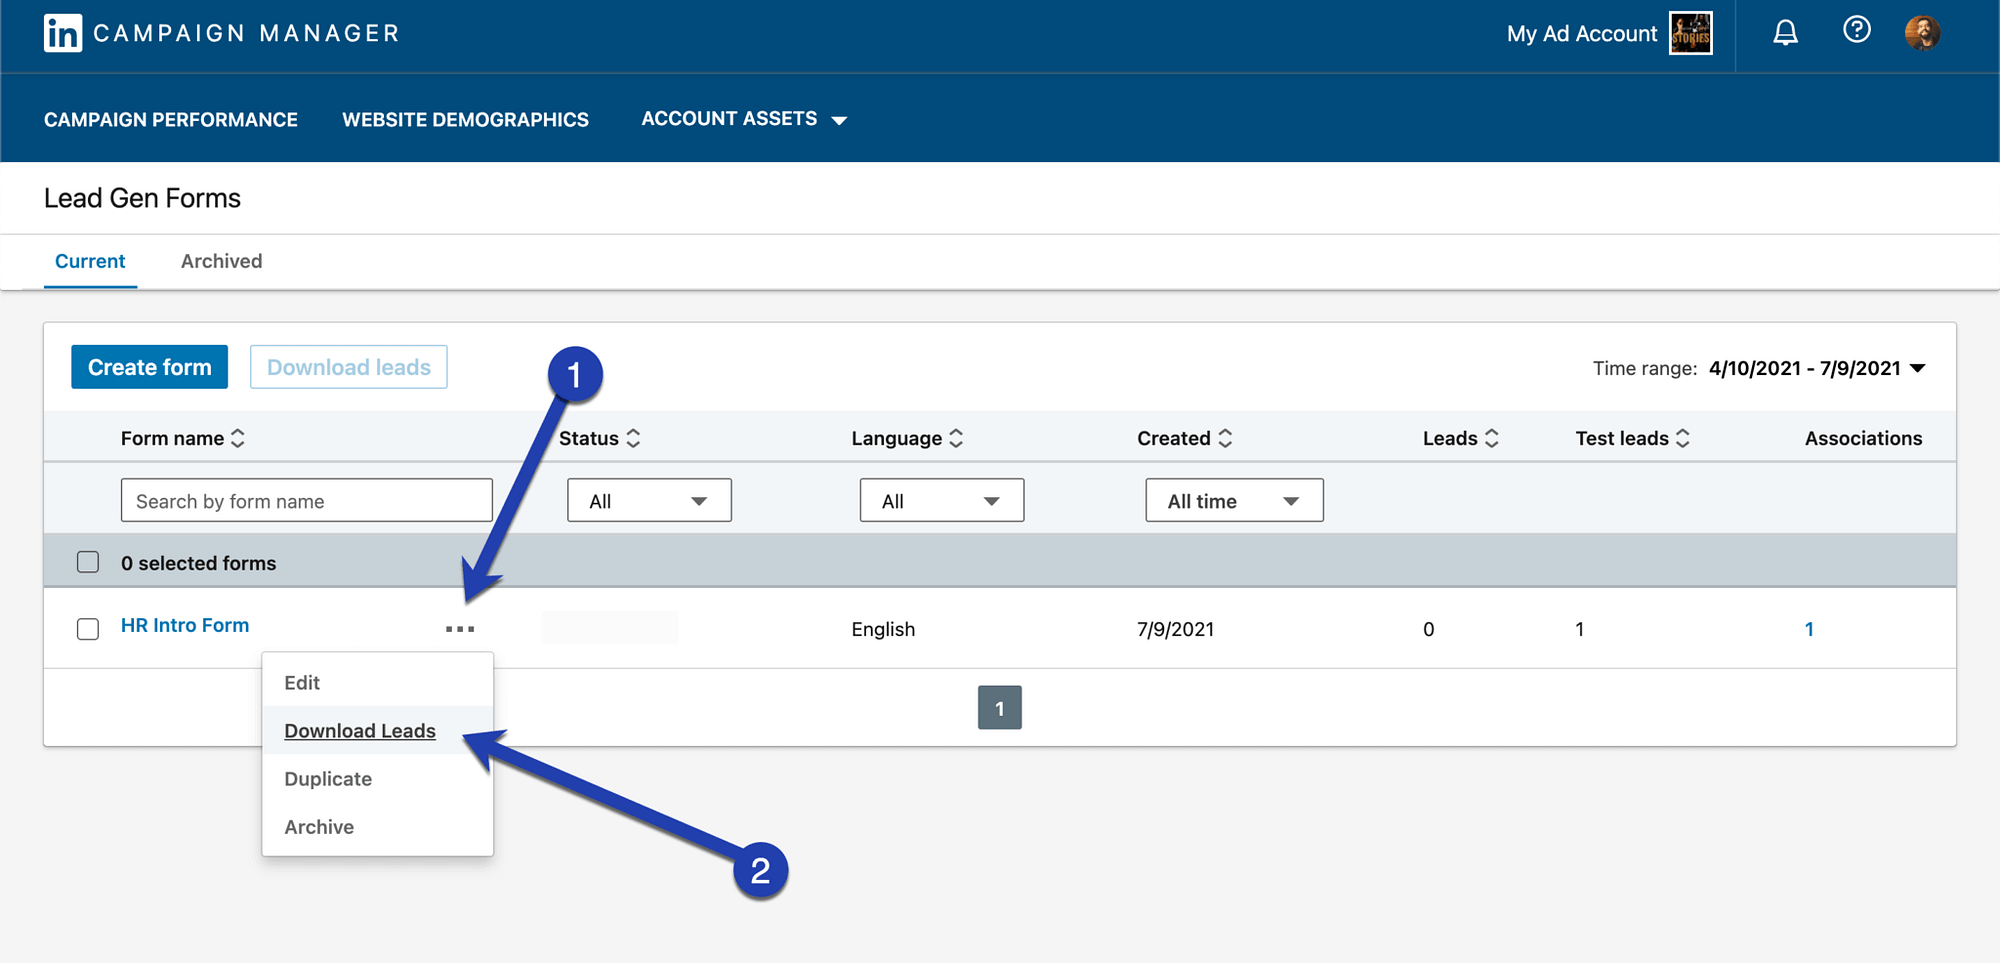
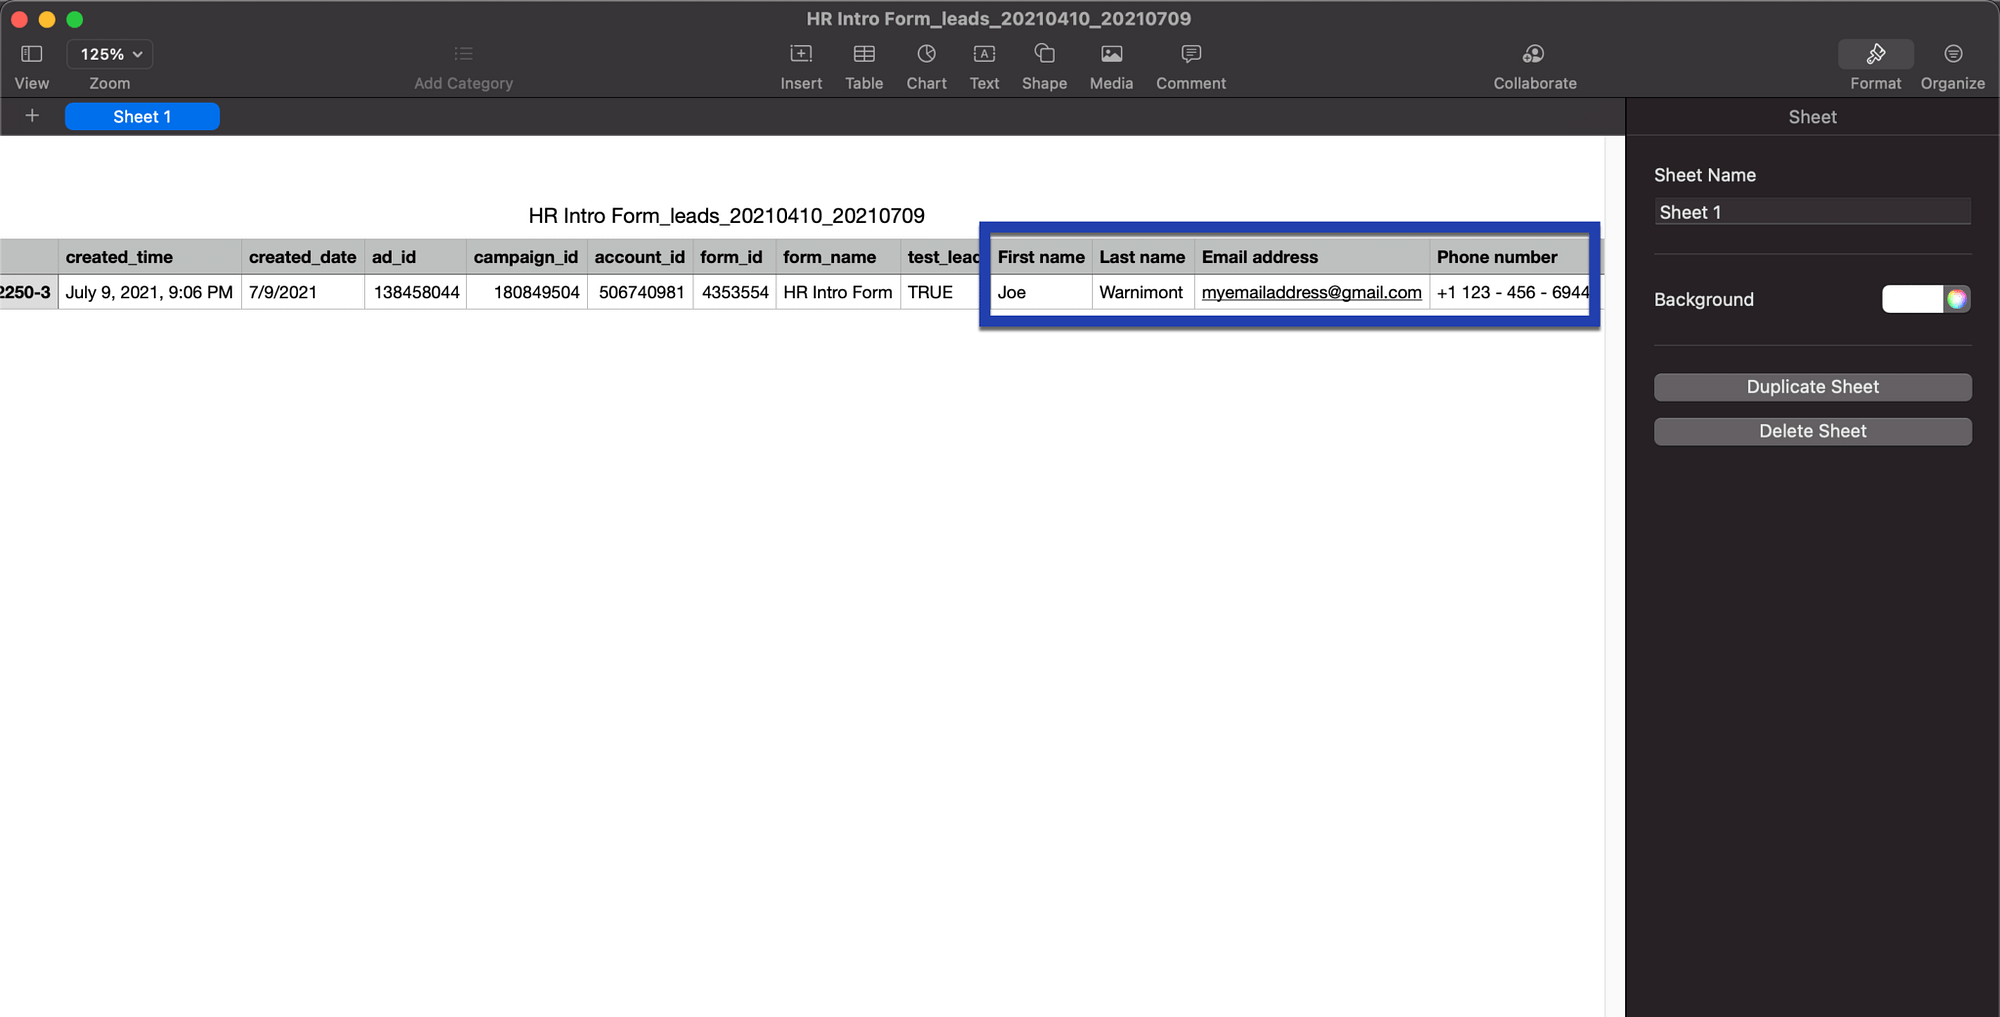
The Download Leads button automatically saves the data from this LinkedIn lead generation form as a CSV (comma-separated values) document, which can be viewed and edited in software like Pages and Excel.
In the screenshot below, you can see that our test form worked after I filled in all the fields and submitted it.

In conclusion
LinkedIn lead generation forms make for simple advertising while also allowing you to obtain valuable information about potential leads. In addition, the process of filling out those forms is much easier for LinkedIn users, seeing as how they don’t have to go to an external landing page or even fill in the fields themselves.
Another bonus is that you can link popular tracking and customer relationship management software to LinkedIn lead generation forms and ads. As an example, you could connect a Salesforce account to log all leads in that software instead of exporting a CSV file. Or, the Zapier integration allows you to track form performance and send collected data to even more external tools.
All in all, this is a great way to get more leads for your B2B business on LinkedIn.
How do you plan to use LinkedIn lead generation forms? Let us know in the comments section below!
The post LinkedIn Lead Generation Forms: A Beginner’s Guide appeared first on Revive Social.

